Planning Projects in a Bullet Journal: A Minimalist Layout for Tasks, Events, and Milestones
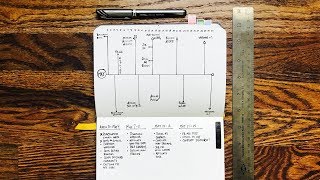
Matt Ragland shows his custom bullet journal layout for tracking a large ConvertKit project across May. He uses a horizontal timeline with circles for tasks, triangles for milestones, and squares for events, then walks through mapping webinars and training videos to specific dates.
Chapters
Hey everyone, my name is Matt, and welcome to another Bullet Journal productivity video. In today's video, I'm going to be showing you how I'm planning out a massive project that I have happening in the month of May for work at ConvertKit. The reason that I'm going to show you this instead of, like, the previous Plan With Me months that I've done is, well, number one, you kind of already have a feel for that. So I'm going to link to those in the description below if you want to see how I'm laying out my months normally. But I want to spend a little bit more time going over this project timeline that I'm showing you. It's going to lay everything out with the month and the tasks, and we're going to spend more time on that so you can see what I'm doing. So we're going to jump into that in just a few seconds, but before, before we do that, I want to remind you that if you want to download this project template, if you want to download the 10 blocks, the time tracker, everything that I do in terms of a Bullet Journal, and time management, time tracking, project tracking, you can go to bulletjournalguy.com. There's also going to be a couple links below, and up here in the cards, so make sure you check those out. They're going to help you be more productive, be more mindful, and we have a lot, we, I, have a lot coming down the pipe in the next couple of months with ways to help you do even more of that. You know, the reason that I say we, actually, and the way that I think about that, is a lot of this comes from you. So make sure that you make a comment below with how you track your projects, different things that you do to take care of your time, or if you have some trouble, just ask a question. And there's a lot of people in the comments, in the community, that love answering questions and like giving their own feedback. So make sure you give this a thumbs up and go ahead and subscribe if you're watching this for the first time. You're going to get a lot out of these videos and the people that comment below in in the comments. So let's go ahead and jump into the project. Changing it up on you a little bit this month with this project template because we're going instead of the normal, you know, kind of portrait layout, we're going horizontal, more of a landscape layout. And the reason we're doing this is that I wanted to use more of the width of the page than the vertical nature of the page. So let me show you what I'm doing here. This is a new project template that I'm testing out because I have this huge project this month with ConvertKit. And what I'm doing is using kind of a timeline layout to show how different tasks that I have during the month correspond with different days. And so my hope, my plan, my desire with this is that I'm going to be able to have this one page to look at and see right away, these are the different things in terms of a timeline of the different events and tasks and milestones that I need to be aware of as we're going through the month. Now you may say to yourself, Matt, you can just use a calendar for this. Yeah, you could do that, but that sounds kind of boring and like things that a lot of people have done. And so I wanted to try this out. I think you're going to like it as well because it allows me again to just see like just in a nice minimal layout. I don't have to have like a bunch of grids, a bunch of, you know, calendar grid boxes that nothing's in. I just get to have a nice minimalist layout that lets me see these are the things that I have to do and this is when they're going to happen. So let me show you a little bit closer, zoom in as much as I can. You can see the days of the month are up here at the top, weekends included, even if I'm not doing anything on those days. The month itself right here, and then the end, the terminus of the month here on the 31st. 3 things due, in fact. And so I just have them kind of split out to the left side, could be the right side also. Okay, you'll also see that right here I have with this task, the mini training video, that I have an arrow going forward. What I'm thinking with this is this is how I'm going to denote, how I'm going to trigger, kind of trigger in my own mind that this thing that I've created right here has a specific value for something going forward. So I'm not sure how I'm going to connect these two things yet, but this mini training video is going to be part of a Facebook ad test.. So in a way pointing towards the other task, event, or milestone that it's a part of. And you can see other, other webinars here and here. Still kind of thinking through how I'm going to kind of create the legend for this. But the idea that I have so far, I'll have just a circle for a to-do, put a dot in it if I've started, completely fill it if it's completed, and then triangle for milestone, you know, kind of a symbol for building on something. And then a square would be an event, and I could put the time of the event in the box. Now I haven't totally done that for this one, and I didn't want to, you know, just waste the page, but that's kind of what I'm thinking. So, you know, even though this Facebook— so, you know, this triangle right here should have been a square, like, as I'm thinking about it. But I did all of this, I was just testing out some different symbols. But this is probably what I'm going to go forward on. And if you download the template for this, then this is what you're going to see on the template. And I'm going to build this out further as I go on during the month. Now, here's a— this is the big look at the month itself in terms of the timeline. Let's get more specific about the tasks that need to be completed. So let's zoom out a little bit more. You see the name of the project down here. Then you can see that I've split out each week. So each of the 5, you know, mostly weeks, you know, you see there's a little bit of April, there's a little bit of June, the 5 weeks that May is comprised of. Each week has a series of tasks and responsibilities associated with it. So let's zoom back in here. And you can see now I've used just a regular, a standard Bullet Journal legend or key of the bullet for a task. I'm going to, as I continue to go through this, again, you're watching me work in public, watching the process here. So as I go forward, I'm going to, I'm going to be rearranging based on this key that I'm coming up with myself as well. But standard Bullet Journal key right here. And these are things that, like the Jonathan webinar, this has a specific time, but this is just every— here I'm just seeing like this is everything that I have during the week without any specifics. The specific dates you can see up here on the 9th. And let's just go ahead and say here's the square as it should have been. And then, oh yeah, by the way, trusty Pentel EnerGel 0.7 metal point. What's up? And then this nice little Pigma Micron 0.2 for very, very fine, so fine sketching and drawing. So this one, let's just say 1, because, well, say, because that's what time it is. So I can have my— now I know it's an event. It's at 1 o'clock. So you can see on the bottom, these are the weeks. This is everything that I have due during the week. You can see the early ones, of course, are a little bit more filled up because I already know what's going to happen. This gives me time to add in other tasks as they are totally going to come up throughout the month. So I can see that I have space to add things in, and that's great because there are going to be things that need to be added in. Down here, you can see I didn't quite have the space. I didn't really want to, like, scrunch in 5 weeks right here. This layout of 4 works really well., and then I have room down here for that 5th-ish week. Anything that I need, instead of going vertically as I have here, I'll go horizontally across, and that should fill out pretty well. All right everyone, thank you so much for watching this video. Make sure that you check out this project template. It's going to be live for you to download, so make sure you check out the links that are going to be— they're just going to be all over. Just click on a link, you're going to find it, or you can comment below if you're having trouble finding it. I'm here for you. But thank you so much for watching this. If you have anything that you're doing to track your own projects and different things that you're doing in terms of work or side hustles, I'd love to hear about them. I'd love to hear about them in the comments below. So go ahead and hit me up down there. Let me know. I'd love to chat with you. And make sure you download, download everything because it's going to be helpful to you. The next video that I'm going to do is all about the difference between how I use the big BuJo and little baby BuJo, how I use these two together, how I use them separately. Make sure you check that— make sure you check that out. That's going to be the next video. Gosh, this is just a disaster of an ending, but usually people don't watch the ending, so peace.
More from Matt


Journal reading 📖 Reflectjons on how I’m living & how it aligns with the vision I have for my life.

You don’t have to listen to me. But you do have to be intentional about the systems in your life.