🌿 Fun project - setting up new kitchen containers! Join me for some quick organizing
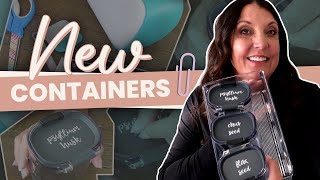
Nicole Jensen decants flaxseed, chia seed, and psyllium husk into clear Pro keeper containers, then labels them with a Cricut Joy. She shows how to design, cut, and apply vinyl labels to the lids, plus add expiration dates on the bottom.
Hi there. It's early morning for me, and I have a fun project. All week, I've been decluttering and getting things, you know, simplified and getting rid of stuff, and it's been fantastic. But today I'm going to do a fun project. Every morning, I drink a green juice, and I put different things into it. And I have three things that I put in. I have flaxseed, chia seed, and psyllium husk. Always struggling trying to close these. These bags, they never want to close, so I always have to just put them together and put a chip clip on them, which works fine, but I like to also leave it out on the counter because I will sometimes forget to take them. And I want to make sure I remember every day. And it's just a good habit to have. So for me, even though I love my counters clear, I want to leave this on a counter. So between struggling with the bag and trying to keep it closed and also just looking at it, I decided I wanted to use one of these little mini Pro keepers. I use these with my clients, and we love them. I typically use this for products or items like these that I want to stay fresh because they seal really nicely. And I can put a little label on there, and it'll look. It'll look nice sitting on my counter. I. I don't think it'll bother me. So I've got this little clear container here, and I'll have all three of these, and they'll have a label on top. I'm going to use a labeling format that matches my pantry. So I think this will be a fun and easy project to get done. In order to do this, I obviously need my three containers. I' also using my Cricut Joy. And I know a lot of people are really intimidated by using Cricuts. I have a large. I have actually three Cricuts in total, but I have. I use this one a lot in anything like this. Any small project. I even take these on client jobs. This one is so nice. If I'm not doing a ton of labeling. This is such an easy device. It's not expensive. So if anybody wants to try and been a little bit intimidated by it, try the Cricut Joy. So I have this. I have my scissors, which I need, and I have the labeling accessories that I need. I have some transfer tape. And then I. I use the smart vinyl. I use white. That's what I've used in my pantry. So I'm just going to continue with that same font and everything. I don't have any problems with this stain on the products. The only time I've ever had a problem in my kitchen is when I put olive for olive oil on our olive oil container and oil got on it and it made the the label come off. Otherwise I never have a problem. Once I put these labels on, they stay. And if I do want to to change it, I am able to though it is kind of a pain. So just a heads up there. So this is all I need to get this project done and it should be pretty quick and easy. So to get started, what I want to do is go ahead and I'll definitely need to wash the containers, pull out the paper on the inside, wash them and then I will also need to make the labels. And to make the labels I'll share my screen. It's fairly easy. So I use the Cricut Design Studio.
Let me me start that now. I want to go to Cricut. Oops, there it went. Cricut.
Okay, so I use the Cricut Design Studio and I want to use an existing project that I have here and this is one where I use it for baking soda. And what I'm going to do is.
I'm going to go in here and edit it and I'm going to put Flax Seed Flex.
I want a little f. I like to do all my labels in lowercase.
And it always wants. Okay, there we go. Flaxseed.
And I'm going to duplicate that and.
I will do Chia Seed Pixie. It gets me every time.
There's probably a setting.
Okay. And I'm going to duplicate that as well. And I'm going to do Psyllium. Make sure I spell it right. Okay, there. So I've got all three of my.
Labels in here and I think it's the right size. That size looks good. It's about two inches by a little less than one and a half which will be perfect to fit on the top of these lids. I'm not going to label the fronts or anything like that. I'm just going to do the tops because I'll always be looking down at it. So that' want to do. Let me set this aside. Okay, so my Cricut Joy is on and I'm going to say make it and then it has my three labels there and I'm going to say next and then I need to get my.
Accessory to show up and it may.
Have been asleep because I've been talking so much.
So let's see if it shows up there. You Go Cricut Joy.
And it says without a mat, which I'm doing it without a mat. And I want to say it is smart vinyl permanent. And then now it wants me to load it. So the Cricut is blinking. And I just load this in here. And now it's going to check to make sure I have enough product. So I'll let it do its check. It says it's loading. Okay, it's all ready to go. All I hit now is go. And it is going to start cutting. So it will cut out my labels and then I'll be able to cut them and then transfer them onto the product. So I'll do that really quickly. Okay. The labeling is all done, so I don't need my phone anymore. So that was super easy. So now what I want to do is cut this. This. Now you can use a mat and be more precise. I'm just going to do a quick cut here.
Just look to see where your labels.
End and try to cut it straight. Okay. So now we're done with the labels. We don't need those, so those can set aside. So now what I want to do is go ahead and use this little tool and take off any of the little pieces that we no longer want on the label.
So that's easy.
So I'm just going to tear this off. And when you're working with smaller fonts and these labels, you just got to be careful and take it slow so you don't rip the labels.
So I'm gonna do that. Okay, there's flaxseed. That looks good. And chia seed. That looks good. And let's see. Okay, chia seeds. Done.
Now, psyllium husk might be a little more trickier because it has so many Ls. They're little skinny labels.
So let's just see. I'll take it slow. And there we go. That looks good. Looks good. And that looks good. The eye looks great. Oh, there we go. A little bit finicky at the end with the M. Perfect.
Okay, so this is garbage. Now we have the labels that we want, and all we have to do is take out any part that we don't want to transfer. So in the inside of the A just needs to be taken off.
Chia seed. Same thing inside of the A inside of the Y. This is kind of small. Oops, there it goes. Same thing for the L. You need to take that off. Okay, so you just take off any.
Pieces that you don't want to transfer. And I'm almost done with that.
Okay. Okay. Got the D's. Let's see there. Got off the S for the husk.
Forget what the name of this tool is. So if you remember, comment below. But I always. I used to remember it and all.
Of a sudden it won't come to me. Okay, okay, there.
Oh, I got to do my ease for seed.
So these are just a little bit.
Of insides that the labeler leaves that cuts.
But when you pull off the label.
It doesn't come off.
So it looks like, oh, I've got.
A couple more ease and seed.
Okay, I just got to do those. Okay.
So those are just the tiny little pieces that come off. So see, they're on my finger. So these are the things that we want to make sure are not on there so that when you put your labels down, it's nice and cut. So I'm going to get a little bit of transfer tape. I only need enough to cover.
And let's see if I can get this to come off. Sometimes this is the trickiest part, is separating the transfer tape.
I know a lot of people that.
Just use masking tape and other tapes. I tend to use this. But yeah, it drives me crazy sometimes trying to get it off. Sometimes it's super quick and sometimes it is not. All right, so now the transfer tape is coming off. So I'm done with this. So I have my clear tape.
I'm going to put that over my labels.
Okay, I did that.
So now I've got the transfer. I've got the transfer tape on here. And I'm just going to use this guy to make sure it's really on.
Good.
And I just like to. I just like to run over it.
A few times so that way I.
Don'T have any problems when I'm trying.
To take the labels off.
So what I like to do now is I'm actually going to cut because this is three labels. I'm just going to cut in between.
Each of the labels. There's one and there's two.
So now I have my three labels. So all I need to do is I'll use my flaxseed as the example. So I have this. So now I want to peel the transfer tape off and make sure that the labels are stays.
And so what I like to do.
Is do this and then I like to bend the underlying label.
And you can see it's coming off here. There we go.
So now it says flaxseed. And I'm going to take one of my tops. So I'm going to do it so that it's facing me. I can see the words like this on top. So I want to make sure that that stays like that. And I want to line it up and try to make it straight.
It doesn't have to be perfect, but let's see what we can do. So I just center it.
I center it vertically and horizontally, and I'll use this guy again to push it on. And then now all you have to do is peel it off. And again, be careful, just in case something didn't stick.
Good. But there we go.
So now my. My little jar is labeled, and I just have to do this to the other two.
So I'll do that real quick. So again, I'm just going to use my tool to make sure that it's on. Okay. And I'm going to peel it off. Okay, so this is the chia seed. And I'm going to put it on centered and put it on with my tool. Peel off the label or the transfer tape. Oop, the S. So the S didn't sit down good.
So I'm just going to push it down a little harder.
There we go.
So now I have another one done. So I have that one done. This one might be trickier. So this is a psyllium husk. Just a lot of I. I got.
The I, the Ls, the Y. So let's see how it comes off. Husk came off good. Psyllium's there, the eyes there, which is great. The U and M. Okay, so now I'm going to put this on here, and I'm gonna center it. Oh, there's one thing I gotta fix. Okay, I'll try to fix it when I get on there. Okay, so now. Now I'm just going to center it on here. I'm actually going to do this in two. So I'm going to cut it. Okay, so I'm going to do cilium first. All right, so I'm doing psyllium centered. There we go. Push it down. There you go. I'm gonna try to pull up this S. There we go.
Perfect.
Now I just got to put husk on here again. I'm going to center it, try to keep it straight. There we go. And I'll use this guy and peel it off. See, some of these thin ones, they.
Want to be finicky, so you just.
Got to be careful. And there we go.
So now I have them all done. All three of them are done. And I have my clear container that I'm going to put them in.
Take this Off.
This is by I design. I'm actually, it's one that I had.
From another project, so I'm glad I get to use it. Okay, so I'm gonna have to probably.
Use something to get these labels off because it's label's not coming off clean. But now what I have is I have all of three of these that will now sit inside this container, and it will. Will look nice on my counter. So I'm really happy with this.
Okay.
Now that the labels are on, I can now go ahead and fill these up. So let me move my other supplies. I have cleaned the. The containers. So my chia seed is here.
So let me do that.
What's really neat about these containers is they come with these little sliders, you know, if you want to sift something out. But it's nice. If you put like a table tablespoon in there, you can level it off. So I love these little, little inserts that they have. So here's my chia seed. There's not much in here, but I'm.
Going to still see. I'm gonna. I'm gonna put it in here.
And.
Then I'm gonna snap the lid on. There we go.
So there's my chia seed.
And let's see, I've got the flax. Same thing. Okay, there we go. There's the flax seed. And I'll put this guy on top.
I spilled a little bit, but that's okay.
So there's my flax seed.
And then now mycelium husk.
Okay. And just fill it. That should be good there.
Now I will show you my trick. Okay, so there's all three of those. Now I will show you a trick that I have, and I'll be right back. I've got to go get them. Okay, I'm back. So one of the things that I love to use when working with food are these little labels. They are disposable labels. They are so easy to use. And it comes in a pack. They're not expensive. I'll link them below. But. So I think I got 500 labels. It's going to last me forever. But what I like to do with these is I like to. So I have three things. So I'll just tear this off. So for the flax seed, there was an expiration date on here of 12, 16, 24 for the flax seed. So I'm going to put 12, 16, 24. You could even put the date that you opened it if you want to track that for some reason. I'LL take this and I will put it on the bottom of the flax seed so I'll remember what the expiration date is. And the nice thing is if you haven't used these labels before, they're amazing, you have to get them. But I just write on down with any type of pen. And then when you don't want to, when you want to change it out or you want to put a different product in here or put a new one with a new date, you just wash it and eat. It easily washes off with water. It literally takes one second or one minute to dissolve. Not one second. It's fast, but not that fast. So one second to dissolve. So I love to do this. So my chia seed. Let's see what the expiration date was on this Best Buy, 312025. So I'll put 3, 1, 20, 25 and you could even write Best Buy if you want. It's not a firm date, doesn't expire.
So 3, 1, 20, 25 and I'll.
Just take that and I'll put it on the bottom of the chia seed. And now I, by decanting it, I didn't lose the date that it expires. So let's do the psyllium husk and.
Let'S see what the date is.
It's on the bottom and it is September 2024.
So now I'm going to go here, this is my Last one at 9, 2024.
Take that, put it on the bottom. And now I've preserved my expiration dates and I don't have to mess with that finicky packaging anymore. So that'll be so nice. I'll get up in the morning, I'll be able to make my, my green juice with all of my little things I like to add in here and everything will be easy. It'll be on my counter and it looks a lot nicer like this than it did sitting with all the bags. So I hope you're encouraged to try some sort of project like this. This would have literally taken me 15 minutes if I wasn't trying to explain.
It and film it.
So it's quick and easy and it will improve my day to day. Moving around, trying to get through the things I need to get done on a busy morning. I'm able to easily get in here, get my tablespoon in each of these, close it up and be done.
So.
Oh, sorry, that was my dog shaking. So anyhow, I hope that you're encouraged to do something in your house today and make your life a little bit easier for your hectic mornings or your hectic evenings. So see you next time. Bye.
More from Nicole
It takes minutes to set up and seconds later to find what you are looking for! See full video