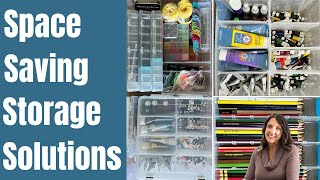
Nicole Jensen organizes a teenager's art supplies into an under-bed rolling bin using jewelry organizers for pens and sleeve organizers for embroidery floss. She picks a lidless wheeled container to work with hardwood floors and keeps everything in grab-and-go sub-containers so the whole kit rolls out for projects.
Questions this video answers
July 2022
Four categories
About $3–$4 from Joann's
Foreign.
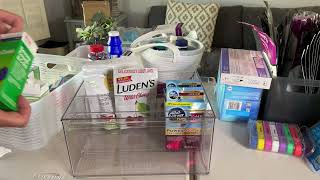
I'm tackling art supply organization for a teenager with very limited space. So we're going to utilize under bed storage for all of her art supplies. This will be a challenge. Her room has shifted and we've moved a couple times, so all of her art supplies have been dumped in bins and they just haven't been organized for quite a while. So the first thing we want to do is take inventory of what we have. I decided to tackle all the pens, pencils, paint, and some of the other supplies while she tackled detangling the floss for me and also some yarn. While this is nice because it holds some of her stuff, it won't hold all of it. So it's not going to work for this solution. So I'm going to eliminate this. After getting a feel for what we have here, I decided to do a first sort where I wanted to take all of the pens and pencils and get them separated from the rest of the stuff. If you've seen my other videos, you know I don't do anything without my trash bag, my donate and my put in another place bag. So I'm using them for this project too because there's plenty of things in here that don't belong with her art supplies. Now I'm going to start more detailed sorting so I know what I'm looking at when I'm looking for storage containers. I'm going to need to make sure that I know how much I need to store for pens, how much pencils, and how much paint. So that's what I'm really trying to get a good feel for here. So I'm getting close. After I got done with that initial sort of the pens and pencils, I looked over and realized I missed an entire bin of her supplies. So taking a peek at what we're dealing with here. Okay, the initial sort is done. Yay. I'm so happy. I've got things kind of into broad categories, and now I'm ready to start looking at more detailed sorting and storage bins. I want to make sure that this organization really suits her and works so that she has easy access to her supplies. Since they're going to be stored underneath her bed. I want her to be able to take out all of her pins at once. But I still want there to be some organization. I don't want it to be a bin like this where everything's just thrown in here because I think that that will not maintain over time. So I'm going to try to get like for like so that I know how I can put them into some sort of organization bin that will work for her. Okay, so here's the space I have to work with. Everything needs to fit inside this storage bin and be able to roll out and in from underneath her bed. So this is going to be a challenge. I got these for her pens and pencils, so two will be dedicated to pens, and one will be for her pencils. And I think these are a nice size for her to easily grab and be able to use. Of all the storage bins that I'm going to utilize for this project, the pens and pencils were probably the hardest because they have varying sizes, and none of the bins that I found seem to work. So I ended up finding these jewelry bins, and they're going to work perfect. I think I won't need all of the extra dividers that you can put into corral jewelry, but that's okay. I'll use the few that I need, and then I'll get rid of the others. It's always good to think outside the box when you're looking for storage bins, because who would have thought that a jewelry container would work for art supplies? But it does.
Sam.
My daughter was helping me on the side every once in a while, but she didn't want to be on video. Maybe next time. Moving on to the embroidery floss, I really wanted to get a good solution because that really turns into a disaster just thrown into bins. I like the one where you wrap it around the plastic, or they have cardboard. They even have, like, llamas or, you know, zebras, whatever you want. But I just thought the option on the left was not going to be maintained by her, and I didn't think it was practical, so I wanted to go practical. I went with the sleeves, and I think it worked out really well. I had her detangle and organize all of her embroidery floss, and I had her put it into four categories, because I thought that that's about. I'd have about four bunches of the floss in the end. So let's see how it works out.
Sam.
One of the things I was debating with the solution was whether the bags would tear. So I think actually they're going to be fine because of the way that I'm storing them. I'm putting them in an area where they're just going to be on their own in the container. If they were tossed in with a bunch of other stuff, I'd be more concerned. But I think this is going to be fine. And I don't think they'll tear. Okay, moving on to the paint. As with the pens and pencils, I wanted to be able to keep all the paint together if I could. So this bin is perfect. It took me a little while to find it, but again I got another art bin and this is going to be perfect. I'll put links and details for all of these storage bins in the video. Description I quickly gave up on the idea of having all the paint neatly organized in each section. I think having the paint in each section, even if it lays down, is fine as long as it's divided. And for the little ones, I tried to divide it by a quarter, acrylic, watercolor, oil, and other things that I'm also going to label the different sections. This small container was perfect for her paint brushes. I think it was like three or four dollars from Joanne's. I hope I can find the link. When I was looking at storage options for her pens and pencils, she really wanted these sets that were still full sets to stay in the original containers, so that's why they're not included with the rest of them.
Sam.
When selecting the under bed storage, I did go with the option with the wheels because she has hardwood floor. If she had carpet, I would have gone with the cheaper option that didn't have the wheels and it would have just slid on the carpet. I did decide early on not to even consider having the lid on it. I just don't think it's practical and I don't think it's necessary. Wow, that was a lot of stuff. But what a fun project. I really enjoyed working on this and even though my daughter didn't show on camera, it was fun working with her on this project as well. I'm so happy with the end solution because I was able to get all of her supplies in one area and under her bed and she'll have easy access to it. And I like the fact that each item, the pens, the paint, they're enclosed storage so she can just grab the whole thing and go to where she's working and utilize everything and then put it back. Love the way it turned out. Let me know what you think in the comments below and let me know if you'd change something. I'd love to hear. See you next time. Bye. Here's another organization video and don't forget to subscribe. We've got lots of these types of videos coming.