A practical how-to describing fumigating grain stored in grain bags (alternative to sealed silos). Covers two main steps: (1) application of phosphine tablet fumigants using homemade probes — 1 m long, 20 mm conduit tubes inserted at specified spacing and loaded with tablets — and (2) post-fumigation ventilation using perforated tubing and a powered fan. Safety and sealing are emphasised, and specific equipment/specifications (probe count/spacing, tablet quantity, fan model and motor power, and ventilation duration) are given.
Questions this video answers
1 metre long, 20 millimetre electrical conduit tubes.
3.5 metres from the start end of the bag.
10 probes in total, placed every 7 metres along the bag.
Approximately 50 tablets (or 'half the tiny phosphine tablets').
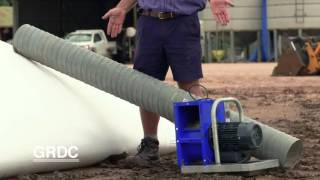
F650 fan with a 1.5 kilowatt single-phase motor.
Chapters
For grain fumigation, ideally we carry that out in a sealable gas tight silo. However, recent research has shown that we can fumigate in a grain bag. There's two simple steps in that process. Number one, the actual application of the tablets to the bag and number two, the ventilation. So in that process, the application, we can make up these 1 meter long 20 millimeter electrical conduit tubes or probes. A cap on the end, slots across the top surface and at the finish end, a rope to allow easier removal after the fumigation is complete. To put these probes into the grain bag, we come in three and a half metres from the start end of the bag and then move along and place a tube, 10 in total every 7 metres along the bag. Before applying the tablets or handling them, we need our protective gear on. The tube is put vertically. We add a small funnel and place approximately 50 tablets or half the tiny phosphine tablets into the tube. So the tube is shaken to bring the tablets evenly along before placing into the grain bag. So once the tablets are in the tube, we lean across to the bag, roughly chest height, push a hole through the bag. The probe is inserted horizontally. With the slots up, push it all the way in and sealing that hole that you've made for that tube on the bag so that it's totally gas tight again. Leave this rope hanging proud. That'll make for easy removal of the probe once you've finished the fumigation. So the next important step is ventilating following the fumigation. In front of us, we have the appropriate equipment to do the ventilation. Some perforated tubing. You'll need a little point end with a bit of flight to make it easy to wind this tubing in horizontally into the start end of the bag. What we're aiming to do is connect the tube to this F650 fan, which has the capacity to pull the air from the far end of the bag, which will be open, draw it all the way to this point and vent from for the 24 hours as required on the label to drive the fan. This is a 1.5 kilowatt motor single phase. We're looking at just connecting up a standard gen set. It is important that the entry point into the bag, the connection to the fan and any exposed perforating tubing is actually well sealed. For more information on fumigating and venting a grain bag ring the hotline.