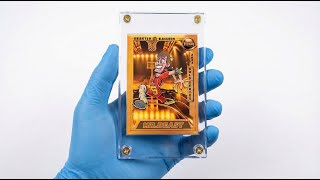
Ryan Maloney draws MrBeast as a trading card character in Procreate, then designs the full card in InDesign with stats and a QR code linking to a collector website. He covers sketching with references, inking, color blocking, shadows on multiply layers, and embedding interactive elements.
Chapters
Today I'm going to be drawing MrBeast as a beastly baller basketball playing trading card. That was difficult to say. I'll be walking you through my 7-step drawing process in Procreate on the iPad, and then I'll take that drawing and I'll set it up in InDesign and have the card printed and show you that at the end. If you're drawing along with me, you can draw on paper with a pencil or pen, or grab your Apple Pencil and your iPads and Procreate. Let's start drawing. Doing research for this project is not going to be hard. YouTube and Google, that's your friend. What I'm looking for is the structural shape MrBeast's face in his head. When it comes to sketching, just throw ideas into Procreate and just keep building up layers and adding and subtracting until you figure out something that works. You can see here I'm just dropping ideas in and refining them. You need to see something in the physical space, not just in your thoughts, to see if they feel right. I'm just going with a gut feel on all this. The best sketching is just throwing a net out and trying to capture your best ideas. When it comes to inking, we're really refining things down and picking the best lines that work. When you're inking, zoom in, especially if you're tapering your lines. Working close up is going to give you more accuracy and more control versus drawing your lines when you're zoomed out. I was having trouble visualizing how MrBeast's hand would flip backwards, so I took a pic of myself to get it right. Here's a tip for smoother lines in Procreate: draw through your lines and erase the excess line. When it comes to colors, I like to make quick decisions and drop colors in fast, and then I'll go back and tweak them in the hue and saturation slide. With shadows, I create a new layer on top of the colors, set the layer to multiply or color burn, and turn down the opacity. I aim for 15 15 to 25% on shadows. Next step is the highlights. Sometimes I'll experiment with overlay modes, but for the most part, I'm working with a white color with the opacity turned down or a lighter or brighter color, the color I'm drawing on top of. The details are the final step, the icing on the cake. This is the reward, and it can also be the signature on your drawing. It can be tempting to drop in details early on in the drawing. But I like to hold these till the very end, knowing that my structure and everything is built well underneath these details. The details are what tell people you cared about the drawing. You put the extra time in to make it just right. Before I start designing the card in Adobe InDesign, I sketch a plan on paper. InDesign is great for setting anything up you need to have printed or duplicate. Say something has a lot of information, like these cards have stats that I'll need to change from one card to another. InDesign makes it so easy to set text in place, and then I can edit it later on. The back side of the card needed a drawing, so I created this drawing of MrBeast. I want Beastly Ballers to have a growth flywheel built into them, so I'm adding a QR code that goes to the website where collectors can take free shots to win packs. That website is set up, but this is just a prototype. If you want, you can join the waitlist. I'll send you an email when the website's ready and you can start winning free packs. Got the package. MrBeast trading card prototype is done. I wonder what I should do with this. Maybe I'll send it to somebody. Give me some ideas in the comments. Thanks for watching.