Nomad Sculpt for Beginners - Lets model a Fly basketball player
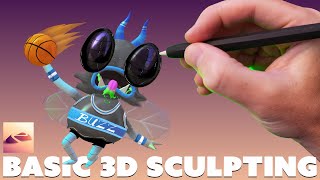
Ryan Maloney, a 2D illustrator, sculpts a fly basketball player in Nomad Sculpt on iPad using basic shapes, duplication, and voxel merging, then composites it into a finished scene in Procreate with custom brushwork and lighting.
Chapters
As a 2D illustrator, learning 3D has always been so difficult for me. But for the last 30 days, I've been forcing myself to learn Nomad Sculpt on the iPad. While I'm still learning, I want to show you a little bit of my progress. I'll walk you through how I turn this sketch of a fly into this 3D character. Now, this isn't fully 3D. You can't rotate around this character because what I did is created the 3D character in Nomad Sculpt, exported the PNG, and then drew flat illustrated layers over top of it in Procreate. Maybe in the future I'll do a fully spinnable 3D, but I'm still learning. I'm probably only 2 steps ahead of you.
So let's dive in and let me show you what you can do in Nomad Sculpt with Procreate. When I first started Nomad Sculpt, I would dive in and just work on the eye, and then I couldn't connect the eye to the head. I was all over the place. But now I sort of take a step back. I realize I am going to get this model done. I'm not going to quit on it. And these are the basic shapes that I'm going to set up first: sphere for the head, sphere for the eyes, Probably going to duplicate those eyes to make the eyebrows. These are all going to be details that come off of the head. We're going to create a shape for the mouth. We're going to create like a hole in here.
It'll probably go through the head.
Basic circle. These are tubes. And actually, I'm only going to do the leg once, the arm once. These are tubes, the sphere, triangle, cones at the end. And I'm only going to do this left arm once.
Then I'm going to duplicate that, put it over here and just tweak it a little bit to make it look different.
Same with the wing. But I'm not going to design the left-hand side and the right-hand side of the body.
I'm going to do the center parts.
Actually, maybe I'll do only one eye too, and then just do the left-hand side, and then flip and mirror all the objects, get them into place, and then it will take shape a lot quicker. First thing I like to think about in Nomad Sculpt is work fast. Get your basic shapes into place as fast as humanly possible, because otherwise you're going to quit, you're going to feel discouraged because you only have a few pieces in place. I use a lot of duplicate. We said we're going to do the left-hand side. My iPad is super slippery because I just took the ghost paper off of it. It used to be very textured. So there's my head base, my eye base. Get a body base in there. I'm just going to duplicate this sphere. These don't need to be the correct size at all. I'm not going to validate it yet because I'm still sizing things. You can size it after you validate it, but I just like to keep it preserved. Sort of go from setup mode in my brain to modeling mode. And now the next step is I'm going to grab this tube. Let's just grab the curve. Let's draw the leg with a curve because this will show some volume here. And I'm going to pull this out. And that's basically it for the leg. And that's how quick I want it to be because I don't want to overthink things. I'm going to duplicate this body because I lost it. The body's not very big. The head's not very big. Let's make the eyes big, and I'm actually gonna— I might veer away from this drawing a little bit, make the eyes super big, make the head small, and then let's grab the tube again and just draw. Make sure we're set on the curve instead of the view, and here we go. You can scale the radius down, make the arm a little bit thinner, validate it. That's all you need to do a basic setup of the body, just a few spheres, and a couple of tubes, and then we can duplicate all that. I actually want to get a wing in here too, so let's see what would make a nice shaped wing. I believe a flat cylinder would do it. All right, so I'm just gonna shrink it down. I'm gonna get rid of one of these cylinders, shrink it down. Let's stretch it a little bit. Let's rotate it. And let's just put it up in place. And I'm losing, uh, might want to move my character down to these axis. My iPad is so slippery today, it's crazy. I'm just going to put it back here. Eventually I move my character forward because it's in an annoying spot. This does not need to be perfect at all. I'm just going to get it into place. If I take it like a week off of Nomad Sculpt, I sort of forget all of this. Let's, um, just put it in a decent spot. There we go. Let's just call that my main base character, and then we'll move on to the details. All my shaping tools and everything I need is over in this right-hand panel. This gizmo is what I use the most. Anytime you need to move an object, we're just tapping or double tapping. So I'm actually going to scale this in a little bit. Let me validate it. You'll see that this will auto-save every now and then. So I'm going to create sort of an eye shape, get a little bit of a bulge going in the center. Let me revalidate that. I don't know, maybe I didn't do that before. There was a double. I'm just going to delete that. This could be my main eyeball. I'm going to move it forward a little bit and rotate it. I'm going to try to inflate the bottom of it. Let's see if this works just to get an awkward shape. In this tab here, we can make things higher resolution. We can subdivide it, the multi-resolution. So you see, I just selected subdivide and it made it much smoother. I can do that with all these objects, objects as long as they are validated. Sort of an eyebrow around, almost like a casing around this whole eye. Let's see how this is gonna work. I don't know if it's gonna be needed. Yeah, I think that works. I'm just going to rotate this eyeball a little bit, bring it out. I'm actually going to paint the eye so I can see it better. I'm going to do a force paint. So I'm just going to select a dark black color with a little bit of shine on it. And then hit Force Paint. That will show me the eyeball versus the other parts. So I still feel like it needs to be scaled up and crazier, a little bit wackier. So I spend extra amounts of time on the positioning of these original— of these, like, let me see if I even need this sphere. Maybe the sphere is messing me up. Yeah, that's going to mess me up. So, I'll build the eyebrows into the head somehow because that second shape is just not doing it for me. Here, let's duplicate this. Let's go over here and we can flip the object. Nope, that's not it. It's the thing about 3D, if you take— I just took a week off and now I have to remember everything. I'm going to turn off that. Ah, is it mirroring? Flip right to left. Let's just get it in place. Move with that same, maybe a little bit bigger, the brush. Pull it up. In art school, I always had a teacher that wouldn't let you paint with the colors right out of the—
cheers—
right out of the tube. And she would always say, make your original colors. So even if you're using green, don't just squirt green out of the tube. Add a little bit, a little bit of something else to it to make it your original color. And that's That's sort of how I feel about 3D objects and using anything in any of these programs is to make it your own. So even if you're going to put a sphere on the stage, squash and stretch it somehow. There's my leg. I'm going to validate it. See what we can do with the— actually, you know what? Let's invalidate it. Let's choose radius and let's see if we can make the foot a little bit pointier. Leg's still strong. A little bit of weight. Validate that. Subdivide it a couple of times. Let's see. And we can— I'm going to trim it and take the trim tool. Make sure I'm on lasso. And after you do that, switch over to view. And then I got that little pointy shape. I'm just gonna see if I can smooth that out. I'm sure there's a better way to do this, but this is gonna get me where I need to go. There we go, that's very insect-like. Let's get the arm in place. See what the hand is gonna look like. 3 points on this hand. I think I might get in here, flatten this shape out a little bit before I add fingers on it. Let's grab the flatten tool. So, this will give me a little bit of a palm. Let's smooth it out. I'm gonna inflate it, put— a little bit of a palm, a thumb palm right here. Then we're gonna have a thumb coming off of that this way, and let's just do 2 pointy fingers. Fingers, the cone for insects, like cartoon insects, this cone works really well. And I set my character so far off stage, this is— it's crazy what I'm doing right now. I find Nomad Sculpt is way easier to navigate around and not get lost. A lot of times working in Blender or other programs, you know, I find myself just quitting because I get lost so often, and you need to know so many shortcuts and mouse command, keyboard commands to get back to your original spot. With Nomad, it's very hard to get lost. Like, you can pretty much zoom out and see everything on the stage. Use my second finger and let's, um, just shape it up, extend it a little bit more, make it a little bit fatter, rotate it in. It's probably popping out back here. That's fine. And then let's duplicate that one more time because we have a thumb to put in here. Thumbs are a little bit shorter, wider. Let's bring it up here. Put it right there, and then we'll— so for voxel merging, select all of your objects, check all of them, make sure they're all on. If I had any of them off and I voxel merged it, that one that you had off would create a hole in the other objects. Or other objects. So I have them all selected, all the eyes are turned on. I'm going to voxel merge. I'm not going to turn up the resolution too much.
I can—
I'm going to clay it and smooth it, and then I will increase the resolution. So voxel merge, that gives me this one object. Now see, it's a little, little chunky. That's fine. I'm actually going to throw some more clay in here. And over here, things are getting a little weird. Let's throw in a knuckle and another knuckle. And what's going on? We got too much hand here. That should work. Smoothing, subdivide it. Now we got a really smooth object, but it gets chunky. So, I'm going to flatten some of it. That's bothering me a little bit. Let's flatten this so it all blends together. Smooth it out. Things are still going to be chunky. That's why I like to stick with basic shapes as much as possible because it gets into chunk mode and it's like, what is going on here? Smooth things out a little bit. I'm not going to spend too much time on this. I can always come back to it. And let's duplicate that right now. I don't know why I'm forgetting how to just flip it. There's got to be a quick and easy way. Let me figure out— I mean, flip object, but that puts it way over here. Okay, that is it. I'm just so far off the center of the stage. Don't do what I did. Little contrast. Arm being down over there, this arm is going to be up like a basketball player. And yeah, rotate it out. That's fine. I'm going to leave the other leg right there. See me, I'm constantly hitting undo and forward here. Sometimes when I tap around the stage, you'll accidentally do an undo. Next up, let's get simple basketball in there. For the mouth, let's use a tube to draw this shape right here. I'll make sure I'm selected on Curve. Draw like a funky monster mouth, try to make it connect. I don't get every single shape perfectly right. This does look like it'll work. The lips will be underneath there. See how these shapes don't connect? Let's make these line up.
The problem is I need—
I'm going to need to connect the mouth to this. Looks like it could probably do it with a drag. Validate the mouth first. Tap on the object I want to drag and bring it over. It doesn't have to be perfect. And try that again. I'll just do the sides and the bottom. A lot of times I'm just making this up. I'm just sort of figuring out how to do this. We have it connected. Not perfect, but I kind of like the asymmetry to it. Should be fine. Let's, uh, smooth out and add some clay to this lip right here. Let's see if we can get some clay, smooth it. I'm still getting, uh, sure somebody knows how to figure that out. I'm gonna subdivide it, pinch it together a little bit. Actually, there's a pinch tool, but I don't use the pinch tool. I don't I have no idea what this does. Maybe it pinches it together, maybe not. For some reason the smooth tool is not smoothing this out, it's just separating it. Let's build it up a little bit and then flatten it out. I'm sure to the expert 3D modeler this looks like amateur hour, but I'm probably, I don't know, 60 days into learning Nomad Sculpt, so I'm only a few steps ahead of you if you're a 2D illustrator. This should work, and then smooth it out. No, I'm still getting that line. That's annoying. I'll leave it for now. I'm going to create a mask. I'm going to move the mouth in. Draw mask. So whatever's in the mask is going to stay locked. Now you can invert that mask. Let's go up to— oh, sorry, here. And you can invert the mask. So I have the mouth highlighted now. When I invert it, the head is going to be selected, meaning the head won't move, but the mouth interior will. Now I can move this in. I can just go make it deeper in there, shift it over. Sure, it did some damage here. That's totally fine. We're going to fix that. But this gives it a little bit of depth, like, and you can shrink this down a little bit to release the mask or clear it. Sorry. Subdivide this, smooth this up a little bit. Let's grab the drag and go back and fix everything that got busted here. It is ugly inside there. Might smooth it out. I feel like it might break it a little bit. Let's see. Should be fine. Grab a flattened brush and just work the inside of his mouth a little bit. Let's throw some hair on this guy. I'm going to start off with a comb. Such a pain to not keep your character in the center. I don't know how many times I'm going to say this in this video. Validate this so we can grab it right in the center and this will bend it. I'm going to flatten it out a little bit. I'm going to duplicate it, rotate it. Now, maybe these are horns instead of hair. It could look pretty cool. Over here we'll do the hair. Which, let's see if we can get that done by dragging. At this point, I'm going to turn off the reference image.
It's just getting in the way.
That looks decent. For the teeth, I'm going to do a box, flatten it, and then validate it, trim. The line. Turn off symmetry. This will be fine. There we go. The tongue, let's grab the tube tool, the curve, into place before I validate it. Okay, let's go to Radius, open it up a little bit, validate it, move it down, subdivide it, subdivide it again. Actually just nailed the the trimming on the first try. Pretty proud of myself. Let's go here and try this one more time. Here we go. Give the tongue some shape. So let's get this leg over there by duplicating it. And let's Flip it and it sends it into outer space, and then I gotta figure out how to get it back. Maybe we can make this guy flying because he's a fly. It's like you got the Michael Jordan tongue. His arm would be raised more. Looks good. Now for the wing, I want to, I want to shape this before I duplicate it.
I like to do some basic painting in Nomad Sculpt before I bring it into Procreate.
I usually just force paint all on most of the objects just to give myself an idea of what colors I'm going to be working with when I bring it over and start adding the 2D layers on top of it.
I see a lot of people do most, if not all, of their painting in Nomad Sculpt. I think that's one thing I want to try to work towards in the next year. Is, um, making fully rotatable 3D characters with all the shading and the colors right in Nomad, maybe bringing it over to Blender to add some additional lighting because I know Nomad is limited in what you can do. When I'm painting, I'm not trying to make it perfect. I'm just trying to move forward as fast as I can and get things into place. And you can go back and fix things, but a lot of the times the details that you worry about people won't even notice. And the people that don't like it, or the people that call out, you know, the, the lack of attention to detail or these tiny little things, they're not really your fans. They're not, um, you know, rooting you on, and you don't need to worry about them at all. Because I just make sure that my next piece of art, whatever I'm working on next, is just a little bit better than my last one, and I let that build up over time. Rather than trying to make things absolutely perfect, because a lot of times trying to be perfect is just, um, is just fear. Fear of getting things done and putting out there. When you go to export your image, I choose 1280 and I check transparent background, and then you'll see in a second the image. There's your PNG saved. I saved the image down in this video, but you can bring it directly over to Procreate. That would save this step that I'm going through right now. I'm going to place it directly in my sketch. First, I'm going to grab some background layers from a different Procreate file. So the way to do this is just swipe right on any layers you want to drag to a new file and then drag them with one finger, click on gallery, choose the file you want to drop them in, and then drag them over. Now I have that basketball floor in the background. I'm going to tweak the shadow and some— add some full color opacity over top of the character just to give it some mood lighting. And now I really just go to town on the details. Procreate is my bread and butter. I love drawing in it. I could do it all day long, so I really don't have to think too much. Whereas Nomad Sculpt, I'm stretching my brain big time because I'm still learning it. But Procreate is sort of my treat after working in Nomad Sculpt for a while. I let myself bring the image over to Procreate and just go crazy with it. I find making clothing in Nomad a little tedious, so I'm going to shape these shorts and the bottom of the jersey and do all the details of the jersey in Procreate. I'm mostly using the Crunchy Cow pen. This is a free, uh, free pen that I created. It's a little bit like the Studio Pen, about 10% tighter. It's free on crunchykows.com or in the CrunchyKows Discord. I'm gonna go through, add some final details, some final hairs, give this team a name. We'll call them the Buzz. Add some little grungy dots. We don't want things to be perfect. I could really go on for days in Procreate, but at this point I'm starting to wrap it up. Let's go through, add some spit or some green neon saliva, some shines on the eye— eyes, sorry. Some final details on the horn. You can see him taking photos for other platforms. And there it is. That's our fly sculpted in Nomad Sculpt with the details added in Procreate. If you made it this far— wow, almost 29 minutes into the video— I appreciate it. Thank you for watching, and let me know in the comments what you want me to make a tutorial about. I will try to make that in the future. And say hi in the Crunchy Cows Discord or on social media. Talk soon.
More from Ryan




Drawing Mr. Beast into a Beastly Baller trading card #art #drawing #tradingcards card




The first draft of my graphic novel #art #procreate #originacharacter #graphicnovel #drawing


