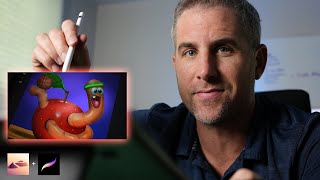
In this tutorial Ryan Maloney walks viewers through creating a whimsical 3D illustration—a worm inside an apple with a basketball and a sweatband—using the iPad app Nomad Sculpt and then finishing the piece in Procreate. He demonstrates the basic sculpting workflow: starting with a sphere, using the drag, tube, and crease tools to shape the apple, worm, and basketball, and employing the gizmo and hierarchy panel to manage objects. Ryan explains layer organization, the trim and voxel‑merge tools, and how to apply flat colors and basic lighting within Nomad before exporting a transparent PNG. He then imports the PNG into a 3000 × 3000 px Procreate canvas, adds shadows, highlights, textures, and additional details using blend modes, overlays, and layer‑merging strategies. Throughout, he shares practical tips (auto‑save, view mode, double‑tap shortcuts) and reflects on his learning curve, noting that this piece is part of his “Beastly Baller” NFT series and promising more advanced tutorials in the future.
Chapters
Today you're going to watch me make a monstrosity of an illustration. I'm starting in Nomad Sculpt. I'm going to shape this apple. I'm just going to set up a sphere. You can see that all the layers and where you get all these objects from, it's a little bit different than Procreate or other drawing apps. It's up in that little hierarchy icon. So I'm just going to set up a sphere here, use the drag and move tool to sort of shape it., and then for the stem, I'm just going to use the drag tool. Now, this is one of my favorite tools in Nomad Sculpt. This is the tube tool. If you draw a line and then check the radius, you can scale the sides of the tubes. So this is what I'm using to draw my worm, and then you can just add points to this line and move it anywhere you want. Now, to zoom around the canvas, make sure you are on view mode in that left-hand menu. If you choose Curve, then it's going to allow you to draw a new line. And if you try to zoom around the canvas or rotate around the canvas, you're just going to draw a new line. So make sure you're on that View tab. And now I'm just going to get this worm into place, scale it out, make it a little bit thicker. So the worm is going to go— be going in and out of this apple, and then there's going to be a basketball at the end of the worm. And I'm also going to put a sweatband on the worm's head. All right, now that the worm is a little bit thicker, I'm going to add in the basketball. The basketball is just a simple sphere, and then I'll use the crease tool later on to add the lines on the basketball. Nomad will auto-save every few minutes, so you really won't lose your work, just like Procreate. So the Gizmo is your best friend. The Gizmo guide is gonna— like, anytime you need to move anything around, just select Gizmo and tap that object. You'll be able to move it around. I was having trouble a little bit figuring out how to round out this top of this tube, so I went in and I added a sphere instead of just trying to inflate it. And make it perfect. I'm still learning Nomad Sculpt. This is probably my third or fourth sculpt, so I may be a few weeks ahead of you maximum. I think you can catch up and do just as well as I can. So Nomad is a paid app on the iPad. So one thing I always have trouble with is the trim tool cutting through objects. I cut this hole all the way through it, and I really don't want to do that. So here I applied a patch using the tube again. And then smoothed out the mouth. Now one thing I'm going to do is color this object in Nomad. I'm going to lay down a base coat and then I'm going to bring it into Procreate to add the shadows and the highlights. Usually the good 3D artists will color it all in Nomad. They'll do all their translucent cool stuff, but I'm still learning. I got a long ways to go. Maybe in future videos I'll make it that, uh, make all that detailed color, but for now I'm just gonna set up the basic shapes here, lay in flat colors, and then I'm going to bring it into Procreate. Here I'm using the crease tool to create the segments of the worm, and I'll do the same thing on the basketball. Anytime you want to crease or move or drag around an object, you just double tap it and you're on that object. Like I said, the layers are up in that little hierarchy tab So it's not like Procreate where the layers are on the right-hand side. So if you get lost, the hierarchy tab has layers and new objects. So here I'm laying in flat paint colors. I'm just double tapping the object and then you can color away. There is an option to set up the render to like tweak the render and make the colors and the lighting perfect. I didn't spend too much time on this video, on that in this video, because I'm about to hop over to Procreate in 2 minutes. Here I'm selecting objects and I'm doing a voxel merge to reduce the amount of objects in the scene. Now I'm just going through and I'm adding a little bit shinier paint to this apple to get a little bit of reflection. Same thing with the tongue. I'm going to save it and I am going to export this as a PNG with a transparent background and open it directly. Actually, I'm going to save it as a PNG to my iPad and then I'm going to open it or import it into Procreate. Took me a couple times to get it right. There's the PNG transparent background. I'm going to open it up in Procreate, do a quick import. My canvas size in Procreate is 3000 by 3000 at 300 DPI. I'm going to copy all of these background files, background layers, and drop them into this worm file. You can see the resolution was a little bit different on that worm file or on that ghost file. So I'm going to scale these up. I'm going to merge them all together. Scale them up. Doesn't get too blurry because I'm at 300 DPI. Now I'm just going to position my worm in the apple. I'm going to drop in a little bit of darker shadow on the bottom of this canvas, and then I'm going to go in and just work out the details. I cannot rotate around this 3D object in Procreate because it's a flat PNG, but in the future I'll do full 3D objects where I can rotate around. So here I'm just going to use overlays. In different blend modes to set the highlights in the shadows and to just give it a little otherworldly feel. I'm going to make it my mission to learn how to paint and light in Nomad Sculpt and Blender, so in future tutorials it's going to look a lot better. This is sort of a hack to get me to a final drawing. This is going to be one of my Beastly Baller NFTs. So I wanted to make sure I got this done in a, you know, in a couple, in a week or two. But every new sculpt, I try to push myself a little bit more and learn one more feature in Nomad or Blender. So this one, I kind of tapped out and jumped from Nomad to Procreate too quickly. So keep an eye out for future tutorials where I push myself a little bit more, and you'll learn a little bit more about color and Nomad Sculpt. So for shadows, I just pick one direction that the shadows are laying in and one direction that the light is coming from, and highlights will go on top, shadows will go on bottom. I'm going to add some texture to the apple. I'm I'm going to choose an overlay here with a dark textured brush. Now the eyes are super fun to me, so adding in pupils and then you can add in reflections over top of that. You can turn down the reflections, use a soft airbrush eraser to sort of, sort of show the color of the eye through those reflections. And then I'm going to go through and drop reflections on the worm here, and then that's going to get us closer to being finished. I'm going to merge some layers, but I'm going to preserve the other layers because if you merge too many, then anything that's set at overlay, it's going to disappear. So if you feel like you want to merge layers, it might be better to set them in groups. But sometimes your Procreate layer will max out in layers. So I usually find my, my files are maxing out around 30 to 40 layers. So I do need to merge certain things together. I'm going to go through and add some extra details. Use a soft brush to create the illusion of those details tapering over the edge. I'll do this for the, for the, for the sweatband and the lines on the worm, the segments on the worm. I love the little details, the shadows and the shines in the eyes. This is— this little extra stuff makes things pop. All right, I'm gonna add a tooth, drop some shadow on that tooth. I'm gonna alpha lock it. Drop a little gray shadow, soften it up a little bit, maybe add a little bit more shadow so it looks like that lip is causing a shadow on top of the tooth. Add some reflections. We're getting close to wrapping up this drawing. Yeah, I guess you could call it a drawing. It's more like a 3D sculpt, but— so that's my progress in Nomad. I hope you learned a little bit from it. And keep an eye out for future videos, and I'll keep pushing myself in Nomad so you can learn a little bit more. Thanks for watching.