Maxime Warnault shows how to shoot daily videos from anywhere with a MacBook Pro, iPhone, Rode PodMic, and DJI wireless mic system that lasts 16 hours. He uses magnetic clamps to mount gear, the DJI Osmo Mobile 6 for hands-free tracking, and a color-adjustable lamp for lighting.
Chapters
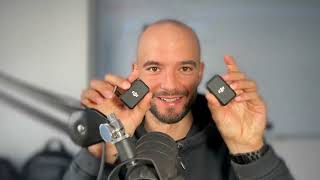
In this video, I'm going to show you my minimalist setup to record a lot of videos every single day. And a few pieces of equipment that I use to be able to either record when I am at home or record when I am on the go. So the very first camera that I am using is the camera from my MacBook Pro. So I have a MacBook Pro M1. And the camera is actually 1080, so the quality is pretty good. And I'll show you my screen here. If you come here, you also have the ability to use some features from Apple. So you have the portrait mode, which is going to really focus on my face and blur the background. And you can do more or less. So if I do all the way, the background is really going to be blurred. And if I do it like this, you can see clearly what is on the whiteboard behind me. Okay. So then we have studio light, which is also once again going to focus on my face. Otherwise it's going to blend all the colors pretty much everywhere. So just like that, I have an amazing focus on myself and not what is in the background. Okay. And then you have reaction. Generally I turn this off. But if you do like this, there's going to be balloons and if you do like this, there's going to be like thumbs up and things like that. So you have like even this, you're going to have a heart. So that's, that's the way it works. So we have the same settings now for my phone here. So I just changed the setup a little bit just to show you the few things that are available. So we have center stage. So this is going to put me like in the middle of, of the frame. Then we have the portrait mode as well. We blur the background or not studio light, reactions and things like that. Okay, so what I want to show you is the behind the scenes. So what is going on in, in front of me. So I'm just going to show you on the other side. So here I have two of these things. So these are clamps that are behind my computer as you can see. So there is one for the light and there is one for my phone. And people always ask me, what are these two things behind your computer here? So this one is for the light. This is called a fill light. And it's very small, as you can see. It's like smaller than my end. And then we have the. This one, which is a magnetic clamp where I put my phone using MagSafe. Okay. And here on the left, I have another One that is plugged into the shelf. And I can either put the lights here because I have the. So I have the window and otherwise I have the light on the left and then I have my phone here and the light here. Okay, so let me just put this back on track. All right, so now I put the iPhone back behind my computer. We have the fill light on the left. And what I want to talk about is the microphones that I am using. So at home I have this Rode Podmic is the name of this one. I will put the link below this video so you know exactly which one it is. And I also have this DJI mic. So this one is the one that I get when I am traveling, when I'm on the go. So I actually have two of these, comes with two. So I have two here. So it's good if you do podcast, if you have one for you and one for the other person and you can literally use it 250 meters away from each other. And there is a receiver that I plugged into my computer and then you have the receiver. You can literally. This is the easiest microphone I have ever used. You just plug it into. If you have an iPhone, I believe if you have the new one, it's going to be USB C otherwise it is going to be this lightning adapter. And you have the adapter coming with the box. And what is good is that you can put everything inside of the box and then you close it and you charge it using only one cable. So this is literally the easiest microphone that I've ever used and the one that I highly recommend everyone to buy because you can use it at home if you don't have a microphone like this one. And I believe you can record up to 16 hours of content in one go. So you're pretty much going to run out of things to say before the microns out of battery. One last thing that I have is the thing here. So this is something that I use behind me. So I put it behind me to record myself working or I use this at the gym. So I can put it on magnetic surface. So just so you guys can see here, I can put it on magnetic surface and it holds my phone and I can record myself either behind me or at the gym when I do a workout. And I want to post my daily workout for the day. And now I have one last piece of equipment that I use when I am on the go. And this is the DJI Osmobile 6. So this is a stabilizer. So let me get the mic out of the way. And so basically it's stabilizer. When you turn it on, it is going to stabilize your phone either horizontally or vertically depending on like the. The settings that you want. So this one is vertical and basically you can run around and like the. The video is always going to be stable. If I want a different angle, record the on the whiteboard behind me. I put this on the shelves on my left and there is a active tracker. So if I move to the left of the whiteboard, it's going to follow me all the way to the left of the whiteboard. If I move to the right, it' to follow me to the right. So that way I don't have to have someone else with me in the room to keep track of where I'm going. I use this thing to follow me when I am recording. I use this thing to record friends, yoga sessions and things like that. And it's amazing. With the DJI Mic and the DJI OSMO mobile you can be on the go and record super high quality. And your iPhone you can record super high quality. It comes with a extender, you can shrink it down and basically it's really super easy to use and very powerful when you record videos on the go. And obviously to have even better quality of video, I have a lamp as well. So there are like three intensities and you can change the color as well. So this one is more orange and white and super white. So that's pretty much it for this video. I will put the links of all the equipments that I recommended in this video below in the description. So if you want to get them, get them. And if you guys have any questions regarding any of the setup or do you use the DJI mic or do you plug this and what is the arm that I'm using? I will put the link below. But if you have any questions, comments, observation, anything you want to ask, please let me know in the comments and I will be more than happy to answer you. You will find all the links below. Let me know if you guys have any questions and I will see you in the next video. And don't forget to like and subscribe if you like this video.