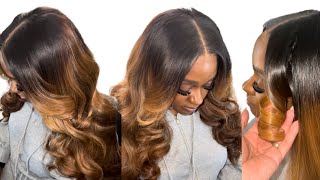
Stylist TT installs a glue-less lace closure on Brittany using her dome cap method, designed for clients with thinning temples or hair loss. She reinforces anchor braids, uses scalp-matching makeup under the lace, and curls the hair away from the face to avoid a common mistake.
Chapters
Hey everyone, it's your girl TT. Make sure if you are not already subscribed and you love this look, go ahead and subscribe and definitely thumbs up this video because YouTube has not been showing y'all my videos. So thumbs up this video and let's get into it. This is my client Brittany. She has been coming to me for years and since I moved to St. Louis from Kansas City. And, um, she is— she usually gets my hair extensions, but this time she did not. She is trying out her friend's hair extensions, so I do not have the direct information for the extensions. I'm sorry. I love the color. The hair was beautiful. I'll try to get it later and add it to the description or like pin it to the top of the comments, but Let's get into this lace closure sew-in. I am using my dome cap method. If you are not familiar, make sure you go ahead and check that video out. I do have courses on the dome cap method. I tried to teach it on YouTube, but apparently it's like, no, they need more in-depth, hands-on— not hands-on, but more in-depth teaching. So I do have courses on that. So Every single product I'm using is on my Amazon storefront, which is on my new website, titidositall.ai. And yes, it's been a while, has it not? Like, since I had like an actual start-to-finish video. If I'm out of breath, just bear with me because I am going on 7 months pregnant with baby number 2, baby girl coming. So I'm gonna try to pace myself and take deep breaths so I can keep up with the video. But, um, my dome cap method was created for those with thinner hairlines, hair loss. Um, she is not the typical person because usually there's people with like no edges or like the crown is completely bald or something like that. So she is not the typical client um, for the dome cap method, but it isn't just for clients with, um, hair loss necessarily, like alopecia or traction alopecia or something like that. Um, her hair loss is actually medically induced by a surgery or procedure she had, and, um, her hair is actually in the process of growing back. I'm pretty sure she's been on one of my videos before where it was a lot thinner, and if it wasn't my video, it she's definitely on my Instagram. Um, so I am doing her anchor braids. If you all are not familiar with my videos, I always add braiding hair to my anchor braids because it makes that first braid stronger. The hairline is a lot more delicate, so yeah, I like to add braiding hair so there's not as much tension on the client's hairline. And how rude am I? If you are new to my channel, welcome, hello, thank you for joining and watching this video. So this is a rare case for the dome cap because obviously you see she has hair up here, but since we're doing a middle part and she has kind of like thinning around the— what did I call it? Temple. The temple, right? Pregnancy brain. The temple on, on both sides. So instead of putting like a thin braid going here so I can get that closure up here, I'm going to use a dome cap method. That way I can bring her closure all the way up and not have to worry about adding any extra tension to this braid. So yeah, if you've never heard of the dome cap method, it's something that I created for clients with thin hair who don't want to wear wigs, who want their hair sewn in but may not have the edges to bring a closure up forward. So I had clients, from years ago that just came to me for closures. They love the closures, they love how they look, that the fact that they're in front of the hairline, and, um, it got to a point where I had some customers who I could not put a braid on those edges. It was just too thin, so I created this method to be able to attach the closure further ahead of their hairline. So from there, the dome cap method was born, and this is it. It is— it requires a dome cap, so that's why I call it the dome cap method. So I'm attaching a lace closure to it. Again, I have full course, a full course on it, um, and I teach everything, everything about the dome cap method. So here everything is in and I am styling, and I was so ready to record a tutorial of curling. I press record. I almost got the other side. How the fuck did I even stop? Oh, I'm so mad at that. I'm so mad. It was so pretty and perfect. God, I don't know what just happened. So two things: I'm showing you the wrong way to curl, which is what I was trying to do on the other side, but the wrong way to curl is towards your face. You never want your curls to flow towards your face. Symmetric look. They're all going away from your face. They're flowing to the back. So this is the wrong way to curl, and then I will show you the correct way to curl the front of your hair. You want it to flow backwards. If you notice, this curl spirals facing her face. It needs to go away from her face and just flow. As far as her closure, if you all notice, there— her closure looks super, super, super powdery when I was installing it, and that's from the makeup that I used on the, um, underneath the closure and on the lace. So everyone's scalp is lighter than their forehead, which is why in this video you saw me applying a color that matched her forehead to the hairline, leaving the part lighter, which is the color of her scalp. And when you see the finished look, as you saw in the beginning of this video, you didn't notice that that closure was going to look all powdery when I first put it on. Like, it looked perfect. And I have another video, um, showing another girl where— I mean, it blended perfectly. So this is a method I use and I do it on everybody. So for my curls, I just wanted to show a little bit of me curling. I curl multiple ways with multiple irons depending on the size of the curls I want. I go overhand, underhand, every way. And I do this to show you, there are these videos that we see on Instagram, YouTube, TikTok, all these curls that are so easy to do. Well, they make it look easy. They're not easy all the time, and sometimes it takes us multiple curls, multiple brushes, and multiple flips of our fingers through our client's hair to get the look exactly how we want to. So don't be afraid when you're finished with your client's hair to re-curl piece or even your own hair. Don't be afraid to say, nope, I don't like the way that looks, let me re-curl this. Take your time. That's what creates these amazing outcomes, and you will have amazing results. That definitely sounded like an ad, but it's not an ad because I'm not trying to sell you anything but confidence, okay? I'm trying to sell confidence. Confidence comes with repetition. I did not start out like this, and it seems like every day social media is full of new styles that I am trying to achieve. So, uh, again, all you have to do is keep trying, keep practicing, and greatness will come. Just be patient. Say bye-bye. Bye. See y'all in the next video. Oh, and I got a comment on one of my videos of someone saying that I should not stop making my full-length videos because people still want to see them, and I do. I be feeling like, oh my God, y'all seen everything, what else can I show? So drop a comment and let me know if y'all are like, we need full videos still, start to finish videos still, and if y'all still want to hear this voice of mine.