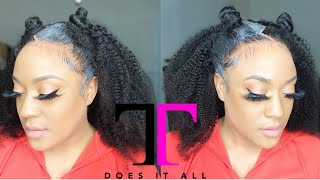
In this instructional video, LaToya Kelly demonstrates how to style and install an affordable 16‑inch, 130% density, 1B Malaysian virgin human hair kinky‑curly lace frontal wig from DY Hair using a completely glueless method. She begins by preparing the baby hairs, bleaching the knots, and applying Gots2b Glued spray. LaToya emphasizes cutting the lace before styling to avoid visible lines, and she walks through the process of trimming the lace, differentiating lace frontal wigs from full lace wigs, and using her homemade baby‑hair cream (available on her website) to secure the hairline. She details the creation of knot balls, precise parting, and the use of an elastic band to hold the edges in place. Throughout, she shares practical tips for everyday wear, highlights the wig’s affordability (under $150 with a $10 discount code), and references additional behind‑the‑scenes content available to members via her “WIDS” (What I Didn’t Show) series. The video concludes with a call to action for likes, subscriptions, and viewer feedback on the look.
Chapters
Hey everyone, thanks for tuning in to this video. This is a wig by DY Hair and I am going to show you how I got it to look like this. So make sure you thumbs up this video, okay? All right, so first I am going to start with the baby hairs. I did bleach the knots and tweez. I showed the video where I talked about bleaching the knots and the difference with curly hair in that previous video. But right now I am using my Gots2b Glued spray. And, um, one tip that I want to give you guys that I did not do: if you do not want the line to show at all in your frontal, which who does? Nobody. I would definitely recommend cutting the lace before you lay the baby hairs like this because it's difficult to do it afterwards. So this is an inspired look And I got this look off of Instagram. I was like, oh my God, this is dope. I never thought about doing like this look with a frontal. And I had this curly hair. And as far as the length of it, it is 16 inches. So I thought that this would be a really, really cute, just everyday style. Um, it's not something where it's like, oh my God, I have to get glamorous to put this look on. Um, it's an everyday real, real look. So I loved it for that reason. This is 130% density, 1B Malaysian virgin human hair, okay? And this is kinky curly. Um, there is a link to this exact wig in the description, and there's a $10 off code, so make sure you check that out, guys. Um, this wig is really affordable. It's under $150. So during times like this, we need the budgets, okay? So this wig is really affordable. And, um, I am just going to show you the— just the process of me laying it. Okay, it did take me trial and error to get these two little balls right because I am just not a twist knot ball person. Like, oh my God, one of my customers, we did this really cute style for her and I was like— we did it over and over and over. So with this, I did realize the quickest way to do it. And if you are a part of my membership, you You guys are going to see some funny stuff with this video because yeah, I made it really, really difficult. But, um, I am still just customizing and making everything perfect. I am a perfectionist and, um, I just want my parting— like, I'm very, very, very anal with my parting. Like, it has to be straight. So I just sprayed the spray and blow-dried it away from the part because I want that part to really be defined. Um, and yeah, I think that it looks really, really good. The parts look really, really good. Um, and then I'm just kind of smoothing it back. So I upload to my membership channels a video called What I Didn't Show, and that's what the video is called. So I'm going to start calling those WIDS, W-I-D-S. Wigs videos. So it's gonna sound like I'm saying wig videos, but in my wig videos, um, I show a lot of things on here that are just really, really tedious details that you really want to have. Um, the main one, like I told you all, was to make sure you cut that lace before you do all of this. If you remember that full lace wig that I sent out to my customer um, that wig I did show that I cut the lace off before, but— and it was a lot easier to even put it on this one. Um, yeah, I just should have cut the lace beforehand, but it still came out super, super, super duper cute. Um, all right, so I am going to cut this lace, speed this up, and then we're going to get back with the rest of the video. So while I am cutting the lace off of it, I am going to kind of show you at the bottom half of the screen, um, the difference between this wig, which is a lace frontal wig, and then a full lace wig. So on your left you will see the lace frontal wig, and on your right you will see a full lace wig. So this right here is the curly It is the lace frontal wig, and you can see that there's a big middle parting space and a side parting space, but right over the ears it's not that far back. And on the full lace wig, you have lace throughout it all around. So if you're interested in wearing like, um, styles that you want to wear all the way up into a high ponytail those are what you would need a full lace wig for. But if you're okay with having your back down, doing lower ponytails, you can do all of that with a lace frontal wig. A lace frontal wig does give you the edges and the baby hairs that you would get in a lace frontal, and it also has combs in the back, combs in the side, so you can use the combs to hold it in place also. Since I have Sisterlocks, the combs really don't help me much because I can't put a comb through them. So I'm almost done cutting this lace, and then we are going to go to the next step, which is cutting the little bit of lace off the back. And this back part allows you to kind of pull it into a low ponytail if you want to and it not show. So the way we're going to install this is we're going to do a glueless method, and we're going to use my baby hair cream which I make myself. It's available on my website, ttdoesitall.com. And I am just going to lay some baby hair cream on it and blow dry it, kind of comb it in. And then I am going to perfect one of these balls because one of them just doesn't look right to me. So, um, I'm going to lay my edges first and then What I'm going to actually tie my edges down with is an elastic band. I get it from like Joann's Fabric or something, but since a lot of places are closed now that we have the stay-at-home orders, I will link in the description, um, where you can get a band exactly like mine. And everything that I'm speaking of will be listed in the description also. Um, so my baby hair cream, I'm just putting that on the hairline. You don't have to put this all throughout the front if you don't want to.. If you want a super hold, I recommend it. If you're just looking for something more casual that you can take on and off, then the only thing you would have to do is put it on the sides, like right above your ears right here. That's the only thing that you have to do if you wanted to lay nice and flat. So here is where I'm going to actually tie my hair down with that elastic band, and this is only so that it won't slip up. While it's drying while I'm fixing this ponytail. So I'm just gonna put a ponytail holder on that piece, and then I'm gonna twist it up. I told you all, like, it's nearly impossible for me to get good knot balls, whatever you want to call— I don't know what to call them, but it's nearly impossible for me to get those perfect every time. So now I feel like I have it good to go. Um, all right, so I'm going to brush the ends out with my wig paddle brush just to kind of give it a bigger look. I love the big look of it after you kind of brush it through. Um, I would use something wide-toothed if you, if you have something available. Don't use anything fine because you will be tangled for days. So I'm just kind of pulling my fingers through it just get the curls to kind of separate, and then I'm pretty much gonna be done with my look. So what do you all think so far? Do you like this look? Would you wear it? If you are still watching, make sure you thumbs up this video and subscribe if you haven't already. I have another video coming up where I talk about these lashes because listen, y'all, these lashes caught me off guard. I actually I get them from my distributor, and this was my first time getting them. And I was like, okay, you know, I'll give it a try because I love my hair. And when I tell you these things, I'm not even gonna tell you. I'll just let you guys see that video. So make sure you guys thumbs up this video and let me know what you thought. Um, did I, did I do good on the look? I know this isn't exactly what the picture was that, that I was inspired by,, but this is my little twist on the look. Um, I love it. And yeah, don't, don't judge my, my phone. I got this expensive phone and already dropped it, and it's like I dropped it as soon as I took the case off. So I am just taking my pictures, and I'll show you those. And I want to know what you all think. Would you rock this look? Do you like the kinky curly hair? Have you worn it before? Yeah, give me your ideas. Maybe for another look, maybe I'll upload this same hair with another look because I love it. This is that get up and go hair and it's affordable hair. It looks good. Yeah. All right, well, if you have not already, make sure you thumbs up this video and I will see y'all in the next one.