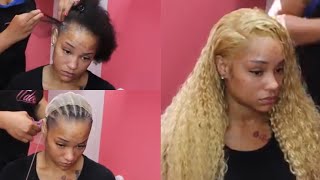
LaToya Kelly installs a blonde lace frontal from start to finish, covering prep work, the ball-cap method to hide dark hair underneath, and sewing the net flat. The whole install takes about two hours.
Chapters
Hey everyone, it's your girl TT Does It All, and this is a lace frontal video start to finish, starting from the braids all the way to the finished look. And this is what the finished look will look like right after this. All right, so this is what we're going to have as the outcome, and I am going to start with what she came in as before.
As you all requested in one of my blonde videos, I did use blonde thread and a blonde net. Okay, okay. All right, so this is my baby hair cream that I personally make and sell. It is for sale in the description. I do use braiding hair on the two outside braids depending on how thin their hair is. It's not really a necessity because I won't probably sew on it, but it's just to hold that hair really nice and firm back. Um, I am using my KeraCare grease between her braids. I always use a carbon comb, which is a heat-resistant comb.
And I use it whether I'm braiding or styling or anything.
It's just my favorite rat tail comb. I use braiding— the braiding hair that I use is that, um, what is it called, pre-stretched hair. I like it because it's not a blunt cut at the bottom, it's softer, easier to use. So that's the braiding hair that I use for clients now. I get it in a 1B, and I do have some blonde in the back in case the customer's hair is blonde. Since our hair is black, it doesn't make sense to use blonde braiding hair when the braids will be underneath everything. All right, so I smooth the beginning of each braid back, and then I grease behind the hairline because you don't want grease where the adhesive will be, and I am bonding this frontal down, um, completely across the hairline. Sometimes I use the ball cap method, sometimes I don't. When a customer is super, super light and they have black hair, it's the most beneficial to use the ball cap method because you don't want their black hair showing through the frontal. And especially with her hair being blonde that she's having put in, you don't want, um, her hair showing through as black And this is her first time with me as a customer, and I did do a frontal touch-up on this same customer about a month later, and I'll post that picture and share with you guys so you can see what that looked like. We used the same hair except we straightened it, and it came out really, really, really pretty.
So now I'm using my Wild Growth hair oil between each braid, and I always put that on my snap, so you see me in the background recording. I put it on my Snapchat because everyone loves to see this part. Um, and after this, I put the net on, and then I do the ball cap method, and then we apply. All right, so now I'm using my blonde net as well as blonde thread, and I have a link to both both of those in the description. They are a lot cheaper on Amazon to— than to buy in the store. So all those Amazon links that I put in the description are very beneficial because the store adds like everything, and plus there's no tax on Amazon too, so that's even better. But yeah, I am sewing on the net, make sure that it's nice and flat to her head, not pulling anywhere. And again, this is going to help so that nothing black underneath shows through. And then after this, I'm going to do the ball cap method. So I pre-thread all of my needles prior to my client coming for her install. It cuts down on time and it cuts down on work that you have to do while she's there. So it takes me about 2 hours from start to finish to install the frontals and sew it in, and whatever else is extra— so if I'm styling it, if I'm curling it, straightening it— that is what takes the extra time. But start to finish, it takes me like 2 hours. All right, so my commentary is just about over, so I'm going to play some music so you guys can watch the rest of the process.
And make sure you thumbs up this video if you haven't already.
Drop a comment and let me know what you thought of the outcome. And don't forget to subscribe if you haven't already. If this is your first video, this is one of many, okay? Because I have so many videos, so make sure you check those out. And I will catch y'all later. Enjoy the rest of this video.