Bob Frontal Wig Install | Start to Finish | VIPWigs
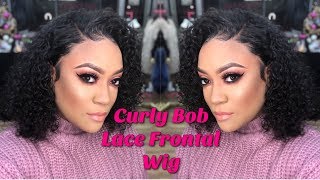
LaToya Kelly installs a curly bob lace frontal from VIPWigs, showing how to moisturize the curls, tweeze the hairline thicker, and cut the lace without damaging the wig's three combs and adjustable strap. She styles it without adhesive using baby-hair cream, then sets the edges with a neck strip for a finished look that holds all day.
Chapters
Hey everyone, it's your girl TT Does It All, and this is a curly bob lace frontal wig from vipwigs.com. So already I'm feeling this look, and y'all should probably see it in my face, but let's get started from the beginning, okay? All right, so this was the wig. I had already tweezed it. Now let me warn you, this wig does come bleached, and that's not really a warning, but The wig comes bleached. This was the natural state of it. So I tweezed, and now I am about to brush all of those tweezed hairs out. I'm using my spray bottle full of water and my wig paddle brush, and I am going to soak this bad boy down so that I can mold those curls to where they stay. Because there's nothing worse than having curls that are super beautiful and then those things kind of fluff into a fro later on if that's not the look that you're going for. And the look that I'm going for— the look that I'm going for is a nice tamed, coily, curly look. Okay, okay. All right, so of course you saw the foam that I'm using, the styling— the setting lotion that I'm using, and I am using water and that foam, and I am getting it nice and soaked so that it gets that curl pattern right there that I want it. Shake, shake, shake. Yes. Okay, so now that I have it where I want it, and I just wanted you to kind of see the natural state of it, of the curl pattern. I did not have to bleach the knots. All I did was tweeze the hairline, and I tweezed this hairline a little bit to be a little bit thicker because I tend to like thinner Oh, this is my hair oil that I spray to keep the shine to it and to keep it from kind of getting crunchy when, when I make it hard into the set. So I am using my Got2b Glued, and I'm using the black bottle or tube, and I'm going to soak this hair in that as well as the hair oil and let it dry overnight. Okay, so again, I made the edges of this wig to be a little bit thicker than I usually do because everyone likes something different. I have other YouTube videos where the wig that I have on, it's very thin, and some people think like it's too thin. So this one is going to be for those who like thicker edges. Okay, all right, so his hair reacted so well to to the water, the foam. And this is the next day, and as you see, it's beautiful. It did not poof out. It stayed— it maintained its curls, and it's gorgeous. So what I'm going to do now is cut off the lace. I did not have to tint the lace, and again, this is medium brown lace. I did not have to tint it at all for my complexion, and I just went ahead and cut the lace right off. Cutting, cutting, cutting, cut, cut, cut. And make sure you take your time with cutting off the lace because you don't want to poke any extra holes, you don't want to tear it. You want to be extra careful. And honestly, I like cutting the wig— cutting the lace while it's on the mannequin head like this. It's so much more controlled. So I think that I'm gonna start actually doing my wigs like this, like cutting the lace off of them while they're pinned down to the canvas head, because that made it so much easier and it made it a lot more visible for you to see. All right, so here's the inside. It has 3 combs in it, 2 on the sides and 1 in the bottom of the back, as well as the adjustable strap that goes in the back. All right, so now that I have it in, I'm like, okay, what am I gonna do? Because I really didn't know what look I was really gonna go for. So let's go ahead and cut that extra lace off because, as you know, most wigs come a little bit longer just to fit everybody's head type. So I'm gonna cut the other side right above my ear so that it doesn't flap over. And I am not using any adhesive for this look, so I am going to use my setting foam and I'm going to also use my baby hair cream. And that is something that I always use on my frontals if I don't want to use adhesive or if I want my baby hairs to last for a long time. Literally, I can take this wig off and the baby hairs will be laid in the exact same place, and I can put them on the next day by dabbing a little bit of water on the baby hairs or a little bit more of this, which is the baby hair cream, and I could wear it the next day and it'll look the exact same as it does today. All right, so I am going to lay those baby hairs. And, um, again, for those of you who like thinner baby hairs, this look is for those who like the thicker ones, okay? Because everybody's different and I have to cater to my audience, which is a huge variety of people. So this is for those who like a thicker baby hair look. All right, so I am setting that sideburn and I'm going to cut that right there, and I'm going to also cut the other side when I lay that as well. Speak— I know this is so random, but that phone in the back, I cannot find it, and it's my business phone. I have no idea where it is. Where's my business phone? That's probably the last time I saw it. I have no idea where it is. Okay, all right, so that is more baby hair cream that I am putting on it. And again, there is no adhesive on this, which is why I was kind of holding it while I combed it back. So I am putting that on there and putting some more so I can lay it. And the sideburns really help with holding the frontal in place also. So not only— I mean, this isn't fully for looks, it's really extra stability as well as looks. Okay, so I am just still working with those baby hairs, and baby hairs are nothing that you do a particular way. If you check out the videos that I've uploaded, I have so many different ways of baby hairs. I have the ones that are just kind of like naturally there, and I have the ones that are just like really, really formed like these. So I have so many different styles, there's so many different ways to do this. And with this, I'm kind of checking it out, seeing how, how I want to part it or where I want to part it. I really didn't want a part, so I was kind of just messing around with it and seeing what kind of space I have. Now I'm cutting off those sideburns to make them shorter because the long ones look silly to me. What do you guys think? Did you think it looked okay longer, or do you prefer it like this? I prefer it like this, but everybody's different. Again, I would love to know what you all think so that, again, that I can cater to the look that you all like and recreate something that, that you all like. The hair— I've had wigs that shed like crazy, and this was not one of those wigs. It was very, very pretty. Um, the curls really held in place. The cut was perfect. If I wanted to go shorter, I could, and I may in the future, and I'll upload that video if I do. But I'm just kind of parting because there's that space up there to be able to part and just seeing what it looks like. Because I think this is— if you all know, my SSS is one of my signature sew-ins. It's called the Sexy Signature Swoop. And if I can achieve a sexy look with every hairstyle I do, please believe I'm gonna try it, okay? I know it's just me and it's just who I am, I don't know. All right, so I am still messing with those baby hairs, just kind of making sure everything is laid in place. And then I'm going to tie it down with a neck strip in black just to make sure that it dries exactly where I just laid it., and I'm gonna let that dry. Then I took it off and got my makeup done. This is Keisha Marie, okay? Keisha Marie is who does my makeup for 95.9% of my YouTube videos, and she's located here in St. Louis where I live, and she does a beautiful job. She transforms me for every single look that I want to do. And with this look, highlighter kind of do her thing. Um, I'm, I'm there so often, so it's like, yeah, free game pretty much. Okay, so as you see, my hair is still laid in place and she has her hand on my head, which is another reason why I really like to lay my baby hairs with a baby hair cream. Because they do not budge regardless of what you do to them. To deactivate the baby hair cream, you just use hot water. So if I am ready to take this off, I can just put like some hot water on my finger and kind of just lift under that lace with it, and it'll come right on up. All right, so look at that wing. She really perfected that wing. Okay, so, um, what, what do you guys think about the length of the hair? Would you have gone a little bit shorter? Would you have gone a little bit longer? I really— I think it's perfect the exact way it is. I was kind of unsure when I got it, but with the makeup, if you're like just not wanting hair all over your face, if you're not the person that likes super long hair, I think this is a beautiful, beautiful wig. Um, if tracks in the back that are like machine stitched, so, um, you don't have to worry about anything coming loose, anything unraveling. And you just have a beautiful wig that is so easy, that doesn't require glue, and you have a flawless finish, especially if you go to my girl Keisha Marie to get that face beat. Okay, I could not resist myself. So let me know what you all think about the hair. What do you think about the makeup with it? What do you think about the baby hairs? Look at that part, those sideburns. What do you think think? Just let me know what you all think about it, and I will be looking forward to your comments in the description below. And the company's information is also in the description below. So I will see y'all in the comments and also in the next video. Let me know what y'all think. All right.
More from LaToya






St. Louis, Missouri - Lasts 4–6 months - Takes 4–6 hours - Investment: $3,000 www.TTDoesitall.ai


What are #ktips? Here’s your answer! Schedule at www.TTDoesitall.ai 🩷 #extensions #ktipextensions

4-6 hours install and last 4-6 months #ktipextensions done by the right stylist the right way 💕

Located in St Louis Missouri 💝 Consultations available www.TTDoesitall.ai 💕#ktips #natural

K Tips take 4-6 hours to install and last for 4-6 months with proper care! #ktipextensions