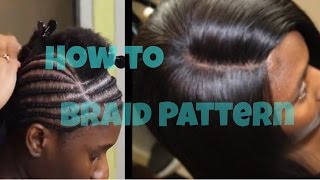
LaToya Kelly demonstrates how to braid a pattern for a lace closure sew-in, from consultation through installation. She uses small flat braids at the hairline, reinforces the first two with braiding hair, and keeps outer braids lightweight so the closure sits flat. The full braid pattern takes 45 to 60 minutes, plus an hour to sew.
Chapters
Hey everyone, it's your girl TT back with a voiceover braid pattern video for a lace closure, and it can also be used for a silk closure. And this is the before that I'm working with. Hey guys, since I have moved, I have had a few questions on how to get an appointment with me, and it has been from regular clients. So this message came from a client, and I'm like, oh my God, I posted it everywhere, but Obviously it's not working out too well, so I posted this on Instagram to see what should I do. And these are the comments that people gave me. Um, I do have an app and it's just not working, so someone suggested a GroupMe, and I thank you so much, girlfriend, for that idea because I am going to use it. Um, I have created a GroupMe. The link is in the description. And everyone join it. There will be a lot more members once you see this video than there are today, but the link is in the description. It is a free application, so I will see you all soon with a better way of communication, hopefully. And still, don't forget the app. The app is still out there. It's TT Does It All or TT Does My Hair. But I will see you guys soon either way. So before you braid, ask your client, where do you want your hair parted? Left, right, or in the middle? If they want a middle part, explain to them that the center of the head is the focal point, so it will grow out faster and become more obvious, so it won't last as long as a side part. If they want a side part, you'll ask them, do they want a deep side part with it in their face, or do they want it just to the side and out of their face so they can kind of pull it back randomly? That's when you will determine where the placement of your part will be. So as I'm doing that, I am going to part it out, and the way you like your part is up to you. I like a kind of slant to it, and I use some small clips to just kind of hold it out of my way. So the first braid and the second braid need to be very close to the hairline and small and flat. This is an example of what those two braids should look like since I didn't quite take a picture of it in this video.. But if everything is done as I have mentioned, this will be the outcome. So the client that I'm actually showing in that example, this was her outcome, and you'll— you've already seen the outcome of this client. So I also use braiding hair in the first 2 braids. It's just to make them a little bit more sturdy so there's not as much tension on her natural hair and natural hairline. So I use 2 extra large banana clips that I section it off with, and I use a very small amount of braiding hair when I am doing the 2 outer braids for a lace closure because you don't want that part to be bulky or heavy. You want it to be flat so that the closure lays flat to the scalp and looks very natural and realistic. By the way, if you're subscribed to me, you know that I recently moved to St. Louis. So this week I'm in Kansas City and I'm working in my friend's salon, so there's a salon environment in the background. So excuse the people, but yeah, I am actually finishing off my last 2 weeks in Kansas City. And I'll be flying out to Reno, Nevada with a customer for the Miss US Universal Pageant, and then I will be back in St. Louis. But as you see, I am talking to the shear guy in the background about getting my shears sharpened, and my dog is also playing with me right now, and that's his collar you hear in the background. But you've— if you subscribe to me, you see that I actually do this same kind of technique in every single braid pattern where I connect the outer braid to the back. And, um, oh my gosh, so my dog is like really wanting to play fetch right now. Not my dog, actually my friend's dog. So yeah, anywho, as you see my hair in the background, I am wearing Brazilian deep wave hair and it's 28 inches at the longest, and I'm short, so it looks extremely long on me. But this is actually the natural wave pattern of the hair. Most people request body wave when they're on there, but this is deep wave, and this is probably the wave that you think comes out with body wave, but it's not. So I am braiding her hair, and if you want a video on how to sew in the net after I have installed— after I have done all the braiding, then that link is in the description as well. As the, um, how to flatten the lace closure. I get asked a lot, does my sew-ins hurt? Um, do I braid tight and everything? And the answer is no. No, I do not braid tight. And I was saying no to the dog as well because he's still trying to play. But, um, no, I don't braid tight. I don't— I'm tender-headed myself, so I think that I've kind of mastered how to braid lightly but still have it secure onto the scalp. My typical go-to for greasing the scalp of my clients is KeraCare. It's the Glosser, and it's in a blue container, and the grease itself is pink. It kind of has like a mint feeling, so the client's head is like tingling throughout the sew-in, and they love it. They say it's very refreshing. So once I finish braiding the braids that are up to that part, I'll go to the next side and I'll do the braids up to that part as well, and then I'll finish off the middle. Um, so I will remove the clips holding that initial part, and then I will start with the braids on the other side, and then I'll finish the middle. And you'll see in my frontal video why I stopped the braids here. On the opposite side. So if you haven't already looked at that, check it out. So now that I finished both sides of the part, I am going to continue with the back, and I'm just going like a starburst, like it's just all coming from one point, and I'm going to finish the braid straight down from there. So as you see, I brought the two ends of those last outer braids together into that last braid, and I tuck the bottom of this braid in just up under one of the other ones and then sew on the net to that. Um, and it's finished. It takes me, um, 45 minutes to an hour to do this braid pattern and an hour to sew everything in, including the net. And the net for this sew-in is not required. It's not something that you will need as a guide, but if the client has really short hair, it is a good thing to use it just so that the net keeps everything together as one. If you enjoyed this video, please subscribe. Don't forget to comment, rate, and share this video with fellow stylists or clients that you want to see my work.