Client With No Edges Sew In |Tips and Tricks| by @TTDoesitall
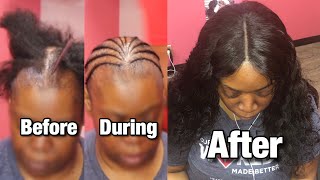
LaToya Kelly installs a glueless sew-in on a client with thinning edges, using a wig cap instead of a traditional net and an 18-inch lace closure. She demonstrates gentle braiding to protect the hairline, recommends Wild Growth oil and low-tension techniques, and shares aftercare tips like scarf placement to prevent further damage.
Chapters
Hey everyone, it's your girl TT Does It All, and this is the before and after of a sew-in using a lace closure.. I am using my Brazilian deep wave hair, but right now I am using my baby hair cream, and I'm going to go ahead and braid the foundation for her hair. The last video I did on this topic was kind of like pictures or still frames, and this time I was able to record start to finish, which I was so happy to do. So this client is a first-time client of mine. Um, I think that she was saying she was dealing with like break damage from quick weaves. Um, so of course I'm not using any adhesive on her hair. She did want a frontal, but that was not what she booked for and time did not allow it. So next time we'll probably do a frontal, which won't be damaging as well because we can do a glueless. And also, as long as I as a stylist educate my client on how to maintain and remove that frontal, it will not cause any damage. But for the sew-in at hand, I am braiding her foundation as I normally would, and the only difference between her sew-in and another client that has full edges is that I'm smoothing her hairline back into that braid that is able to be thicker. I wouldn't do a small braid on her hairline. I would pull those fine hairs back into a thicker portion of her hair and then do the braid down. I do not braid tight. There is not tension on her hair, even though it may look tight to you. Trust me, I don't braid tight. And I get clients every day in my chair that are like, wow, you really don't braid tight. And I'm like, I know. Do you think that I'm just doing false advertisement out here? Well, listen, I guess some people do, but I'm not that one. So I am just braiding her foundation down, again, not tight. I don't braid tight. I do braid very light-handed. I am tender-headed myself, so that is one of the main reasons for me not being heavy-handed. I know how it feels and I don't like it, so I treat my clients the way I want to be treated. Another thing I said in my previous video about the sew-in with clients with thin hair with a closure is that they often desire to cover up those edges. So I'm going to show you my technique live and in action where I use a cap, a wig cap, and instead of using just a traditional sewing net, I use a wig cap. I stitch that down and I use the wig cap for a replacement where her hair is not there. You'll see, um, more in detail what I'm talking about once I get to the cap. But I have about one more braid to go, and then we're off to every client's favorite part. And I can't even say client because it's my favorite part too. When I get my hair braided, I'm like, hey, can you put some oil in my hair? Or actually, can you do it twice? So this is every client's favorite part, and I'm gonna go ahead and slow it down to regular speed. And this is just Wild Growth hair oil. It's not anything special or custom made like my baby hair cream. This is just something that you can buy at your local beauty supply store. My my clients do experience hair growth. Um, it could be a combination of things, from the hair growth oil, from their hair just being oiled, to the tension not being on their hair with a sew-in, to their hair being left alone so that it can grow. So go ahead and rub that in. And I thought this was so funny. Watch her open her eyes, and then she's like, I'm good, I'm good. But then she kind of started closing them back, like Yeah, I should just soak this all in. So watch her open them. She's like, you know, I'm cool. And then watch them close again. But they get heavy, they getting heavy, they getting heavy. Girl, close them. Yeah, see? So this is every customer's favorite part, and it's my favorite part too. So I am going to use my wig cap. And again, this is a cap that's used at a local— I mean, I'm sorry, that's found at a local beauty supply store. And I do remove— there's, there's these little wires that come in the cap right above the ear, and I think it's to hold the cap down to your scalp. But I have learned that over time the wire will poke through the net eventually, so I cut those out prior to installing it to every customer. So I am sewing on the cap and I am cutting the bottom of the back of it off because I'm not going to sew below her hairline. Now I am going to sew in front of where her braids are, but as far as the bottom of the back, I am not going to use the extra cap space. So I go ahead and cut that off. I pull it down and then you'll see that I will cut the bottom of it off. So you see right there, right above the ear, I cut that. I don't cut the front flap because we're going to need that. But I do cut whatever's underneath the braids in the back because we don't want any of that extra lace. Now, if she was like, hey, I got 22-inch and I want it to look like 24, then I was sewing that, but I'm not. So I sewed that flap down from the front to the, like, behind her ear so that wouldn't flap. And now I'm sewing on my closure like I normally would. I do have start-to-finish videos on my lace closures, and I have tutorials teaching my lace closure. So this is the same exact step. I start one side and then I start the other side, and then I go and I find the braid and I stitch up just like I normally would on that outer braid. So I find that braid, kind of feeling where it is, and then I will stitch up that, not stitching over the part, and just go back down. And then I stitch the rest of the way around the closure. Now I'm just finishing up stitching that down, and then I will go ahead and pull the, the closure up out of my way so I can go ahead and stitch the bundles in. She has decided to use 12, 14, and 16— wait a minute, no, she used 16, 18, 20 inch in my Brazilian deep wave, and I used a 18-inch lace closure. So I am going to go ahead and start with the longest length, which would be the 20-inch, and I'm sewing that in the bottom of the back first. Because she does have a small head, I am doubling the first bundle and then the second bundle, and you can see it over there a little bit to the right that they're doubled. And then, um, depending on how much space is left. Since I do sew in so much, I can just kind of eyeball the space left with how much hair I have left and see exactly if I should double the next one up or if I should go single. So right now I am finishing up that 20-inch bundle, and I am not going to cut any of her wefts. With my Brazilian deep wave hair, it can be straightened, curled, or worn in its natural state. And even after being straightened or, or, um, curled you can wet it and it reverts back to its natural wave pattern. So I do not cut these bundles because my clients do like to reuse them. Um, so now I am on the 18-inch bundle, and she's leaving hers in its natural state. So I just kind of put some mousse on the end and then finger comb it out and install it. And it looks like, like here I am doubling the wefts So I am starting a new thread here, and I do pre-thread all of my needles. I have like 100 needles, and I pre-thread some of them short for my closure and some of them long for sewing the net on or the cap, and also stitching, of course, the sew-in. So Actually, what I did was, since I knew that I had more than enough space, I doubled the first portion of the weft and then the rest of it single. So I didn't double the entire track, I kind of folded it over before it was halfway. I hope that makes sense. So I am almost through with the second bundle, which is the 18-inch, and then I will be installing the 16-inch. Is she checking it out? Okay, we see you, girlfriend. Okay, she said, you know what, let me put in some headphones because it's boring. I don't even know if I was born or not. I hope not. Who knows? I was probably on the phone. So rude. I'm gonna stop doing it, but I got so much going on right now, girl. They be blowing my phone up, honey. Okay, so I just put some mousse on her hair and I am brushing it out. Oh my God, have y'all tried the new Got2b mousse? It is my new favorite. It does get stiff, so I would recommend putting some oil with it, but I love it. It's by Got2b, the same as like the, the Got2b gel stuff. Oh my God, it's so good. It gets hard and it's perfect. All right, so I'm sewing in the 16-inch now and then I will customize the closure. All right, so I use my clips to just kind of spray with some holding spray and then clip down the little fold over if there's anything like that's not flat. And that's a little trick that I use to keep everything flat around the face. And I am done sewing in. Oh, and if you do not already, make sure y'all hit my Instagram and follow me. It is TT Does It All. And I am always on there and Snapchat, which is also TT Does It All. I'm on Snapchat way more. All right, so I am flattening her closure with a hot comb. I'm sorry, yeah, a hot comb that's plug-in that I got off Amazon. And then I am tweezing the part a little bit more. And then there's something else that I'm going to do, which is cut off a little bit of that black cap so that if her front— our closure was to shift during wear because our hair grows out a little bit, I don't want that black cap to start showing at any point. So I am stitching down the sides of it just to double secure it and make sure that the middle of it is nice and flat. I do advise my customers to make sure they tie the hairline of it down and bring the scarf underneath the bottom of the back, and that just keeps her hair nice and flat. Okay, so we are almost there. So what do you all think? What do you all think about the fact that her hairline is a lot further back than this closure is laid, and I was able to do that because of the wig cap and the way I sewed it down? So I hope you all enjoyed this video. Thumbs up the video if you like, drop a comment, drop a heart, and I will see y'all in the next video.
More from LaToya






St. Louis, Missouri - Lasts 4–6 months - Takes 4–6 hours - Investment: $3,000 www.TTDoesitall.ai


What are #ktips? Here’s your answer! Schedule at www.TTDoesitall.ai 🩷 #extensions #ktipextensions

4-6 hours install and last 4-6 months #ktipextensions done by the right stylist the right way 💕

Located in St Louis Missouri 💝 Consultations available www.TTDoesitall.ai 💕#ktips #natural

K Tips take 4-6 hours to install and last for 4-6 months with proper care! #ktipextensions