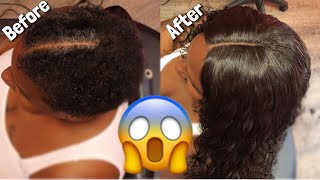
TT Does It All sews in extensions on three clients with very short natural hair, using wig caps and anchor braids to install 12 to 20-inch bundles. She shows how to create natural-looking leave-outs, blend colors from brown to purple, and achieve seamless transitions without tight braiding.
Chapters
Hey everyone, it's your girl TT Does It All, and I'm back with a video on how I achieved this. This is the before, during, and after of the daughter of this family, and this is the before and after of the mother of this family. And I did two daughters and the mother, and that's one daughter, and this is the mother. And I'm going to show you some before pictures, and her hair at the top was a lot longer than it looks it was stretched out at least an inch and a half, um, at least an inch and a half. I may say 2 inches. And I just braided it like I normally would for a natural part leave-out and used a wig cap for it. And I stitched that down. And then when I started sewing, I started sewing like I normally would, as if this were her. In, and I used the cap for a guide, and then I went all the way up just like I normally would. And if you all are wondering, why are you saying you normally would? We don't know. You need to subscribe and click on the video in the description that shows the how-to on this sew-in. But this is her leave-out, and you see it's at least 2 inches long. I'm gonna give her 2, okay? The ends may be sparse, but I I'm gonna give her 2. And this is the end result. So I use my Brazilian deep wave hair, which is hairinkkansascity.com. And, um, for her we used 16, 18, and 20 inch. And of course we just used her leave-out. And this is the end result, the before, during, and the after. Like it? If you like this, you should be thumbs up and already— all right, so now for Mom, what we did, she wanted a middle part and we were doing a closure for her. So I went ahead and parted it out, used my KeraCare Edge Tamer to kind of hold her part in place, and I use the same method. I braided her hair where I could, and you see the bottom part is not braided. And there I use the cap just like I did on the first pictures you saw, and it worked out. You see the cap right there, and you see how I sewed that closure on just like I would a normal closure, which is in the description below. And again, my Brazilian deep wave hair— she used 12, 14, and 16-inch, and I used a 14-inch deep wave closure with this. So you might have thought this video was over right now. Nope, it's not over. I did another one of the daughter's hair. Remember I said that in the beginning? And this is her before picture. And I was like, okay, now we're working with something where I can braid her entire head. So for her, she even had like— it was like tan into purple. But of course, you know, I am the blending queen, so we made it work. She wanted a middle part, so this is her middle part with her two anchor braids. And of course, I do my anchor braids around the back. If you don't know, watch those other videos and you'll know what I'm talking about. So these are my anchor braids. Again, I do not braid tight, ladies and gentlemen, so even if it looks tight, it's not tight, trust me. So I'm doing her anchor braids, and then I grease between every braid. And I'm— that's halfway through, and you see her middle part's still there. And then I start— I sew on her net. I use a net on her instead of a cap because I didn't need the cap um, where she didn't have hair because I was able to braid everything. So I used 3 bundles on her, 12, 14, and 16 inch, and that was without water. And this is when I wet it, what it looked like. And again, after it air dries, it'll be bigger again. So I use a 12, 14, and 16 inch on her, and then I of course did the middle part leave out. And voilà! You see how her— you see, you can kind of see the brown into purple, but you don't see like a jagged line that shows the separation of where her hair stops and the weave starts. So it's blended well, um, and she has her natural part leave out, and she's good to go to school next week. So tell me what you guys think in the comments and let me know what ideas you think I should do for my next video, and I will see you in the next video.