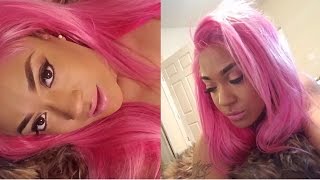
LaToya Kelly colors Russian blonde hair bundles in soft baby pink and brighter highlighter pink to recreate T.I.M.E. the Infamous's look. She uses Pravana professional pinks, varies the magenta ratio to keep the front softer, lets it set overnight, then sews the frontal to the bundles without heat.
Chapters
Hey everyone, thanks for tuning in. This is a video inspired by T.I.M.E. the Infamous, and her pink hair was everything to me, so I decided to recreate the look, and here are my results. It took a lot of pink to get this look, and, um, I will show you how I did it and what I used. So here you will see, um, the that I'm using a 24-inch, a 22-inch, and a 20-inch bundle of my Russian hair. And I also have a lace frontal, and I don't remember the length of that right now, but I will put that in the description below. But if you are wanting to recreate this look, everything that I am I'm pouring in here as I'm putting it in the bowl is in the corner. So if you want to recreate it, just replay the video or pause or write it down. Um, I did use a lot of color for this, and on the frontal I started out with a few different pinks from the Pravana line. Pravana is a professional color line If you know a hairstylist, she can get it for you, or he can get it for you. But you do have to have a license to order or to actually go to the store and get Pravana. I started out with my frontal, and I started out with my frontal because I knew that I wanted my frontal to be lighter than the other bundles. I kind of wanted a baby pink or a soft pink for the front. I didn't want a really bold color, but I do want some bold pinks in there. So that will be later on in the video. But first, I am just combing through and making sure that each section of this frontal gets some of that pink. And it— in the frontal, it's very, very important that you thoroughly comb through each section Flip it over and do it again. Um, getting pink on the lace, it really didn't matter because it didn't dye the lace at all. And I thought it was really important, but it, it didn't dye the lace at all. Um, I do my shortest bundle first because my shortest bundle will be at the top, which is closer to the frontal and more visible. So I wanted it to be the exact batch of mixture as the frontal. I didn't want it to be like, okay, there's the frontal where it stops and then that's where the back hair starts, and I didn't want that. So I made sure that the first bundle and the frontal have the exact same mixture. And I, instead of using like any other hair like brown hair, I chose to go with the Russian blonde hair because I it is a lot easier to just color the hair versus having to lighten it, having to lift it, having to get it lifted enough so that the pink will show up, because you have to have the hair pretty blonde in order for the pink to be visible. Um, so that is it with the first bundle. I'm going to comb it, and make sure you have a wig brush I do get one later on in the video, but a bigger wig brush actually helps you kind of brush the color all the way through and just make sure that each strand is fully saturated. All right, so now it's time to add more color, and here is where you're going to see me kind of using more than just pinks. I actually am going to throw in this color, which is magenta, and it's the same color line, and it is darker, so it's going to make this pink more of a— more of a I, I call it a highlighter pink. The first pink was kind of baby soft, and this one's more of like a highlighter pink. It's almost fuchsia. Um, but on the last bundle, I actually used more magenta because I wanted the back bundle to have a lot more color in it, and I just didn't want that magenta around my face. I wanted a more soft pink around my face, so that's why I left the magenta to be mixed in, in the back bundles. But later on, I actually will kind of highlight my frontal with the magenta, and I'll show you how I do that after I finish making sure this last bundle is fully saturated. So I'm going to use some clear in here, and clear is actually going to soften the color, and it's going to let your color spread a lot more. So clear can either be used for two things. It can be used if you don't have enough color and you're wanting to kind of spread it out some more because you have more hair to dye, or clear can be to soften a color up. So you see how it took that pink and kind of made it like a peachish type of color. Um, but as you saw in the picture, it all came out so pretty and you can't tell of what exactly was used, but I mean, it just, it came out really pretty. So now that I'm done applying, I let it sit for a while, as long as you really want to. Um, the packaging on color will always give you direction, but I kind of let mine sit overnight sometimes, um, or just hours because I wanted to stain the hair fully. I don't want it to bleed. Um, usually when you are putting a color over hair, you don't want to shampoo it out. I shampoo anyway, and I use warm water because I let it sit so long that the hair is thoroughly stained with the pink. And honestly, if I wear a white shirt, I don't want this pink hair bleeding on it. So I am using, um, One and Only shampoo and conditioner, and it smells so good. You can get this at Sally's, and I will put the information in the description. I got this hanger from Bed Bath and Beyond. It's more for pants or shorts or something, but I love it for my bundles and letting it air dry. But this is the look. And I did not apply any heat. I sewed the frontal and the bundles together, and I did make a wig out of it. This is what it looks like. I'm on the phone having a conversation, but I did want you to see the hair before I straighten it and what it looked like. All right, so these are my results. I hope you all enjoyed this video. Please leave any comments, thumbs up the video if you did enjoy it, and make sure you subscribe.