DIY Braid Pattern for a Lace Frontal Plus More by @TTDoesitall
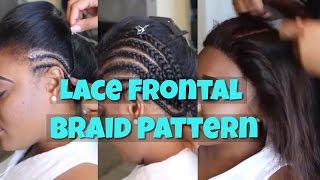
LaToya Kelly shows her braid pattern for installing a lace frontal. She braids three-quarters down, then weaves outer braid ends into inner braids to create a flat finish without sewing each end, making the sew-in easier to remove.
Chapters
Hey everybody, it's your girl TT, and this is another frontal install. This is before the frontal, and this is showing the frontal actually installed on her head, and I'm actually sewing it onto the braids in the back. But I didn't realize I had someone ask me, hey, I want to see the braid pattern. I'm like, uh, yeah, I already uploaded that. And then I was like, wait, sorry, no, I didn't. So here is the braid pattern, which I feel like is very simple. But I start with straight backs, and I am not the best straight back braider because I started out braiding, but I quickly got into sew-ins, so I did not perfect how to get every straight back braid small and crispy and go straight to the bottom of the back of their head. So if you braid, you realize like sometimes you will get that braid in the middle that is like crooked or doesn't go all the way down to the bottom of the back of their head because you ran out of space. So I'm going to show you how I eliminate that problem, my little tips and tricks for sewing in a frontal. I will show you what this is, and actually I posted it in a previous video, and I'll post that video below. It is about, it's actually from Razak, and it's a product they actually sent me, and they're so awesome. But anywho, I do use braiding hair on the outer braids, which means on the first braid on this side and on the first braid on the other side. So I use braiding hair just as an anchor braid, and I said braid with a T, I mean braid with a D, braid. Anywho, I don't start my braid at the very, very edge of their hairline because their hairline is going to be where that frontal is laying on. You want it to be very flat and you don't want it to have, you don't want the braid to be something that is preventing it from looking natural. So if the braid is too far in front of their hairline, it will make the frontal look not as natural.. So I'm parting out the other outer braid, which I do connect the ends, and you'll see that in a second. But I part the outer braids, and, um, sorry, if you all watch my 50 facts, you know I have a dog and he will not eat food out of his bowl. He will only eat food off the floor, and I think somebody probably tortured him with his bowl, like made a bunch of noise or something when I went out of town and they babysat him or something. So yeah, Um, rambling. But yeah, he's not neglected, and I don't make him eat food off the bowl or out of the floor. He is— I don't know, I think he's scared of his bowl at this point. He's a very shy, timid dog. Anywho, so, um, let's figure out how to get her hair the heck out of my way. So I use a very, very long crocodile clip. It is not your average crocodile clip.. But again, I'm using braiding hair in this one as well and using my Rezac cream, which is a leave-in conditioning cream, and I'm using it all around that braid. So again, I braid straight from the edges. It will take time for you to learn how to braid without it being tight. I do braid to where it looks very secure and every hair is in the braid, but it is not a painful braid for my client. So, um, that's something you really want to practice on. It takes trial and error. Um, but yeah, go ahead and braid that, and then I connect— sorry about my shoulder, it's going to be in and out of this video the entire time— but I connect the ends of the first 2 braids. So I'm bringing that first end, which is that longer strand you see, and I am braiding it into that braid that I just started from the other side so that it actually combines to one braid. And when it combines to one braid, that way I can lift it into the next braid, which you will see in the next braid. But, um, yeah, I'm actually moving, you guys. I think you guys know that from one of my previous videos if you have subscribed to me. But yeah, that's why I got a couple of boxes still on the couch because I don't know, when I shop and order stuff, it's like, why, why open the boxes? I'm going to be moving anyway, so I just leave it there. Anywho, the next braid, this will be in a subtitle. However, I'll tell you now, I braid 3/4 of the way down, and then 3/4 of the way down, I stop and I connect that previous end of that braid. So I will go ahead and add my leave-in conditioner from Rezac and make sure that it's all over her roots because we want to make sure her hair is conditioned. I do have my clients come with their hair freshly washed, blow dry. If you're getting a full sew-in, I'm okay with you putting products in your hair, but it's up to you. Some people still don't, but I will still take care of your hair. So like I said, 3/4 of the way down, bring the connected braid. You see that? I'm pulling it up and I am braiding it into this second braid. So I am going to braid that down, and you'll see really, really clear when I get to the next side. You'll see how like every braid on the opposite side of it is connecting to the inner braid., but, um, that will become more obvious to you. And again, I know this in every video, but I want to make sure y'all realize you can stop, rewind, expand, make it smaller, bigger, stop, rewind again this video. So please do not say I went too fast, I went too slow, because there are some things I even do in slow motion. However, this is YouTube, so it's not one size fits all. You can stop and start and play whenever you feel like it. So I'm doing the end of that braid, and I really hate putting music in my videos, so that's why I talk so much. But I do feel like my videos are very thorough, whereas I don't really hide anything that I do. There's nothing that's kind of eliminated from what you all see. So there's my leave-in conditioner, and I am braiding. And as you all will see, I do braid with my middle finger on one hand. I don't know where I got it from. I don't know where I learned it from. But even when I do slow motion on the other side, you'll see like I have my right hand where I braid with my middle finger instead of my index finger, and then the other hand I do with my point finger. Weird. So I have already picked up the end of that second braid and braided it into— and there's Harley— and I have already picked up that braid, but you'll be able to see it more. The more braids I get done, the more you'll be able to see when you look at the back of her head. You'll see the pattern of the, the prior braid being lifted into that next braid. And you all will have to excuse me, it is like 2:30 AM Central Standard Time, which is where I'm from. I'm in California right now, so it's 12:30, and I am just tired. I've been drinking, but I really want to get this video up for you all because I want you all to be able to make more money. And yeah, I'm trying to give it to you all as fast as I can. I'm sorry it's late.. But you see kind of now the pattern of the back of that braid, and it is all being brought into the next braid, which to me, it leaves it for a flatter finish so that when she goes to take her hair down, everything is still flat. Even when she wants to lift her hair up in a ponytail, there's no lumps. I don't have to sew each braid into the next. It's just so simple to me. But finishing cream again, and I'm braiding straight back, blah blah blah, said that before. And, um, yeah, at the end of this video I think I'm gonna put up like a bunch of frontals I've done. Um, I really, at this point, hopefully you all have subscribed and you've seen most of my prior videos so you know my level of expertise in this subject to where I don't have to keep posting why I am beneficial to you. Um, but I might just do it just in case because there's some people who maybe this is the first video you've run across, and I understand that. So anywho, next braid, blah blah blah, and I will come back and speak after I've gone to the next side because that's where things slightly change up a little bit. So you see, I'm, I'm about to hit you with the slow motion and show you how I bring that previous braid up and I braid it into this braid, and I'm 3/4 of the way down, and that leaves for a flatter finish. Like I said, you don't want to keep having to sew the end of each braid down. You don't want the client to have to cut through a bunch of thread when they remove their sew-in because for me personally, when I get a sew-in, I, I get it for convenience. If it takes me 5 hours to sew it down, if I'm cutting my hair out to remove it, it kind of defeats the purpose of a protective hairstyle. So I want something protective while it's in as well as when I have to take it out. So now we are ready for the next side, in which I will show you where I actually stopped the first braid. And you see that this braid is stopping like right at the back of her ear. And it's not going all the way down to the bottom corner like the other side. And that's because not each side is even. On the left side, I might have gone too far down. On the right side, I may have gone too far down. So on the opposite end, I make sure that I leave myself a leadway of room to go all the way down. I don't want her middle braid to stop at the middle of her head. And I'm— I hope you understand what I'm saying, but you'll see once I get to the middle, the middle braid will go all the way down to the very bottom of her nape, and it won't be too little space. So as you see, I'm 3/4 of the way down of this braid, and I'm still going to bring that outer braid into it, and I am going to braid that all the way down. And like I said, once I get further away from the outer braids, you'll start to see the pattern and the overall look And here I'm bringing it up and I'm just braiding it right in. And I'm sorry, you guys, I am not— I know that I do a very detailed video of how to install and how to sew, but as far as braiding, it's very hard for you to get what I'm saying over video. And I just— I have patience for a lot of stuff, but braiding is one of those things where either you are learning in person or you get it or you don't. Like, I can't— I'm sorry, I just can't do a YouTube video on how to braid. But, um, you see that one? It's still not down to the corner of her head. It's not all the way down to the bottom. This one will probably go all the way down to the bottom, but the, the last one did not. In that way, it gives me room so that I'm not running out of space in the middle of the bottom of her head to finish out those middle braids. So again, you see I use my leave-in Rezac cream, and I'm bringing that in a third of the way down. And I brought, I brought that braid up and I braided it in. And like I said, on the opposite side, you can see more with this angle of each end that I brought up into the next braid. And I say this in all of my videos, it takes practice, it takes trial and error. This is not something that you will see this video and say, oh my God, the light's on, it clicked. It's not going to happen that way. It's going to take trial and error. It's going to take you practicing and doing it on your own for you to actually get it. But again, here's another braid straight to the back. And as you see, you see the edges of her hair are still kind of fuzzy. Because I cannot— with the frontal, you cannot start the braid at the very edge of her hairline because that braid will show unless you put the frontal on top of her forehead, and that's just not a realistic look. So there's the next braid, and you can see the ends of those braids braided up. I just love braids, they're so pretty. But, um, what's her name? I think her name is Beauty Can Braid. Oh my God, her videos just— she's African and she's just good. She's really good. But anywho, um, another straight back. Now since I'm on the last braid, I'm just going to split it in the middle and put the, um, leave-in conditioner inside the braid. And then I'm going to go ahead and braid it back because I still want that braid to be moisturized. Now on this particular braid, you will see how I take the left end of that braid and the right end of that braid and I bring them both into the middle braid. That way I only have one end to sew, or not to sew up, because I don't sew the end of the braid. I don't want my client to deal with that. But you see, I took the left braid and I am braiding that into the middle braid. And after a couple of strokes, I will take the right braid and I will braid that in. And I actually just kind of twist and intermingle that into the ends of the other braids and sew it down while I'm sewing the sew-in so that she only has one set of thread to take out. I don't want for my client to have to take her sew-in out and then have to take out another set of thread inside the sew-in to get her sew-in out. Like I said, the whole point of my sew-ins is for a protective style. You want it to be protective while it's in and when they remove it. You don't want them to have to cut out their hair to actually get the sew-in out. So as you see here, I'm tucking that braid in and I'm tucking it through another braid. And when I do the sew-in, I'll actually sew it— I won't actually sew it by itself, I'll sew it in with a sew-in. And I hope that's clear. For you all. So now that you all have seen exactly how I do the braid pattern, everything else I have separate videos for, and I have very detailed, like, 16 to 17 minute videos for. So, um, as you see right now, her frontal is actually on, and I'm going to stitch that down. And as for the rest of this video, you all can go ahead and watch if you feel like it, or you can go ahead and look in the description and click on the links to show how I actually sew down the lace frontal and what I'm doing now, like dropping the comb. But, um, styling and everything else I have in separate YouTube videos. So if you guys want to just watch along right now as I kind of feel around and sew everything down, you can. I'm just including this just so you all can see in real time, not fast-forwarded, not slowed down, how I'm kind of doing things. And if you have questions, please leave those in the description. But go ahead and subscribe, you guys. I am so grateful for you guys. As of right now, I'm at like 22,000 subscribers, and I appreciate each and every one of you all. But go ahead and subscribe, leave a comment, leave a question. And one thing I want to address, if you all don't realize by now, my comments are filtered. You cannot leave any comment if I feel like you're being rude or disrespectful to my client or to myself. It will not be approved. So it's kind of like a waste of your breath because the world won't see it. You'll kind of be like an internet thug on your own, and it's kind of like pointless. But anywho, um, if you all have questions or something positive to say or some kind of constructive criticism, which I can take, go ahead and leave that in the description or in the comment box below. And go ahead and subscribe, share this video with other stylists you think may need to learn the technique, or, um, that may want to learn more information about the technique. But I will see you guys soon with the next video, and I hope you guys enjoy the rest of this. All right, bye! If you enjoyed this video, please subscribe. Don't forget to comment, rate, and share this video with fellow stylists or clients that you want to see my work.
More from LaToya






St. Louis, Missouri - Lasts 4–6 months - Takes 4–6 hours - Investment: $3,000 www.TTDoesitall.ai


What are #ktips? Here’s your answer! Schedule at www.TTDoesitall.ai 🩷 #extensions #ktipextensions

4-6 hours install and last 4-6 months #ktipextensions done by the right stylist the right way 💕

Located in St Louis Missouri 💝 Consultations available www.TTDoesitall.ai 💕#ktips #natural

K Tips take 4-6 hours to install and last for 4-6 months with proper care! #ktipextensions