DIY Natural Crochet Hair Style by @TTDoesitall
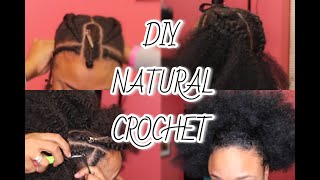
LaToya Kelly recreates a natural crochet hairstyle using Xpression 3X Kinky Crush bulk hair, walking through sectioning, folding, and the crochet process. She shares where to double-knot, how many sections work best, and why her mix of dyed and natural hair made it trickier than the original.
Chapters
Hey y'all, it's your girl TT back with another video, and this one's different from my usual videos, okay? This one I am going to duplicate a hairstyle that I saw on YouTube. Yes, that's right, I watch YouTube videos and sometimes I'm like, girl, that looks good, I want to try it. And oh my God, it was not easy. So this is my base, and this is me. Hey y'all! So this is what I'm starting out with, and I am going to finish with this little video you see at the bottom. That's the outcome. Okay, not as easy as it looked. It was easy, but we'll talk about it. So I found this video, and her YouTube name is Miss Naturally Mary, and I searched on YouTube natural hairstyles because I— let's talk about this— I was completely natural at one point. I— my hair was red, and I'll post a picture of that. My hair was completely natural, and I was so sick of that red, I wanted it jet black. So I dyed my hair jet black, and I don't know what box dye I used from that store, but honey, when I tell you my hair never reverted back its natural curl pattern. So I have grown my hair back out and I'm just starting over again, and I did not do the big chop. I'm just letting it grow out natural. So I have about 2 inches on the end that are still straight— not relaxed, but straight somehow from the black dye that, as you see, didn't even take because my hair is not even black in this video. It was black, but how does non-permanent black dye straighten my hair but doesn't leave my hair black. Okay, whatever. So I left out hair all around the outside of my head so that I can pull it up in a high ponytail just like she did in this video that I watched. Okay, and again, this video that I watched will be in the description. After you watch my video and you watch hers— hey girl, hey— you will be like, uh, yeah, you can see probably why I got it wrong. And there's just— there's a lot of tips I'm gonna give you. So my hair, one thing that I do know is my hair is shorter than hers. So that is another difference. Her hair was completely natural and it was a beautiful, pretty length and curl pattern, and it was all natural. She didn't have any straight ends like me. So if you got straight ends like me, this is not a transitional hairstyle, okay? This is the hair that I use. It is the Xpression 3X Kinky Crush Bulk 36-inch, and I got the number 2. She got the number 2, I think, but I probably should have got a number 4. Because my hair is a dirty ashy brown color, and in some pictures it looks good, but in some lighting it looks terrible. So it came pre-sectioned off, so there are 2 bunches in each section, and 2 bunches each have their own little sectioned off pieces in it just to make it easier to manage. And she showed exactly how to cut off the straight ends, and I'll show that as I'm going to But I'm just crocheting this in, and I was thinking to myself, how am I going to see the back of my head? But I didn't. And I, I don't know, I guess you just kind of finger your way through it, and you just kind of feel where there's already something latch hooked in. Another tip for you guys, she double knotted hers when she put them in, and in that video she says something on the lines of they still held without being double knotted, but she just did it just because. So I was like, well shoot, duh, I'm about to save myself some time and I'm not gonna double knot it. Now warning, on all of that hair that's not in those two braids, I would double knot it because it just slides across your head. You want to double knot right where I am now. If you are not latch hooking on that actual cornrow you want to double knot it because it just slides up and down. When you double knot it, it doesn't slide, it stays right in place. And honestly, I might do a redo of this video because I think that you could get a much better outcome that holds and is more durable with doing some different braid styles. But this is a very easy— and I'll give it to her— this is a very easy, quick, I need my hair done, I need something in something just cute. And this, it really was that. But if I were charging someone to do this, I would do it totally different. So I'm gonna do that. I'm gonna actually do that on somebody. I don't know who yet. I'm gonna think about that. But comment, drop a comment if you are in St. Louis and you are like, hey girl, I would love this look, redo your thing on me. Drop a comment in the description if that's— I mean, in the description, in the comment box if that's you. So, and maybe we can get together on it because I need a model. Um, so okay, she did hers into ponytails. She did a high ponytail, she did it in like the half up half down. Oh my God, it looks so beautiful on her. But her hair was just as long as this hair, and hers was beautiful. Honey, it did not work out for me like that. So I feel sorry for y'all now. Like, y'all be watching my videos and y'all probably be like, oh, I could do this. And then you'd be like, wait, So some things just come natural for me as a hairstylist doing hair versus someone who's like, wait, I do not normally crochet, this is not my forte. There's just extra tips and help you need. So trying this out really told me like, wait a minute, I need to do some things differently when I talk about my videos and how I do everything. But I folded the hair in half just like she did, and I cut off that straight end. And you see how much is left. Girl, get out the camera, we see you. But I'm gonna tell you one thing, and I'm just kind of showing you what the texture of the hair looks like and the curl pattern of it. It's beautiful. Like, the hair is actually really, really pretty, and you could really pass for it being your own. But I would not do it if you have not chopped off that relaxed hair because it just looks stupid blended in. But some people have time. I don't time to do like maybe a straw set on your head or something and just kind of make maybe flat twists. I just don't have time to mold my hair. So I am already— I've already used half of a bag on one side. And that's another thing, I feel like I used way too much hair. I am a very tedious hairstylist, so I like to be very, very neat. I don't like gaps or spaces. And look at that, it looks really good until I pulled it all the way up, and then those things start sliding right back to that braid. So here's the next one, and you want to chop off that straight end, and then you take off that rubber band, and then you just fold it in half and you let you get in. It's very, very simple. It's very easy. This is a very easy DIY. But, um, I think I also used way too much hair. Her hair was so pretty, and it was a lot less hair than mine. So when I got done with all of this hair, I was like, okay, now what do I do? Here's another thing, I don't deal with my natural hair, so why was I thinking that I was about to put crochet in to make my hair a big fro and I was gonna actually do something with it? I don't even do my real hair. What? So yeah, I would love to redo this on somebody else though, because I feel like it would be beautiful. But I have to look at your natural hair. We gotta see, because again, you cannot be half natural, half straight. You got to be all curly, honey. And the last thing that I noticed that I did a lot differently, which I didn't even realize it, is what she said she did was each sectioned off little rubber band thingy, she broke that into 3. Honey, when I tell y'all, I broke it off into like 10. So it made my hair come out a lot bigger, and I feel like my coils of the natural texture were a lot more poofed out because I broke it into so many sections. So do what she said, break it into 3, okay? Because what I did was just not the business. And then finally finishing, you see how it moved up. Now I'm going to go to that other side and then just crochet that in. I tried this because it was so beautiful and I thought this would be a get up and go, but I am honestly not a go to sleep, twist it, flat twist it, go to sleep, and then wake up and do it. And I'm just not that girl. So I want to do this on somebody who is that girl because this is a beautiful hairstyle and it's a beautiful look. And it was a beautiful outcome. It just— I couldn't do it. I don't know why I couldn't do it. Somebody tell me why I couldn't do it, why it didn't work on me. Wait till y'all see once I get all this in, how I react and what happened. So if you could not tell by this video already, I am pretty sick. I— my nose is running, I'm sneezing, and as I get finished with this, I'm like exhausted. And I'm like, okay, what am I gonna do now? Because I don't feel like mine looked how hers did in the end. But that's probably because I didn't flat twist it and sleep on it. So I was like, let me try my favorite mousse. And here's where you're gonna see that my ends are so straight that this was just not gonna work unless I flat twisted my hair. But in the middle of my second episode right here, I just did not get that. So yeah, I'm trying to feel it and figure out what am I gonna do. But I was like, you know what, I'm gonna go to my favorite edge control, go to my favorite edge control, slap an elastic band around my edges and go, because that's pretty much all I could see to do. I had to tuck those straight ends right there. I had to tuck that in. So if you are 110% natural that's the best way to go because you don't have to worry about those ends coming out. But the hair was pretty. It did blend with my roots and my natural texture. Oh my God, I'm just sick. Don't ever do a YouTube video and do a new hairstyle with a big hair— a lot of, a lot of hair and big hair while you sick, because I was pretty frustrated. And this is like like uncut of me doing my own hair, okay? Because I feel like the video I watched, she made it look so easy, and I was like, this is just— I'm, I'm not feeling it. But it's— it was me. I don't know if it was because I was sick, if it was because my hair is really not fully natural. But then I was like, oh wait, she cut it. I forgot about that part. So I think that my hair would have been a lot easier to manage if I didn't use as much hair, and also I had to cut it. But it's beautiful. This is such a pretty natural hairstyle, and it's just low maintenance. She tied her hair down as she slept overnight to let her flat twists set. I never tie this down. I'm sorry, y'all, I just don't tie it down., and I just get up and go. And there it is. So after I cut it and got it shaped the way I wanted to shape it, here is what it looked like up close and personal. And let me know what you all think about this. Again, if you've tried this hair, send me some pictures. My email address is in the description below. I want to see what you all think. If you're in St. Louis, hit me up, and I will see y'all in my next video, I need some NyQuil and a nap, honey. Okay, and to cut that piece. All right, y'all, I will see y'all in the next video.
More from LaToya






St. Louis, Missouri - Lasts 4–6 months - Takes 4–6 hours - Investment: $3,000 www.TTDoesitall.ai


What are #ktips? Here’s your answer! Schedule at www.TTDoesitall.ai 🩷 #extensions #ktipextensions

4-6 hours install and last 4-6 months #ktipextensions done by the right stylist the right way 💕

Located in St Louis Missouri 💝 Consultations available www.TTDoesitall.ai 💕#ktips #natural

K Tips take 4-6 hours to install and last for 4-6 months with proper care! #ktipextensions