How to: 💁🏽Deep Side Part Sew in
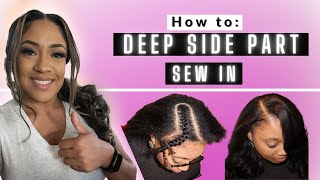
LaToya Kelly shows how to sew in a deep side part, a technically demanding style where the first weft track angles from higher on the side toward the face. She uses curved needles, dark brown thread for visibility, and emphasizes that practice and honest client communication about coverage are essential before attempting this on paying clients.
Chapters
Hey everybody, it is TT back with a video of how to do a deep side part sew-in. Now here I'm going to show you a few different clients because this is a highly requested sew-in. A lot of people want the deep side part with the hair in their face, and, um, it is— to me, it was the last sew-in that I learned, of course, before the closures and stuff came into play, because to me it was the hardest and it took a lot of detail to get it flat or to get that hump in the front like some people want. So this was a very tedious sew-in to learn, and I'm happy to teach it to you all. There's two parts to this video: the demonstration in still frame and video. First up, we have still frame, which shows you where the placement of the first track goes. So it goes higher up on one side of the head than it does on the other side because this is going more towards one side of her face. And here you can see where I am still sewing side to side, but eventually the track starts to go towards her face, and I leave out that outside braid so I can sew another way on that. So I sew towards her face, and I never cut any of the tracks, leaving that first braid out. I have a video of folding over the tracks. I have a video of my stitching and everything, and those are in the link below, but those are a separate video. But this is showing exactly how I stitch it down, and then I'll show you the video of me actually doing it on another client. So it's all sewn in, and the finished product of course is here. She's flawless. She has that swoop in her face, which I call my SSS, my sexy signature swoop. Because this is my favorite sew-in. So here you can see I start my first track going right there at the corner, and this is the side that has more hair, the hair in her face. So this is the side of her head where the swoop goes, and I sew right on the corner starting there, and then I stitch to the back bottom corner. So she's not leaving any of her edges out. She's just doing a natural part leave-out sew-in. And some people call this a full sew-in, but I do not, because a full sew-in means that you don't have any of your hair left out. Here she has her natural part left out. So I sew all the way to the back corner, which is behind her ear, not above her ear like the other side, and I fold over the weft. And this video is not showing you how I stitch, and it's not showing you how I fold over the weft, those videos are separate and they are in the links below. So if you are really wanting to see that method after this, then that, that's fine. But here you see I'm stitching back to that same point right above where I left off. I'm folding it over and I am sewing right back the other way. And you see that fold over is nice and flat, so she's not going to have any worries of anything being too heavy. And I do not cut my— I'm sorry, I don't tie my thread when I cut it at the end. Um, that's in another video as well. The link will be in the description below. But, um, I do just stitch and I reinforce those ends, and then I'm going back to stitching to the other side. And you see, I haven't done anything different. I'm just going higher up on one side than I am on the other side. Because this is a side part and not a middle part. On a middle part, you will go the same, the same height on each side, but on the side part you aren't. So I am still on her first bundle of hair, which will be her longest length. In the longest length, you don't want that part cut into the bangs, so I am continuing to fold it over right above the last place that I stitched down. And then I'm going all the way to the other side, and I am going to fold it back over and come back around. One thing I will tell you about a deep side part sew-in is it does— sorry about that— it does take a lot of practice and a lot of trial and error. You have to kind of be able to eyeball how much of her head is left to stitch on and how much hair you have left to sew down. You also have to have my fold-over method down to a pat— you gotta have it down because if you don't, you won't be able to double her wefts. So I am doing hers as single wefts, but if this customer was one of the customers that had 4 and 5 bundles of hair, then I would have needed to double the first weft, which you would still want it to lay flat. So here's where the technical part of the sew-in comes. I am stitching on that front braid, and I am not going to stitch on that very small braid. You see, I didn't touch that first braid that is closest to her part, I am stitching right up to it. So right there, that braid is not being touched. I am stitching right to it and I am folding it over and I am going right back over. So I still have some room left on the other side and I am just going to stitch right to it. And I am going to— and as you see, I did not cut that, that thread. I just keep going with the next thread and I only cut the very last thread I use, so I don't have to tie— I'm sorry, I only tie the very last thread I use. So I'm stitching, stitching, stitching, going around to the other side, and you see I still have room, and I will not run out of room, you guys. Like, I will literally go back and forth and it'll be precise, even on both sides. So again, this is not something that you're like, well, wait, I can't figure it out. This client's head may be bigger than your client, or your client's head may be bigger, or whatever. They may have more hair, less hair, whatever. It's not going to be exact on your first try. It takes trial and error. So get your sister, your cousin, your auntie, your mom, someone to let them practice, or let you practice this technique to get it down. So I am still going back and forth, and I'm still bringing the hair in her face. Because she does want the hair to go in her face and swoop over. So I'm just going to keep stitching, and it looks like I'm running out of room on one side, but I'm not because this, this side is being folded over, and it does take over a lot more room to do this hair in your face on this side than it does on that other side to just fold it over right on her edge. So as you see here, like I said earlier, I am not touching that first braid closest to her leave-out section. I'm just folding it over and I am sewing it down and going back the other way. And you see how I still have one bundle left to sew in, and I am just about done with this bundle. So I'm going to fold that over, keep going the other direction, and then I'm going to start sewing in that last bundle, which you would rather have extra hair than not enough hair. So if you do have one of those clients that wants every single bit of their hair left in, you just have to be realistic with letting your client know, hey, this is a newer sew-in for me, so I may not get all of it in, but I'll try as best as I I can to get most of it in. You just have to be as honest with your clients as you can when you're learning because they'll stick with you. And sometimes a cheaper sew-in while you're learning is better than an expensive sew-in for someone to not tell them they didn't really know what they were doing in the first place. So I am adding my last bundle and I am stitching still back to her edge on this shorter side, and then I'm going back to the swoop side. And I'm sewing it back. And her hair is actually some deep wavy hair, which she wants it straightened bone straight in her swoop. So I am going to straighten it out for her. This hair was provided by my client. It is not my extension hairline, so I do not have the specific— these specifics on it, nor do I know where she purchased it from or anything like that. So I don't have the answer for those questions for you., but, um, yeah, if you just keep watching, I'm going to stitch back and I'm— looks like I have the exact same amount of space on both sides now, as you see, because one side takes up more room than the other. So it does balance out. It may look uneven, but it does balance out. And sorry about the other customer, I was actually doing a consultation as well as recording as well as sewing in. So, um, yeah, this is the second to the last track. This is the track that goes right under the last braid to sew onto, and I sew very close to that braid because I want— I don't want anything, of course, to shine through. I don't want you to see any spaces in her hair. And you also want it to lay flat while doing it. So sometimes while stitching on half of that first braid, you can kind of maneuver it to kind of pull down so the braid is kind of pulling down towards the sew-in so that when you do the last stitching, it's super flat because you're sewing on kind of half of a braid. And, um, The braids do have to be a certain size, so look in the description for my braid pattern video, but that is a separate one. This video is long enough. And if— I've seen a few comments about my stitching and do my clients have problems with it becoming loose, and the answer is no. My sew-ins last until they are cut out, and they do not come out any sooner. The braids grow out, the sew-in is still intact. So no, my stitching does not come out, thread does not come loose for my clients. I never, and I can guarantee that and open my comments up to the public, my, my wefts do not come out. Until you cut them out. I find a benefit in using the dark brown thread because it's easier for my clients to see when they're ready to remove their sew-in, and you don't have to worry about the brown showing through. As long as you have enough leave-out to cover those tracks, they will not show. So those tracks that I folded over, I am holding them the opposite direction and I am stitching them down with the track. And laying them flat. So I don't want there to be those humps underneath my client's leave-out, so I'm stitching over them, not on that first braid, but I'm literally stitching those tracks down. And then I will go over them with the last row of the sew-in, which makes it even more flat when she combs her hair over. Now, this is YouTube, guys. Remember, don't be frustrated because you may not be able to see something, but expand the screen, make sure your video is in HD because HD is available for this video, and you can pause it, you can rewind, you can go back and forth, and oh my God, I have been tongue-tied this whole entire video, but I hope that it's it's understand— or something you guys can understand in this video, because, um, this is a very technical sew-in to me. The middle part sew-in is just so easy. You go left and right, left and right, left and right. This one you have to go more to the left and less to the right. Then you have to go toward their face, so it's not even left or right, it's kind of starting to go another— in a circle. So it is very technical, and once you get it down, you will fall in love with it, especially the outcome. It just really enhances a lot of my clients' self-esteem when they get the swoop and they see that their hair was natural and I blended it in with the extensions and they have a swoop. So it is really a fun sew-in to me, but I'm going to go ahead and continue stitching on the last braid. And of course, I am still using my dark brown thread, but I switched on my last track. I switched to a short curved needle. So I was using a long curved needle, but once I get to the very top, I switched to a short curved needle. And I love curved needles. I don't use straight ones. Curved ones make it a lot easier. Um, so yeah, we are finishing this up. In the next part, you will see— you'll see her necklace now, so you'll see her same necklace in the ending video to show you it's the same person. But I did straighten her hair out and cut it and style the bang. The styling video, um, the actual blending of her natural part leave-out with her extensions I have a video, a very detailed video on that, which a lot of my subscribers do enjoy. So if you all enjoyed this video and you want to see more like it, or you have more requests, please feel free to comment below. And don't forget to subscribe because I love seeing my emails with all my new subbies. So you guys enjoy the rest of the video, and I will see you soon with my next one.
More from LaToya






St. Louis, Missouri - Lasts 4–6 months - Takes 4–6 hours - Investment: $3,000 www.TTDoesitall.ai


What are #ktips? Here’s your answer! Schedule at www.TTDoesitall.ai 🩷 #extensions #ktipextensions

4-6 hours install and last 4-6 months #ktipextensions done by the right stylist the right way 💕

Located in St Louis Missouri 💝 Consultations available www.TTDoesitall.ai 💕#ktips #natural

K Tips take 4-6 hours to install and last for 4-6 months with proper care! #ktipextensions