How to do Bomba Skinny Twist on YOURSELF!
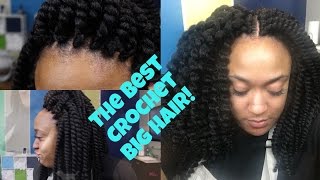
LaToya Kelly installs Bomba Skinny Twist crochet extensions on her own head in Seattle. She layers 8-inch, 10-inch, and 12-inch pieces for a bob shape, starts from the front, and spends about two hours total on braiding and installation. She shares tips like keeping extensions close to the scalp and using gel for untwisting.
Chapters
Hey everyone, it's your girl TT back with another tutorial of crochet. And this is myself, I did these on myself. This hair came with 3 different lengths and yeah, I freaking loved my hair and I still have it in. I'll show you at the end what it looks like today, but I used KeraCare on the front hair of the hairline just like I did with my sister's on the last video. But I am using some braiding hair in it, and I'm using that to kind of make a thick, sturdy foundation so that when I latch hook the extensions in, it's sturdy and it's strong and it's not having a lot of tension on my natural hair. Because who wants their edges to come out? Not me. So yeah, I'm doing mine the same way I did my sister's, the exact same way. I'm just using different hair. And I am going to add in the description below the time frame of this video so you can click on the different times to fast forward to different parts. But yeah, I'm in Seattle right now. What is today?
It is September 29th.
So I'm in Seattle right now working on all of these uploads that I've been recording over the past month or so.. And, um, you all are going to enjoy the outcome of this look. It is so pretty. Um, I am finally doing a tutorial on my own head, and I do have some sew-ins coming up too. Um, I'm going to show you in the bottom left corner. I actually received some hair from two companies that I'm going to be doing a video on as well, and they're curly extensions. So I can't wait to do that sew-in on my own head. But let's go ahead and speed this up. French braided my hair again exactly like I did my sister's. You guys, I am natural. I am not, um, relaxed, and my hair has been growing out for a year now from a mohawk, and my sides were shaved off like bald. I didn't like any hair on it. I didn't like the fade look. I wanted it completely bald. So yes, my hair has grown completely out from that in a year to what you see now. My ends have been clipped and straightened out, but Again, I am completely natural. So I'm braiding this side just like I did the other side, and I'm kind of connecting 3 to 1 braid in the back. In this video, I'm in Kansas City, and I'm recording this in my friend Nisha's shop. She's a nail tech. The salon is called Nisha Nails. You guys should check her out. She's who always does my nails, and in my up-and-coming videos, I will be showing you all her doing my nails, and she's very creative, very talented, very tedious and precise, just like me, which is why I love her so much. But, um, so you may see that movement going on in the background. Every time I come in Kansas City, my videos are typically recorded in this shop, so you all know about the background activity by now. But I am braiding my own hair again, back to that, which is what a lot of people have been asking for. They wanted to see me do it on their own hair. Hair. And I am— I don't usually do my own hair. Now that I am kind of, um, stuck braiding my clients— my braider is having a baby in November and, um, she can't braid as much, so I braid a lot of my clients' hair, which is why I don't have nails on in this video now. So I'm like, hey, what the heck, I don't have nails on, so I might as well do my own hair. I can braid my own hair without nails. I cannot braid my hair with nails. So, um, yeah, this is me braiding my own hair and doing my own crochet. Um, and oh, one thing I had noticed that I did in this video was the middle part. I kind of struggled with getting the middle of my head, and I didn't realize how important it would look to the overall outcome, but my middle part was so not even. So, um, you'll see like one of the sides is parted bigger than the other side, but I mean, it still came out good. But I am just very particular and tedious about my work, and I'm a perfectionist, so I did notice it. And if you are the same way, then you will notice it as well. But yes, I did braiding hair in each braid. Someone asked me in the last video how many braids I did across the front. I actually don't know, and as I'm braiding, you can count them just like I can, because that's what I would probably have to do. I have no clue. Um, I just go and whatever evens out and equals out is what it is. So, um, I don't know if y'all will have questions about this, but make sure you thumbs up the video. Um, add your comments to it. Tell me what you thought about the outcome. Um, again, you see I am not even using a mirror to see the back of my hair. So hopefully the parts look good because I'm kind of seeing it with you all. If it doesn't look good, then the outcome look good, so that's really all that matters. But I am putting the extensions in on the other side just like I did the first side, and I am using more than one of those braids from the front to connect to the back. So I'm just kind of rambling right now because, I mean, it's a long time. So maybe I'll speed it up, stop talking for a second, and come back, um, after I finish braiding.
So I've already started adding them in, and here I am using the shorter inch first because I want it to be really big. So there's 8 to 10 and 12 inches that come in the pack, and there's 3 packs of course. So I use the 8-inch at the bottom, and I also used it around the bottom braids right here in the front. And then I will use the 10-inch on top of that, and then the very top I will use the 12-inch so that the top is longer. It kind of stops like a bob. One difference I noticed between myself and like Beauty Can Braid is she starts completely in the back. And then she works her way to the front. And since I am new to the crochet, I would rather start with my front as well. With this technique, I needed the short ones to fill up the bottom so that it would look right the way I'm doing the lengths. But now that I know what lengths I will have, I am going to make sure that my front is full first because Once I separate these, it'll be so big that nothing in the back will show. So that's just some of my thought process in the way I was installing the crochet hair. I did notice that some of the longer ones were overlapping the short ones, but I really didn't care because like I said, it'll be so big you won't even notice. Um, but yeah, I'm gonna go ahead and fast forward to the end. So even when I got like the first outline braids done, I kind of started playing with them and moving them around because I was so excited on how it was going look, and I do want to make sure that it looks like it's coming out of my scalp. I don't want it to look braided, like it's crochet. So I do go very close to the beginning of it, the part where I start using that braiding hair in my braid, just so that again it doesn't look like crochet. I want it to look like individual braids or just coming out of my scalp. So here's the finished look before I pull them apart, and I'm just going to play around in them so you can see how they look, and then I'm going to zoom into the front of this hairline so you can see how it looks like it's coming straight out of the scalp. You cannot see any of the beginning of those braids at the head of that scalp. Like, I love it. So I'm messing around in it, then I'm going to pull them apart, show you where half of them are untwisted and half of them are twisted still. So the back looks nice and full, and I'm like, yeah girl! Now I'm about to untwist them all, and I'll show you half, and then I will finish untwisting the rest so you can see. But this total process took me 2 hours. I did the braids, came back, and did the rest of it after a couple clients. But yes, it took me about an hour to braid my own hair, then about an hour to put all these in and untwist them.
So I need you all to take a second right now and scroll to the bottom and tell me what you think.
Did you like the left side better or the right side better? Did you like it twisted or untwisted? Because I may do these again and I may leave them twisted, depends on y'all's feedback. So go ahead and drop that comment below. So I'm going to go ahead and finish untwisting these with a little bit of help from gel. And yeah, you see how they're not all the way filled in, but when I tell you these things pulled apart, you can't see anything inside.
You'll see, you see how big it is, you can't see anything.
And this is from my phone on my Snapchat, if you all follow me on Snapchat, but this was a finished look that I loved. And then this is from, of course, my digital camera, which the description is in the information. So yeah, tell me, tell me what you think about the way I did the lengths in there, doing the longer first.
More from LaToya






St. Louis, Missouri - Lasts 4–6 months - Takes 4–6 hours - Investment: $3,000 www.TTDoesitall.ai


What are #ktips? Here’s your answer! Schedule at www.TTDoesitall.ai 🩷 #extensions #ktipextensions

4-6 hours install and last 4-6 months #ktipextensions done by the right stylist the right way 💕

Located in St Louis Missouri 💝 Consultations available www.TTDoesitall.ai 💕#ktips #natural

K Tips take 4-6 hours to install and last for 4-6 months with proper care! #ktipextensions