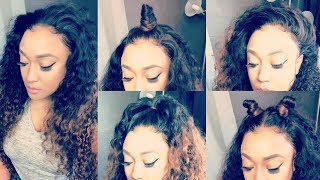
LaToya Kelly installs a lace frontal wig from Longqi Hair, measuring and sewing an elastic band, trimming lace, and styling baby hairs with cream. She shows three finished looks: a single bun, double buns, and a high ponytail with deep side part.
Chapters
Hey everyone, it's your girl TT and I'm back with another walkthrough video of me slaying a wig. And I do show me coloring this hair, so look forward to that video in the description below. In this video, I will be showing you me installing and styling it, so I hope you enjoy this video. Thumbs up if you did, leave a comment below, and I'll see you in the next video.
So let's get started. I'm going to measure this band to to the top of each ear on each side and stretch it out as much as I can comfortably without it being too tight back there. And that's where I'm going to cut. And honestly, it seemed too long when I cut it, but I said, oh well. So this is how it looks, and of course it stretches. I put in one of my previous videos, about 2 videos ago, what I use exactly. I got it from Joann's Fabric. So cut the excess lace off. I also have videos on how I do all of this, so again, I'll be in and out. Sorry, it's so low in advance.
What I'm gonna do first is put it on me to make sure that where exactly I want everything cut, laid correctly.
And yep, that's perfect.
And I'm literally cutting right above my ear. So where I will cut will be— well, not where I'll cut, where I will sew the band on will be from here on back. So where that knit— or where the frontal and the net meet, then literally from here to here, because this part will be all cut off. With your frontals, you want the hairline of it where the frontal is to be free so that you can just slick the baby hairs down, free part over your ears. You don't want the band to be pulling all the way up here because if it does, your frontal is going to stop way behind your hairline. You want it to be in front of your hairline. So if that makes sense, I haven't explained that really in a previous video, so there you go.
If you didn't know, this hair came in its natural state, and they really inspired me to color it, um, and it colored beautifully, you guys. Like, I didn't have any problems. The curl reverted back immediately. It was just beautiful. The hair is really beautiful. So now you see I got my elastic band on You see that I did not sew all the way up to the hairline of the frontal. I sewed halfway on the frontal and halfway on the back part of the net. So now I'm going to put it on, and then I'm going to get to customizing and cut that baby hair and do all of that stuff, because that's what makes this so great.
This better not mess up my eyebrows. Okay, okay. So you see how this is kind of a flat— that's exactly what you want because when you go to cut off anything here, you want this to lay at the corner of your hair. And of course I'll cut above my ear so that my ear is more comfortable underneath it. You see, you just want this to be perfect. So I think I am crooked. So you want to make sure each side is even. If it is not, you will have one side that kind of forms up on the side that doesn't.
So yes, it is very important to cut right above your ears to your ear lace, nice and comfortable. On top of that hair. So I'm going to clip one side and cut just above my ear. And sometimes you may have to go in— you want to cut longer versus shorter, so you want to cut too little versus cutting too much, because if you cut way too far up, it's going to look ridiculous. So even if you want to cut longer for the first time, it's and then go back in and adjust, that's fine. So I'm moving on to the other side. You see my band lays just behind my ear so that that frontal lays freely, so that wherever I lay my baby hairs is where it's going to be sitting. So cutting my hairline, I just cut kind of free at first, and then I go in and I adjust it to my hairline. My hairline is not straight across, so I tend to just cut straight across first and then kind of go in above my eyebrows where I have a different type of hairline. So as you see now is where I'm kind of cutting it and making it look like my hair grows. All right, and after you do that, you're good to lay your baby hairs.. And one thing specific about the baby hairs that I am laying is they are good for all styles. So if you lay your baby hairs at the exact places I lay mine, you can change your hairstyle any way with your hair, your baby hairs still laying the same way. So this is good as a stylist because if you have a client, and I have sometimes have clients who book a sew-in and they book for me just to install it, no style, and to lay the baby hairs. So if I lay their baby hairs exactly like this, the same way as I'm going to style my hair multiple different ways today, my client can too. So as you see, I am disguising everything I need disguised with any type of part after this by laying those baby hairs. I am using my baby hair cream. It's available in the link below. Which is all the things I use in this video. And I blow dry on cool. And as you see, this is just the baby hairs laid, no styling. And now I'm going to show you a few different styles to do. So let me know what you all think. Let me know which one's your favorite, because this is something that a lot of people do with their frontals. I may not necessarily go out in public a certain way, but to each his own. Everyone has worn this style— not everyone, there's someone who has worn this style. So whether you're young, 21, in school, and you're the hottest thing walking, or if you're a little cat girl and you like to dress in all black and leather, you know, like, people love their little top buns. So I showed just a little one bun up at the top. That's really trendy now. And then I'll show two. So I'm going to part it in the middle, and then I'm going to part for two little balls. And again, this is a really popular look now, so that's why I did it, just to be trendy. Um, so that is another look I did. Let me know if this one's your favorite. So this is look number two. The first one is the one bun, then you have the two buns, which is right here. Alright, and it's so easy to take down. I just use one bobby pin. So the next style, I actually have a customer who gets a versatile sew-in and loves to wear her hair like this, and she wears her natural hairline out. But for those who don't have the edges to achieve this look on their own, that's what the frontal is for. So, I just get a long strip of hair from the back, pin it up, and voilà! I have my little high ponytail which a lot of people wear. That is the ultimate look of this look. So, that is look number 3. Let me know if this is your favorite look. I have my to the side which I love either way. And then I went ahead and did a deep side part. You all know I love my deep side parts. Then I'm going to do one that's not so deep.
What I'm going to do now, because the, the front is a lot poofier than the back, is I'm going to brush some of the back so that it is kind of poofy like the other part. So the next step will be to blend the frontal into the rest of it. So to do that, let's see in the lamp. Hold on. Better?
Yes.
Tanged versus not tanged. I prefer tanged.
Bro, do you see this hair?
Yes, it's a frontal.
No leave-out, of course. No glue, of course.
With my baby hair cream, all I use is water and a towel, and I just towel blot it and it comes right up. This lasts at least a week. Um, honestly, it will last you 2 weeks if you tie it down completely, but with shower and everything, that makes it pretty difficult. So this is the inside of the wig, and I want to know which style is you guys' favorite, okay? So if you haven't already, leave a comment, thumbs up this video, and go buy this bomb hair, okay?