How To: NO GLUE NO TAPE Lace Frontal Wig Install on YOURSELF from MyShinyWigs
LaToya Kelly shows how to install a lace frontal wig without glue or tape, using baby-hair cream instead. She braids her natural hair, trims the lace, positions clips and straps, then blends the hairline with foundation and styles with a hot comb. Perfect for sensitive scalps.
Chapters
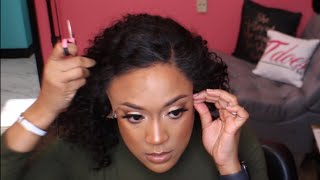
Hey everyone, it is TT Does It All and I am back with a start to finish of this look. And I'm going to get into makeup and I'm going to get into hair. This is my hair room, a little shampoo bowl. If you follow me, you all know what room this is, but I'll add a link to my shop. This video is packed with information, so you might not want to fast forward because you're going to miss a lot, trust me. This is me getting started with my girl Keisha. So we're going to get started with makeup first. YSL Beauty gifted me with this full coverage foundation. If you don't know about their line, they have a Touche Éclat line and they had the brightening all over pen, but now they have the high cover radiant concealer pen. So the all over brightening pen I use on the outside and the high cover I use on the inside, like underneath my eyes and everything. And the all over brightening pen I'll use like for the T-zone, which you'll see here. For the foundation, I use the color BD 60, and you can see that shade right here. And I'll show you the complimentary items that YSL sent me, which is the All Over Brightening Pen and the High Cover Brightening Pen, along with the All Hours Foundation, which y'all gonna see me smell this product when I'm using it with the frontal install, but it smells so good. I don't know if you all have smelt their perfume or not, but Ladies, it's a must-have. Anyway, so she's now about to use the brightening pen, and this one is the high cover. So the high cover you would use first underneath the eyes, and then we're going to use the all-over brightening pen. And you see she switched to the next one right there. So now we're using the brightening pen, and we're going to use that under the eyes too. And also in the T-zone. You all know that Keisha is who normally does my makeup, but this time I brought my makeup to her from YSL and was like, hey, I want you to use this because I got this from the company and I really want to try it out. And y'all saw in the beginning the outcome, but it was so, so, so beautiful. Oh my goodness. If you don't know your color in their foundations or pens, they do have a color match with whatever products you're using in the description. You can click on the link to the product and it will help match your color. I wanted my color to have like a seamless shadow, so I use the shade closest to my skin tone with the concealers. So for the Radiant Concealer, I use a 4.5, and for the Brightening Pen, I use the number 5. So that shows you, like, you'll see when you go in how close to my color that is. Um, and you'll know what I mean. If you play with their foundations and makeup, you will know what I'm talking about already. You guys, my hair is all over the place, I know, but we're gonna do that in a second. I got my hair colored, so there are parts of my hair that will not straighten back— curl back, I don't know what I said. But, um, even after this look, I posted a picture on my Instagram and everyone loved it. I'll show you guys that picture but I still am going to do my hair after she does my makeup, and I'll let you guys know what company and everything where I got that hair from. But now that she is done— look at that makeup! That foundation blend flawlessly with my skin. I will say that that all-over coverage is very, very good. I love it. So now that she is done with my makeup, I am going to get started with my hair, and this is from My Shiny Wig. And all of the information on this wig will be in the description. I will say that I did not have to do anything other than make this lace my color, which I'm also going to use the YSL foundation for. I did not have to tweeze, I did not have to pluck, I did not have to bleach the knots. This wig saved me a ton of time. It comes with the adjustable straps in the back of the wig and built into the wig, so it's kind of like, um it's already ready to go, really. No bleaching or not. So if you don't know how to do hair, this is perfect for you. All right, so I'm going to start with my braiding and use my CuraCare grease between each braid, which is also in the description. And I am just going to grease between each braid as I go. If you don't know, I hate doing my hair. I can't say it enough, I don't like doing my hair. So braiding my hair obviously is just so straining on my body. I'm too old for this. Not really, but it is straining. So I'm just going to braid my hair straight back just like I would do any of my clients, and then I am going to put the wig on top of it. And, um, I do have psoriasis. Shout out to all of you battling with psoriasis, you know what I mean. But with having psoriasis, I am no longer going to apply my wigs with adhesive. My skin is just so sensitive, it can't take it. So, um, yes, I am— this is a perfect opportunity to teach you all how I use my baby hair cream. Clearly I'm getting tired because I didn't start leaning back, honey. But I'm going to show you all how I use my baby hair cream to apply this wig instead of using any adhesive because my scalp just cannot handle it. It's just really too sensitive. I have one ginormous braid in the middle of my head. Don't judge me. So I'm going to finish up braiding my hair, and then I am going to get to the next step. So I'm cutting the bottom of the lace off of the back of the wig, and then I'm going to show you what the inside looks like., which has the built-in clips. It also has the built-in strap in the bottom of the back of the wig and also the middle so that you can truly make this a glueless wig. So I'm going to put this on the tightest one, and then for the built-in straps, I am going to put those where I usually put them. You guys want to try this out on your head because it's very hard to do this on your head, so try it out on your, see where it fits, if it needs tightening, and then take it off and tighten it and then put it back on. All right, so I am going to use my All Hours Foundation on the front of my wig, and I'm going to make this wig match my color seamlessly. When I told y'all earlier This smells so good. I just could not resist smelling it. Like, I just smelled it as I was applying it and I'm like, I need to smell this. I keep smelling it. But this is just going to be me applying the wig and I will teach you all how I apply it using my baby hair cream. So you see, I'm taking that strap and I'm like No. Okay, and then I'm putting that comb underneath. So I'm holding the front as I find the placement for that comb and then put that in there. And I am just going to mess around with it and see how it's fitting my head, see if it's close up to the front enough. And I don't want this messing up my makeup either, so I kind of flip that lace out. But I am going to cut a little bit in front of the hairline. All right, so as you see, I am cutting it, and I'm going to start with one side so you can see the difference in each side and see how it looks kind of plush to my skin and how well it actually blended. I'm also going to cut above the ear and cut that extra lace off because when you're doing glueless, you want it to be exact to your hairline. All right, so I want you to see how it looks right here. Gorgeous, blended from the front view. And then we're going to take a look from the side. Gorgeous, blended from the side view. So we know that once we put the baby hair cream on and kind of melt this lace in with that, it's going to look perfect. But I noticed that the side where the part came on this wig is where that huge braid is that I braided, so I'm going to flip it to the other side, and then I'm going to just clip it down and cut the lace on the other side. And again, you want to make sure you cut the lace above your ear so that, um, it matches. And as you see, it even matches from the other side. So I'm not making this up, no tricks or gimmicks. I'm really teaching you how to do this. So I saw a little piece of lace that needed to be cut, so I cut cut that off. But as you see, I have it like a half a centimeter ahead of my hairline because I'm not gluing it. It's already pre-plucked. So if you see these edges I'm taking out, these things are perfect. Like, I did not have to tweeze, I did not have to bleach knots. Look at how perfect the hairline already comes. Why can't all wigs just come like this? Questions that need answers. But I'm bringing out all the edges from the hairline so that I can apply my baby hair cream and cut. But if I really want to leave this like this, I could. It looks good, but no, this isn't the look I'm going for. So I'm using my baby hair cream, and I'm going to show you how much I'm putting on my finger. You see, it's a healthy amount and I'm thickly applying it on. So just don't be afraid to use the baby hair cream. I say that so much, but I'm so serious. Don't be afraid to use the baby hair cream. When you smooth it in and comb it the way you want to style it, you can wipe off any extra if you want to. There's so many ways to use it. I'm going to try to start teaching you all just different ways that I use it to lay baby hairs or just lay the frontal down. But I'm going to get up close in this for you so you can watch exactly what I'm doing. This is what I call my undefined baby hair look, so it looks like edges but it doesn't look like swoops. It's not like the defined baby hair look, and this is one of my favorite looks to make your frontal look very natural. So I am cutting that hairline down shorter make it look more natural. And I'm watching one of my premieres. Yes, I am always tuning into my premieres, so make sure when you see a video premiere, which is Monday through Friday but every Friday at 6 PM, make sure y'all are watching, okay? So I am just smoothing that baby hair down— I'm sorry, not the baby hair, the baby hair cream— I'm smoothing down, and then I'm just using the end of my comb, which the comb I'm using is in the description below. If you don't have a carbon comb, you need one. It is a lifesaver. I use them on every single client and myself. So I'm just taking those hairs that I don't want in my face and in my way, and I am combing them. And you see, watch how I do this with my finger. I'm going to show you what you don't want to do. So as you see, I'm using the end of my comb. But once you start trying to use your finger like they're baby hairs is when you're going to have a problem. Okay, so I was like, hmm, this— the middle of this frontal, I'm not really liking the way it looks, and I'm going to try to do something different because it's too patchy, like it's too thick of a patch. So you see me smooth it with my finger? No, that's not what you want to do. You want to break that up with the end of your comb so that it looks really natural. When you smooth it down, it looks smoothed down. I want my hair to look like I just tied it down and woke up. Like, I don't want it to look defined because defined baby hairs to me give away the fact that it's a frontal. I want people to ask, is that a sew-in? Are those extensions? Is that your hair? That's the goal. So I am tying it down with a neck strip, and I folded this twice, and I am I'm not putting it on my forehead. It is only on top of the edges. And then I'm going to tie that down the back. She's melting. So while she melts, I am going to flatten it to the side that I want to with my hot comb. And I will put a link to this hot comb in the description because I've had a few questions and I don't know why I didn't link it, but it's down there. So I am just flattening this out. This is actually my favorite hot comb. I got one from like Golden Hot and I hated it. This one I love. It gets extremely hot extremely fast and it's perfect for me. So I am flat ironing— or I'm sorry, hot combing it to that side. And then I'm going to use my YSL All Hours Foundation. It smells so good. So I am going to to put that in my part because I really don't want to tweeze. I don't want to tweeze at all. I didn't really have to and I don't have to. So I just want to put that makeup there to make that part look really, really natural. And then I went and did somebody's hair and I'm back to take it off. So some tips about my baby hair cream: it does turn white if you stick something to it while it's wet. So if you let it air dry, it will air dry clear. But if you stick something to it, the process of removing what's sticking to it will make it turn white. And what I do is I use a towel— not a paper towel, not a tissue, because it will have residue on it— I use a towel and a spray bottle with water in it, and I pat dry and pat clear that white part. So if you have that happen to you. It's not anything wrong with you, it's what happens. And it will turn clear once you spray some water on it, and it will not make it come up. Okay, so I just wanted to brush it out so you could see. And I need to get that lace out of that hair, it's like a piece of lace still in there. But I'm just brushing it out so you guys can see how it looks nice and full and brushed out. And it was actually pretty. I really wish I had left it like this because I really like it. Hm, if only I could see it on the big screen like I do now. Hm, but that is the natural state of it. But I'm going to apply some water on it and tone it down a little bit and show you all what it looks like after it's been brushed through and some water sprayed on it and just kind of finger combed through. So I'm just kind of taming the curls a little bit it so it's not so big. So if you like big hair, this could work for you with the big hair, and if you like it toned down, you could tone it down. But what do you all think? Did you learn something? A lot of people have been ordering this baby hair cream. So did you all order the baby hair cream and have problems with it? Drop a comment and let me know because I'm here to answer all your questions. You all know I use my baby hair cream all my clients and myself, so I really do stand by it. So you guys make sure you do not hesitate to contact me with any questions. So I'm just kind of messing around with it right now, um, I don't know why, I'm just messing with it to see what it would look like in different styles. But let me know what you all think. I end up just wearing it with the part that I parted. But, um, thumbs up this video if you did learn something and love this look. Like I do, and I will see y'all in the next video.
More from LaToya






St. Louis, Missouri - Lasts 4–6 months - Takes 4–6 hours - Investment: $3,000 www.TTDoesitall.ai


What are #ktips? Here’s your answer! Schedule at www.TTDoesitall.ai 🩷 #extensions #ktipextensions

4-6 hours install and last 4-6 months #ktipextensions done by the right stylist the right way 💕

Located in St Louis Missouri 💝 Consultations available www.TTDoesitall.ai 💕#ktips #natural

K Tips take 4-6 hours to install and last for 4-6 months with proper care! #ktipextensions