♡ How to Sew-in Your → 360 Lace Frontal *NO HAIR OUT* 2
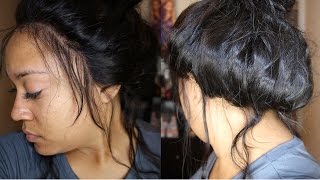
LaToya Kelly shows how to sew a 360 lace frontal onto braids without glue or tape. She cuts the lace at the hairline and ear, stitches it down with careful placement to avoid a crooked hairline, and doubles the wefts for coverage. The lace blends naturally with skin without makeup.
Chapters
But I am cutting off the lace right at the hairline in the back, and that's the side that's like right behind the ear. And you see it's all stretchy, and that's the front of it. And I'm still not cutting the front, I'm cutting the side right above the ear because that lace is really annoying. So I'm cutting it just straight so that the lace can lay on my forehead and I can do whatever I need to do while sewing it down and then cut it off once I'm done. So that— I'm cutting straight up just to get that lace from laying on top of my ear because as you saw earlier, it was kind of folding over. All right, so I'm kind of really close. Sorry about the zoom, you guys. You see that picture all the way in the right— or I'm sorry, all the way in the left? That is my college graduation picture. I'm old, guys. Anyhow, I say anywho in every video. That's so crazy. But for this, with my lace frontals, you guys know I do not use glue. I don't use tape. I don't use anything for them. Now I've had glue and tape and stuff because I've tried it all, but the objective is to do it without glue and tape and make it look realistic. Now as you see, I have not plucked anything and that hairline already looks realistic. Like, I freaking love this frontal, and you all will get the link. You see that there's a $10— I'm sorry, 10% discount code in the description and the website and everything is there. Um, it's perfect. Like, oh my God, it's so perfect. I can't say it enough how perfect this hair is. But, um, I am going to sew down right on that braid that's not coming— that's not going straight back. The braid that's going down and then back, that's the braid I'm going to sew onto. And I'm gonna— you must make sure that this is even on both sides. You want to make sure that not one side is further down than the other, because a crooked hairline is the ugliest thing with lace frontals, and of course 360 frontals too. So here I am just going to sew onto that braid just to secure it into place, because right now it's in the perfect position. Like, the temple matches up with my temple, everything just matches right up with my hairline. So I'm going to sew it right into place. And then I'm going to sew the back in, and I will of course show everything. Okay, so now I'm to the point where I am sewing the back down. And this is one of the parts where I'm like, if I could actually see what I was doing in front of me, this would have been a whole lot easier. Um, one thing that I didn't do is I didn't sew right to the edge of where the frontal stops on the bottom of the hairline. Um, if I were doing this on a customer, I would make sure that my stitch is right there so that when they pull it up, there's nothing to flap. See that? You want to make sure that the whole thing lays flat to her braid, like flat underneath the braid. Um, and that's something that I just couldn't see, but it still turned out pretty good. I just have to maneuver it kind of a different way. Um, so now you kind of want to pull the front hairs out of the way, but you see that this is how the cap is constructed. It fits my head perfectly after I adjusted those bottom straps, and I don't have to put a net on, so I'm just in perfect time. Imagine doing this on a customer, like, it would take no time, especially compared to like a lace frontal or any other sew-in. Like, you don't have to worry about edges being too curly and you having to spend time straightening those out. You don't have to worry about blending their hair with the extensions. Like, it's so easy. Like, my honest to God thing about a 360 frontal is I wish I had tried it sooner because none of my clients would have a lace frontal. They all would have had 360 frontals. Um, I love it, and I love the fact that I can wear it and I can experience it for myself, and I can give you feedback as someone who's worn it and had it in her head. Like, I love it. Um, I am sewing— I'm doubling these wefts. So you see that I have this amount of space and I have 3 bundles. If I were not to double those, I would run out of space very quick. But I am doubling the first 2 bundles and I just fold them in half and just sew them on like they're a single track, just sew them together. Um, so I don't literally stitch them together and then sew them in. I just sew them onto my head together. And that may sound like a stupid question to some people, but people do ask questions, so I just want to make sure everything's answered in this video. But, um, the last bundle, I only doubled up 3/4 of it, so 3/4 of the bundle was doubled. The last was not. I am up top now, so I want to stitch this to my braid so that it doesn't shift back. My frontal is in the perfect position where it is, so I'm going to stitch it to my braid so that it doesn't. And you can do this at the beginning if you want. Again, this is my first time doing a 360 frontal, so I didn't realize like, hey, you should sew it back. Yes, you do that to a lace frontal, but this isn't a lace frontal, so— and plus it has that cap behind it, so I kind of didn't realize, like, yo, you should probably stitch that back. But I did it now, so it stopped shifting and it's in perfect position still. So I am stitching, stitching, and you see again, all I have is a mirror in front of me. I don't have a mirror behind me. My phone— I was watching a show, it's called Underground, look it up, it's so good. Anyway, I, um, couldn't see what I was doing. So honestly, for this to be number one, my first time doing a 360 frontal, and number two, for me to not have a mirror behind me, like, yeah, I'm proud of myself, you guys. I really am. I'm excited. Usually my videos are like, yeah, whatever, I do this all the time, but this, like, I don't do this all the time, so I was really excited about it. So if you all watch my tips and tricks on thin hair sew-ins, that video I show why I use that spritz. So I get comments all the time, spritz ain't good for your hair. Well, good thing it's the weave and not your hair, and your weave's not going to fall out either. So move along, next video. But, um, I am through sewing in the bundles in the back, and you see the hairline still looks good. Not— again, I have not bleached the knots, I have not cut anything on there. But right now I am going to show you me cutting the lace because that's what everyone wants to see. There's— that's another thing about this frontal. It blends so well with my skin, and it was perfect. Like, oh my God, it was perfect. I mean, like, I didn't have to use any makeup. I didn't have to use any concealer. I didn't have to do anything. Like, it just worked perfect. So Again, I told you all in the beginning I had like a trick as to how I made this thing look realistic, um, and I kind of had to go out of my comfort zone. I will be honest with you, this is my first time doing this, so I really didn't know what I would have to do, what I was getting myself into. But, um, again, I told you all earlier in the video that the baby hairs are already in this video if you want them shorter. Some people want them shorter, some people want less. Um, it already comes. So you see I'm kind of combing them out because they're already defined, they're already there. Um, I'm not wanting the little sleek baby hair look, so I personally just comb this out and use these. And again, it's a lot easier for you if you do this on clients. It's just a lot easier to have them already done. So I am going to attempt at this point to stitch the sides down, but before I do that, I'm going to just lay the baby hairs. And I'm showing you what I do to do that. I am using that wand curling iron. It's by Conair. It's not any fancy brand. I bought it from CVS, um, drugstore like 10 years ago. It's really old. And I'm not touching my skin, of course. The lace is right there, and I'm kind of lifting as I pull the hair straight. But that is exactly how I do on customers. That's how I flatten my closures and my sew-ins. I use a wand curling iron. When I tell y'all, I really, really, really love this 360 frontal. Like, y'all know, like, I don't hesitate to say how I feel. I will tell a company in 5 seconds the hair was trash. Um, you might not want me to put your name on this review. Like, I will say it. I will. I really will do it. But this hair, oh my God, it was so gorgeous. Like, when I straightened it, it was so pretty, and I just— I was shocked because I expected it to melt. I use 450 degrees heat, sometimes 455, and some hair that people bring me to sew into their hair, it does melt a little bit. Like, I don't know if there's a mixture of synthetic hairs in there, but it's terrible. But
More from LaToya






St. Louis, Missouri - Lasts 4–6 months - Takes 4–6 hours - Investment: $3,000 www.TTDoesitall.ai


What are #ktips? Here’s your answer! Schedule at www.TTDoesitall.ai 🩷 #extensions #ktipextensions

4-6 hours install and last 4-6 months #ktipextensions done by the right stylist the right way 💕

Located in St Louis Missouri 💝 Consultations available www.TTDoesitall.ai 💕#ktips #natural

K Tips take 4-6 hours to install and last for 4-6 months with proper care! #ktipextensions