♡ How to Sew-in Your → 360 Lace Frontal *NO HAIR OUT* 3
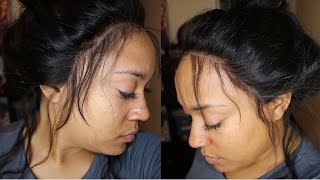
A step-by-step tutorial on installing a 360 lace frontal sew-in, covering securing edges with No Tape adhesive, trimming lace to match your hairline, and styling with a BaByliss flat iron. The creator emphasizes using a scarf overnight and drying hair after washing to prevent mold.
Chapters
This is the baby hairs that are already there, and you see I haven't bonded this down, I haven't done anything, but look how well it blends with my skin. Oh my God, I was so pleased. So I'm gonna do this side, and then I'm going to show you all my trick to making this thing lay down in the front. And a lot of people ask about maintenance. My hair, literally as I am recording this, is tied down with a scarf. Bonnets do not hold your hair in place. Bonnets keep your hair out of your face. I'm not trying to rap, but if the shoe fits, wear it. Like, it, it's— a bonnet does not protect your hair to look the way it did before you went to sleep. You need a scarf. You need to tie your hair down. You need to tie your hair in place so that when you wake up, it looks the way you went to sleep. So, um, a scarf is the way to maintain this. As far as washing it, I don't see why that will be an issue. With any installation, you want to make sure that you are in a position to sit under a dryer whenever you wash your sew-in because you don't want your hair underneath to get mold. So here is a very, very close-up of what it looks like, and I am going to show you how I made everything lay because I want my edge to stop right in front of my ear, not behind my ear. And, um, I'll show you that in a second. But here's what I mean when I said I didn't sew all the way to the edge of that frontal— I'm sorry, of that 360. I should have sewn a lot further down, and I couldn't see what I was doing. So if I were doing a customer, I would stitch to make sure that that thing does not flop up. It would not flop up at all, and you wouldn't have to worry about making sure you have hairs down in the back at all. So I'm looking for a clip. Where's my clip? And I want you guys to see, this isn't candid, this isn't staged. Like this is real. But here, I'm going to try and stitch these sides down to where they look good. But that didn't work, so I'm gonna have to use some glue. It's called No Tape, and I am using my No Tape adhesive, and I'm only doing it right here on the corners. And yes, I am putting it on my hair because that solvent I showed you, it loosens it up. It's like an oil. And it loosens it right up to where you don't have to worry about anything coming off. So, um, you don't have to worry about losing your hair. And maybe my next video will show me removing this and it'll show the fact that I still have hair there. Maybe I'll do that. But I did this 4 times with the blow dryer, put the adhesive on it, blow dry, make sure it was really smooth and flat, and I blow dried it And I did that 4 times, and then I put it down. So next I'll do the other side, and I'll do it the exact same way. I'm gonna apply it 4 times. First, I'm gonna lay the baby hairs forward, clip that back part, and then clip the baby hairs back. But I want to make sure the baby hairs are laying in the right direction when I lie the adhesive down, or when I blend the lace with the adhesive. So here I am putting it there. You see I'm just kind of smoothing it back because my hairline stops right there, so I want my frontal to stop right there too. Um, so this is the only place again that I'm using the adhesive. And voilà, dry it a little bit. And this adhesive really, I would say, takes about 12 hours to 100% dry. Um, so if you were to get your hair done at 9 o'clock at night and go home and tie your hair with a scarf, your hair is going to stick to that adhesive. But it is a very good adhesive, um, and it's sold on Amazon. It's really affordable. But look at it, like, look at how my hair looks. Like, it looks awesome. Oh my God, you guys, I know I feel like— I feel— I don't know, like, I feel weird saying how awesome it looks, but it really— like, I'm hard to please, and this looks good to me. Like, if I came home from a salon and this was my install, I would, I would be so pleased. I would say combing out some of your hair in the back is the best way to do it if your person doesn't know how to sew down the 360 in the back, which I just couldn't see the back of my hair, you guys. Again, I know I could do it on someone else, I just couldn't do it on myself. Um, so you see, once I pull those hairs out, it looks so much better. Um, but who wants to— it's kind of like the fake back baby hairs, like, and whose are that long, you know? Like, no, that's unrealistic. But it still looks good. Like, it looked awesome to me. I have a little lace to cut back there, which I did cut later, but I had to look at the video again to see it. So there's so much hair, you guys, but it was so pretty. I loved it. And I immediately straightened this again. So I keep saying it was so pretty because I loved the curl pattern. Like, it's body wave, and I'm— I really, really enjoyed it. But I should have worn it in its natural state for a while. I just wanted to straighten it for the sake of my YouTube. So y'all see it kind of close up. That's what it looks like. And you see my edges close up, and you see the adhesive has that shine to it. There is like double-sided tape that has no shine to it, but that's what I would I wouldn't put the tape in the front and center because I don't want that shine. But you see the natural state of the hair, you see the hairline, and you see I can flip it to either side and I can wear it all the way up. I can flip it to either side and part it anyway. And this is the, the curl pattern. It is so pretty. All right, so now I am going to straighten this hair. You guys, I'm going to tell you something because again, I'm an honest person and I give honest reviews on everything I, I do. You guys know that in all of my videos I highly recommend BaByliss. BaByliss flat irons, I'm in love with this one. When I initially started, this side is already kind of straight right here because I tried to straighten this but initially, and the iron kept cutting off. Do you know that I went to use this flat iron today, literally today, on a client, and it's completely out? It has a shortage in the cord or whatever, but it's out. This is the fourth flat iron from this company that has gone out on me within a year of purchase. But nevertheless, my hair does look good. It does look good, y'all. But I had to snap this. I really had to snap this hair because I love the hair itself. Love Me Hair, you guys rock. But, um, you see behind me, the stuff's on the floor because I knocked the drawer out. I was looking for the adhesive because again, I never use it, but I found it. So I'm not messy, it's just I was really trying to get this video done and I was already tired after braiding my hair, so give me a break, please. But back to this Babyliss, you guys, I don't know, find another brand because unless you have the time to keep sending flat irons in to be repaired or to deal with warranty type stuff, don't buy it. Just save your time. But you see how easy it curls. It's just gorgeous hair, it really is. Someone's going to ask about my tattoos. One side says 'Live Your Dreams' and the other side says 'Wear Your Passion,' and that's from like a huge poem. You guys should Google it, it's a very awesome motivational poem. But, um, I got really tired on this side, so I'm like, let's straighten this a different way, because that piece by piece was taking forever, which is why I probably didn't get all of my hair 110% completely straightened. But that's neither here nor there, it got the, the job done. So yeah, this iron really good. I'm so disappointed because, you know, I rock with Babyliss, like I really represent Babyliss, and They do not stay. They don't have a life, a long lifespan. Sucks. You guys really have to tell me what you thought about this video. Like, you really have to comment below and say it like, TT, this was trash, or TT, I don't think y'all like that too much, or that seems like too much. Now you can tell me it's too much hair all you want, but I'm used to wearing like 5 and 6 bundles, so this is perfect for me. And I am 5'5" and this is 24-inch hair, and you see that it is past my waist. But here it is, this is my after. And you see my half-ass straightened job. I'm sorry y'all, but the flat iron was just not working with me. This is what it looks like, no bleach knots. But you guys, make sure you subscribe. My makeup— oh my God, I did it myself and I did some highlighting. I don't do highlighting because I'm scared I'm gonna look like a light bulb. Y'all like my wig? Look. Oh, child.
More from LaToya






St. Louis, Missouri - Lasts 4–6 months - Takes 4–6 hours - Investment: $3,000 www.TTDoesitall.ai


What are #ktips? Here’s your answer! Schedule at www.TTDoesitall.ai 🩷 #extensions #ktipextensions

4-6 hours install and last 4-6 months #ktipextensions done by the right stylist the right way 💕

Located in St Louis Missouri 💝 Consultations available www.TTDoesitall.ai 💕#ktips #natural

K Tips take 4-6 hours to install and last for 4-6 months with proper care! #ktipextensions