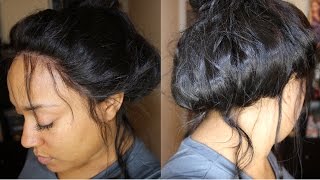
LaToya Kelly shows how to install a 360 lace frontal from Love Me Hair without a wig cap, using a braid pattern that starts at the hairline and runs straight back. She skips the net because the frontal's stretchy base fits like a hat, and walks through her tools and technique for a seamless, no-hair-out finish.
Chapters
Hey everyone, it's your girl TT Does It All, and I'm back with the most requested video on my channel, the 360 frontal. And I got this hair from Love Me Hair. So long, curly side. But, um, I got this hair from lovemehair.com. This is me opening up my package. It was so pretty. I know the shipping jacked up my box, but you know, it's neither here nor there. Um, I got 3 bundles of 24-inch, and then I got a 20-inch lace frontal, 360 lace frontal. Um, so you see the end results, those curls and everything. It was so pretty, like, oh my God. I straightened it out immediately, and I'll show that in this video as well, but This is how pretty the hair was. It's so soft, I could run my fingers straight through it. Um, it was 3 full bundles, and I must say that I loved everything about this hair and this 360 frontal. Um, the front of the hairline is already plucked. I did not have to bleach the knots. Um, so this is very good for someone like me who does hair., but, um, it just doesn't require a lot of work for you as a stylist. But this is a braid pattern I showed you, showed you some of the things that I use. Um, if you have watched my lace frontal sew-in video, this is the exact same braid pattern except I usually start directly from the hairline, um, going straight back, but this time I'm going down and back. And that's just this one braid. But that is probably the only thing different— well, it's not probably, it is the only thing different from my lace frontal braid pattern. And you all highly request to see me do my own hair, so I am new to St. Louis and working on building my clientele here in St. Louis, so I happen to have some free time on my hand. So, um, You guys see how much my hair has grown? Remember, it was in a mohawk like in 2015, so I had like zero edges. And look how long it is. Oh my God, when you do it— but this is me braiding my own hair. Um, I'll be talking about a lot of things, so if you skim through, you just risk the chance of missing some things that I say because I don't like music. Sometimes it overwhelms my voice, so I really don't like to use it. Um, but let's see here. I am connecting those two braids in the back. As you all know, that is what I do for most of my sew-ins. Well, all of them really. I connect that, the outer braid. Um, I am using the KeraCare Glosser Grease, which you all know is my favorite. I also have a video which is my list of favorite things to use for sew-in, and that is one of my favorites. So that is what I am using right now. And, um, you see my carbon comb, which is also one of my favorites. And I'll talk to you about my alligator clips as well, which are like extra long, and you can probably Google them, find them on Amazon. But, um, yeah, I am going to braid all of these and you guys can watch that, and then I will start sewing on the 360 frontal. But let me tell you one thing that I was not expecting when I saw the 360 frontal. First of all, I've never even laid my hands on a 360 frontal and just observed it, you know, inspected everything about it. But I did expect there to be more hair in the back when you raise it up. So I'm not sure if the company does have, um, 360 frontals that have more hair in the back, but I guess it was a good thing that it didn't have more hair in the back because I could truly get all 3 bundles in. Um, and I would rather have the longer hair than the hair on the back of the 360 frontal in a 20-inch anyway. So I guess maybe it's a good thing, I don't know. Um, I guess it depends on you and your purpose for your sew-in. I did sew this in, and I sewed the sides down, sewed the back down, um, and I also did this on myself. And I have not done this on a client yet, but if I was able to master it on myself and it looked as good as it did, I'm sure that if I can actually see the head in front of me, I would do even better. So I'm kind of excited to to book some clients for this sew-in, but, um, I'm braiding of course and braiding and braiding and braiding. What else? There's so much has happened since I've talked to you guys. If you all watched my last video about my surgery, I am doing so much better. Um, I am approaching my 3 weeks Monday coming up. Today is Today's Tuesday, so I'm approaching my 3-month mark, which is woohoo! But, um, yeah, I am doing great. But, um, let's see, I do braid with my middle finger with one hand, so that's one different thing about me. I'm sure you've seen it if you've watched my other videos, and I have a ton of videos. I have a video about plucking the hairline, I have a video about the braid pattern. I have a video about how to sew on the nets. That's a question you all might ask. I did not use a net for this. There was really no need. I have seen videos on 360 frontals and some are just completely open in the middle. And a good thing that kind of saves time about this one is it's not open. It's, um, a really soft, stretchy base kind of cap feel, and it feels like a little cap, but it's really sheer. So I was able to just slide the whole thing on my head like a hat and sew onto it. So if you are a stylist like myself— look at me, girl, look at that mohawk! Dab, dab. Okay, okay. But if you are a stylist like myself, it saves you a lot of time to not have to sew on a net to that area. Um, that is just one quicker step with a 360 frontal versus a lace frontal. Um, and I like that. I really, really enjoyed this 360 frontal, y'all. Like, I really did. Okay, so I am almost done braiding, and I'm gonna turn around so you guys can watch me braid. I think this was the big braid. Yeah, you guys see I'm not using a mirror to see the back of my head. So all the parting, all the braiding, I don't know what the heck it looks like until I actually look at the recording. So this big braid just had to work because I wasn't about to take it down, obviously. I was so exhausted after braiding my hair, but the show must go on and I had to finish this video. So yeah, I was really tired, you guys, but, um, I am almost there. I'm on my last braid. I am bringing both the ends up to those outside braids inside. And you guys, again, I have a video on how to do this braid pattern, so Don't be overwhelmed because it's so fast. Okay, so I'm about done with that. It's tired. So I just kind of pulled that up in between some of the other braids, and you see that, and you see how it's pre-plucked. The baby hairs are already shorter than the rest of the length, which I loved., and you see on the back it's like a half an inch of hair, like it's not your traditional 360 frontal, I don't think, um, it's just enough to pull your hair up. So, um, I mean, honestly, I liked it. I really, really— I— it's still in right now, you guys. I love my 360 frontal, like it is perfect. I tighten mine to where it's on— there's only one open one in the middle. So I really tightened it, and I like that it has an adjustable strap. Um, so I put it on my head, and you see that cap I was talking about that's connected to the entire sew-in? It's a perfect fit. I did need to cut the lace above my ears, and there's also a couple tips I will give you all as we go, but there were things that I needed to know um, well, not that I needed to know. I guess it's trial and error. I tell you all the time, don't expect to do something the first time as you see it on my videos. Like, I practice over and over. Now this, I didn't practice over and over, but usually there's— I record only things that I've done before. But this is my first time ever doing a 360 frontal.