In Real Time: Lace Closure Braid Pattern Tutorial
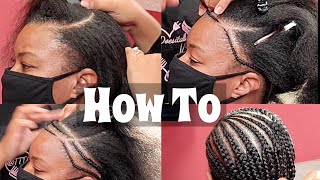
LaToya Kelly demonstrates her signature braid pattern for lace-closure sew-ins, from edge prep through anchor placement. She uses KeraCare grease on the scalp and braids, pre-stretched hair for anchors to add weight, and leaves the final braid untucked for easy removal. The key: don't braid too tight, so the base stays flat and painless.
Chapters
Hey everyone, it's your girl TT Does It All and I am back. This is a how-to video, the braid pattern in normal speed, okay? I'm not gonna fast forward the braid pattern. I'm going to show you guys in normal speed my braid pattern for a lace closure sew-in. This is the outcome, this is what we'll be doing, and this is the before. So I'm going to start with her edges, and I am just smoothing them back. I am doing this particular smoothing with my edge control. The link is in the description to this. This will not flake or turn white. You want a product like that because you don't want something that will cause extra dandruff in her scalp. So you want something that's going to make the hair lay exactly where you comb it. But not flake up again. Okay, okay. So if you all did not know, I'm serious about my parts. That part right there is trash, okay? We're not gonna do that, but we are going to perfect this part, okay? And this is the part that is like kind of my signature part. I like the, um, half moon— I don't know what you want to call it— kind of a C part for my lace closures or any of my side parts. I just think it is sexier. And if you all follow me— if you don't, subscribe, okay? If you do, you know about my SSS, my sexy signature swoop. And my part just has to curve. I don't know, there's something just too basic about a straight part on the side. I just don't like it, okay? But We're gonna get this part together, you guys. Listen, I am 9 months pregnant, okay? So I might be a little out of breath during this recording, but just bear with me, y'all, okay? Okay, so I am parting still because like I said, I gotta get it right. And once we get this thing going I'm going to get to the braiding. And the initial recording, um, the initial— not recording, but the actual video that I posted of the braid pattern for my lace closure sew-ins was 4 years ago. It does not seem like 4 years has passed, but it has. And a lot of people will comment on the video like, oh my God, this is too fast. And I'm like I don't know if you're expecting me to teach you how to braid, but I am showing you the braid pattern. So just in case maybe it in real time will help you better understand what I'm doing, I figured why not upload the video of me in real time showing what I'm doing. So I'm using my KeraCare grease and, um, this is what I've been using for years and years and years. Um, why do I grease the scalp between each braid before I braid it? I really don't know. I like soft hair while I braid. Excuse me. Um, I like soft hair while I braid. I like for it to glide through my fingers. Um, if the hair is really, really coarse and dry, sometimes it causes like a callus on my finger. Um, because I mean, if you're doing this all day and you got dry hair just rubbing across your hands all the time, I don't know, I just like smooth, soft hair. I don't know if that makes sense, but I do know some people who braid that do not like grease while they braid, but I do. So as I braid, I put grease between each part before I start braiding it. So, oh Lord, I'm really out of breath doing this. So I am just braiding in some braiding hair. I do use like the pre-pulled braiding hair, so. It is like the pre-stretched, so like the ends of it aren't a blunt cut. I like it better because it's softer, and again, I'm all about working smarter, not harder. Um, to me it's just softer on my hands as well as a smooth, clean braid outcome. So if you all have not watched my original video, I encourage you to go back and watch that because I explain what anchor braids are, in which there's two for my full sew-ins, and, um, this is one of the anchor braids. So I am only going to use braiding hair for my anchor braids. I do not use braiding hair on the inside braids unless the client has really short hair or really thin hair. It adds weight to the hair so that if the client's hair is thin, I don't have to pull on their natural hair. Um, and then if it's shorter, it has the length so that again I don't have to pull on the client's natural hair. So there's a method to my madness in every single thing I do. I've been doing this for so long that I don't even realize at this point the things that I do that aren't normal for a lot of people who do sew-ins. But excuse me, a little background about myself. I have been doing hair since I was a kid. I started out as doing braids, so French braids were the thing, adding in hair. And then I went to micro braids because I could braid fast, I was, uh, neat, um, I like small, I braid small, you know, so it just came natural. So again, I'm going to the other side, and this next one is my anchor braid. And again, go to the previous video and you'll see full detail of my anchor, anchor braids and why they're important, why it's important to add that braid in here. I just want to give you all again that visual in real time. But, um, I was talking about micro braids. So after micro braids, um, sew-ins were really popular. I started watching YouTube videos and, um, I just learned from YouTube how to do like quick weaves or like a 27-piece or like an invisible part. I know, right? Invisible part. But, uh, that's really my introduction to sew-ins was YouTube. YouTube. Excuse me. So, um, I learned how to do that, and I just kind of started doing it for friends. And then, like, everybody just wanted a sew-in, so, um, I kind of fell into doing sew-ins. It wasn't planned. Doing hair wasn't the plan. It just kind of happened. One thing led to another. Literally when it comes to TT Does It All and her journey of hair. So that is a brief, quick story of me braiding, why I braid the way I braid. And if you think about when you had French braids back in the day, let's think about 10 years ago when you will go to get cornrows. Of course you didn't want dry cornrows, you want your scalp greased. You— I mean, even if you went home with cornrows, they'd be like, hey, can you put some grease between my braids? Like, that is the day and the generation and the time frame that I come from. So when you think about braids under a sew-in, I feel the same way. You can't go home and add grease and oil to your scalp. So I'm gonna do it as I install your base for the sew-in, and then I'm gonna put the sew-in on top. So hope that makes sense. Um, I'm so out of breath, y'all. Just chaotic. I could just edit my, um, inhales and exhales out, but let's just be transparent. Okay, okay. So I am on into my next braid. And if you notice, I braid with my middle finger, point finger, middle finger, point finger, middle finger, point finger. I don't know how. I was never actually like officially taught to braid. I kind of practiced on dolls and heads, and that's how I learned. I don't know how I picked up this little middle finger on one hand, but it's— that is just how I braid. So these are the 2 anchor braids, ladies and gentlemen. If you are new to my channel, I do not braid tight. I am going to speed this up right now, but I do not braid tight. And that is something where a lot of people on my YouTube will argue my clients down. Girl, that looks like it hurts, and I can tell that that's pulling your scalp. No, that's good product to smooth her edges down. And that is pain-free braiding. Trust me, just trust me. My clients will tell you I don't hurt. But by now y'all should have a reason to subscribe, right? If you have not already, click on that subscribe button. Hit that button, make sure you turn your notifications on because I do have a second part to this video that you don't want to miss. But as of right now, I am connecting these two anchor braids and then we're going to get to the inside braids. This music is jamming, ain't it? Hey, hey, hey, hey, hey, where you at? Where you at? On the South Side. Where you at? Where you at? Okay, no, but right now I'm going to go with my inside braids. And again, I only use braiding hair on those anchor braids unless there's a reason for it on the inside. And obviously she has a full head of hair, so we don't need no extra hair on these braids. So I bring the end of each braid into the following braid. And then at the very end, there is one braid left, and I tuck that up. I don't stitch it down, and I don't stitch it down because what client wants to try to dig for thread in their head when they're done taking their sewing out? Okay, not me, not mine. Okay, so I'm using my grease, and a lot of people ask me, why don't you comb like right now, why didn't I comb that braid out before I started braiding? Listen, again, I started out as a braider. It was like, come with your hair washed. Listen, I'm doing this in my kitchen, in my living room, in my dining room. All I need for you to do is come with your hair washed and ready to braid. And the thing is, you want to work smarter, not harder. If you spend your time detangling hair or, um, combing hair that is already detangled, your time in doing this install is going to go up. Okay, so one second, watch me pull this braid, and I'm going to talk to y'all also a little bit about why I pull the braid up where I do. So The reason why I pull the braid up at a certain point is you don't want to pull the braid up when it's at the thick of the end of that braid that you pulled up. So the braid from the, the end of the braid from the previous braid, you want to make sure you braid it down past the thickest parts of her hair. That is because when you add that first braid into that second braid, you don't want it to make that second braid super bulky. So does that make sense? So let's say that first braid, I did not braid it all the way down and it was super thick. Imagine how thick the braid that I'm braiding down now would be because of that first braid added to it, and so on for the next braid, the next braid after that. It would just make her hair super bulky in the back, and the whole point of sew-ins is for it to look natural. You want it to be flat. You want her to run her hair— her hand down her head and feel nothing but flatness, okay? So that's important. So back to the combing. I do not spend my time combing through detangled hair. If my client were to show up— and I don't have this problem, I have this problem a lot of times when I have my braider and I tell my braider, you do not have to sit there and detangle people's hair. They're— they are told to come detangled. I know this is a big problem with a lot of people. If I pay you all this money, why do I have to come washed and detangled? I get it. There's a stylist for you that's gonna do your sew-in, and hopefully they slay it, but that's gonna wash your hair. I'm just not that one, okay? To each his own. I'm just not the one, okay? I'm sorry. So if she comes with her hair detangled like it should be, I will not have to stop and comb each, um, each time I part her hair, and that cuts down on time. So I tell people, if you're pressed on time, if you're like, hey, I don't want to here all day. You know TT's about her time. When you come in, you're not about to sit and wait for me to finish two other people's head. You know that it's your turn next. You are always the next person. I don't overbook people or nothing. So when she comes, if you are ready to really like book your— or, or get in and out, you want to come detangle. If you don't, if I really don't have time and your hair is like superly, super tangly. I mean, I got a client after you. You said yes to detangling your hair when you booked the appointment with me, so if you don't show up with it, I just might not be able to do your hair because I don't have time, especially, especially if I have somebody right after you. So I try my best. People know I don't like turning people away. But it has been done for people just being way too late. I refuse to put my next client so far behind because you booked an appointment for yourself at 12 and you decided to come at 12:30. Like, I just— yeah, no, it's a whole bunch that can be said about stylists and and what, what you can and can't do. And customers just not being with it. What happened to the old school stylist to take you? The most cool stylist also has you waiting in there for 8 hours. Okay, I'm not that one, but I am on to the next, as you see. And I'm still— I'm pretty consistent. Like, this video is the exact same as the same as the same. This video is the exact same as the video 4 years ago. It's just probably 4K now and it's in real time. But I do not— and we got on masks because it's COVID. But I, I still— my work is very consistent. Um, I may change the way I lay a closure or the style, I will put a closure in. But my foundation is always crisp, clean, neat, and greased and oiled. Um, that will not change. So I am going to finish braiding this, and then, um, what else was there Let me pause and go back to the previous videos and look at the comments and come back. Hold on one second. Listen to the music because it's jamming, right? I mean, hey, hey, go, go TT, go TT, it's your birthday. No? Okay, okay. So where happened was my phone— I was actually recording this on my phone and I didn't realize it had stopped recording because I was using the back camera. But once I realized, I quickly started where I could. Thank God I was not finished yet. But I am braiding it down, and when you see me flip this hair, you're gonna see me kind of look at both sides, and that's how I determine if it's too too thick. See, I kind of flipped it. That's how I determine if it's too thick or too thin. And the more you braid, the better you'll get at the braid down. Practice makes perfect, so don't expect your first to look exactly like mine, but just practice on people. Um, I do at the end, the very end of the video, have some information for people who are looking to start a business doing hair or selling hair because the hair that she has is my hair company. And, um, yeah, so I'm going to continue breaking this down. If you— and not if you— when you go back and look at that video from 4 years ago, you will see that I do a sunburst braid pattern from the back, and just go watch the video. You'll understand what I mean. This is just a more real-time video for those who need it. If you want to see me add that braid in, I'm about to do it now. And boom, just picked that braid up, added it in, and I'm still going. And as you see, the end of that braid is not thick. You can see the other braid that's laying there. It's not thick at all at the end. It's the— it's braided down and it will not make the next braid thicker. So her hair will lay nice and flat under her install, under the net, and it's painless. And it's also easy to take down. Again, I said earlier, with the end of the last braid. I do not stitch that down because I want my client to have a good experience while her hair is in, getting it done, also removing it. Removing it is important. A lot of people are like, I will never go back to that person again because I cut my hair out trying to take it out, or I couldn't get it out, or it was difficult. It took me hours or days or whatever. So I think about all of these things. And you as a stylist, if you, um, want to protect your integrity as a stylist, then those are things that you should be thinking about and mindful of as a stylist for your client. Some people don't care and they get by as stylists until they old. Okay, I'm just not that one, and you shouldn't strive to be that one either, especially starting off in a business. So this section where these braids are starting off really thin will be underneath the closure. So remember how I was saying a client with thin hair or shorter hair, I add braiding hair too? I don't really worry about the sunburst part of my braid pattern being thin because, um, the closure is going to be over that part. So that will not be stitched on. You don't want braids that thin right there to be what is initially being stitched down, like to be the whole stability of the sew-in, because that'll start tearing out and we don't want that. So we're on the last braid. I have brought the two on the the two braids from each side into it. And again, go to the previous video to see that. But I have brought it in and I'm good to go. Um, her braids are finished. And actually, no, before I sew the net on, the next step is to put oil in between her braids. Okay, that is super important to me. It feels good to my clients. A lot of clients rant and rave that it grows their hair. I don't know about that. I really don't think it's the oil. I think it's just the braid pattern being not a lot of tension on their head and them leaving their hair alone. But they love the Wild Grow hair oil, and so do I. So Yep, I still do it. Excuse me. So this is from my Snapchat. If you're not following me on Snapchat, go ahead, it's TT Does It All. And the video on the left is what I uploaded to Snapchat. But, um, yeah, I am adding oil to her scalp, in which they love and I just enjoy doing it at this point because my customers enjoy it. So I'm going to wrap that up and then get to the braid, the braid pattern, and then get to the net. Um, and it takes me between 45 minutes to an hour to braid and oil the scalp. It could take less, um, it could take literally 45 minutes if their hair is detangled. It could take me 30 minutes if their hair is thin and, um, easier to braid. But her hair is pretty long and pretty thick, so it probably took me between 45 minutes to an hour to braid her hair. Okay, so I'm just rubbing that oil in, and then It is time to tuck that braid. So that's the one braid that's left. I just kind of pull it under another braid that's already flipped, and then I'll sew the net on. So in the next video, I'll show you all in real time how to sew on the net, but this is the finished outcome of the look that we are doing this time. If you all do not know by now, I have TT Does It All University. It is a Facebook group where there's videos of things that I have paid to learn that I just can't teach you guys for free. Now, if I learned it myself or just picked it up, or I learned something off YouTube, I'll give it to y'all for free. But I can't, you know, get it. Okay, link is in the description if you want to take that route, but I love it. Yes, I love it so much. But I do have my hair vendor, which this is my luxury deep wave hair. I do have my vendors for my product bags, so that is my hanger bag, my sales bag to where I put my baby hair cream or things that people purchase. Um, and the baby hair cream is what what I use when I am slaying baby hairs. But it does come in tones now, so there's a lot of things that I have to offer. Just go to the website, click around, even if you're just going to see what the heck she got going on. Just click around, and I will see y'all in that video on real time, not sped up, sewing on the net. So make sure if y'all enjoyed this video, give me a thumbs up. I'm out of breath. I'm going to recline my feet. Okay, all right, see you on the next one.
More from LaToya






St. Louis, Missouri - Lasts 4–6 months - Takes 4–6 hours - Investment: $3,000 www.TTDoesitall.ai


What are #ktips? Here’s your answer! Schedule at www.TTDoesitall.ai 🩷 #extensions #ktipextensions

4-6 hours install and last 4-6 months #ktipextensions done by the right stylist the right way 💕

Located in St Louis Missouri 💝 Consultations available www.TTDoesitall.ai 💕#ktips #natural

K Tips take 4-6 hours to install and last for 4-6 months with proper care! #ktipextensions