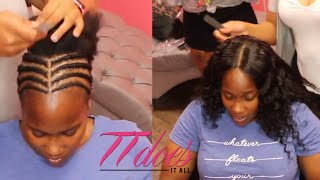
LaToya Kelly sews in a lace closure with a middle part, using a wig cap for a straight hairline and stitching the sides first, then the back. She cuts the lace transparent at the part, skips adhesive unless the client wants multiple partings, and finishes with a carbon comb and KeraCare wax to flatten and tame flyaways.
Chapters
Hey everybody, it is your girl TT, and this is a lace closure sew-in. Blah, lace closure sew-in. And I used 3 bundles of her own hair. If she is around, she can drop a comment where she got this hair from. But I literally just installed it and put water on it, and as I started braiding this customer's hair, I was like, wait a minute, somebody just dropped a comment saying, can you do a closure video of a middle part. So that's what this is. Now you see how the middle of her hairline is forward, like that middle part is more forward than her sides because they're kind of thin? For a client like this is where I'm going to use a wig cap because the wig cap gives me a straight line in the front versus that curve. And of course the closures come in straight line in order to stitch them down and then lay flat As I have taught in my previous video, I need a straight line. So I sew the net where needed, or sew the wig cap as needed, and then I cut off the excess lace in the back. The excess, whatever. So cut out that middle line, and I do that because I want the middle to be transparent. I want you to see straight through and see her scalp. Um, to me it just gives it a more natural look. It's a quicker do than putting a tan cap or something there. That just is working harder, not smarter. All right, and this gets the same job done, just faster. So I am stitching her closure down. I don't use any adhesive on my lace closures unless they— sorry, unless they want to part their hair multiple ways. That's the only way I would use adhesive, and I do have a video of me doing that. Um, the client had red hair and it was a lace closure. And that is actually the client who brought this client to me. So hey girl, hey! Y'all see her in the background near the end. But, um, I do stitch each side down first and then I stitch the back. That's to make sure that the lace closure doesn't have any extra folds in it. Um, of course that would not be a good look, so Sewing, sewing, sewing. Have you all been watching my videos? Have you all been keeping up? Because I haven't posted in a while, and, um, I have been getting a lot of, um, impersonators, should I say. A lot of people have been using my videos as their own. So now when I do like start to finishes, I have to like put my logo all over the freaking video because people want to post that this is either their hair extensions or them doing it, and they want to slow it down and talk over it. And I'm like, wait a minute, this is just the start to finish. This is just to keep my audience seeing something, just keep giving you material. But I have tutorials on my lace closure sew-ins. There's no secret here, okay? But All of you, if you ever see my videos somewhere else that's not TT Does It All, please do not hesitate to inbox me, text me, send me a letter, whatever. My mailing address, my phone number, my website, everything is in the description below, so there is no way for you not to reach me. Okay, okay. But I did 3 bundles in her hair. I did not double up any of the wefts. I did them all single wefted. If you are not subscribed to me, please subscribe. Go ahead and subscribe and thumbs up this video. I use brown thread. If you are a subscriber, you know that by now, and it's a lot easier for me to see when putting it in and for my customer when she's taking it out. So it's a win-win all the way around. And, uh, let's see here. I'm almost done. So I sew all the way up to the closure. I do sew onto the closure, um, and I make sure that I'm not making any of the hairs on the closure fold upwards. So I'm very tedious with the way I do that. But at this point, we are done with the sewing in, and I'm going to go ahead and flatten out her closure a little bit because there's that like lump right next to the part, and I don't really like that. Her friend did bleach the knots to this closure for her. Here is where I am going in and I'm just kind of taking that lump out of the, the top part. And I'm using a carbon comb, which is a heat-free, heat-resistant comb, and just a wand. Any kind of wand will work. Um, I can't tell you how many times I've used a wand to make wand curls. I always use it to flatten either my frontals or my lace closures. But I'm going ahead and do the other side, and then I'm going to spray some water on it. Um, there are things that you can use, um, to detangle the hair or, um, make it more manageable looking. I'm sorry, I keep saying, um, I hate that, but, um, I'm— oh Jesus. Okay, I am spraying water, and then I am going to use my KeraCare wax stick for for those little flyaways that are usually at the top of the closure. And I'm gonna comb that in, and then she's good to go. And she did love her hair. She said she had some previous bad experiences, and I get that a lot with my customers. They're like, oh my God, you really don't braid hard, or oh my God, it looks natural, you know. Like, they come to me and they're like, hey girl, I don't want my closure to look like a wig. And I'm like, me neither, girlfriend. But oh, and my customer, she's a chef. Oh my God, she was telling me such good information about my body and all kinds of stuff. So if y'all got comments about health, whatever, drop it in the description— or in the description— drop it in the comments. I definitely read every comment and I approve or deny. So if you got something negative to say, like, oh my God, her shirt's stupid, it's not gonna get approved. But thank you all for watching this video. I'm just gonna do a little spin for on the beginning and end. And y'all make sure y'all drop a comment below, drop a heart, drop a purple heart. Let me know that you've watched this video all the way through. All right, I'll see y'all in the next video. Hey!