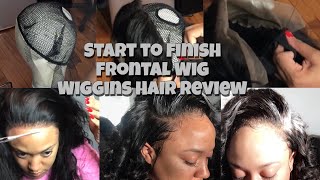
In this YouTube tutorial, LaToya Kelly and co‑host TT walk viewers through the complete process of creating a lace frontal wig using Wiggins Hair bundles without any adhesive. The video begins with an overview of the hair’s characteristics—four bundles (two 20‑inch, two 24‑inch) featuring a natural body‑wave/loose‑wave pattern and pre‑plucked baby hairs. They demonstrate key preparation steps: placing a swim cap over the canvas head to avoid sewing into it, positioning push‑pins to outline the frontal placement, and bleaching the knots. After washing out the bleach, they cut away excess lace, then measure, cut, and sew an elastic band inside the frontal to secure it without glue. Styling follows, including using a wand iron, KeraCare wax stick, and baby‑hair cream to shape edges, and finger‑combing the curls away from the face (a personal preference). Throughout, they share practical tips (e.g., using a swim cap, measuring the elastic from ear to ear) and provide a candid review of the hair’s softness, length, and curlability. The video ends with a call for viewer engagement—comments, Instagram tags, and likes.
Chapters
So I just finished recording this YouTube video for you all, and this is a start to finish on how I made this wig, the hair that I used, a review on the hair, and I hope you all like it. This is so flawless to me. The hair was so easy to curl. It's really beautiful hair. So if you all like frontals and you want to see how I made this wig— yes, it comes off, it's not bonded down, nope, not at all. But if you like this look, check out this YouTube video, drop a thumbs up, and I'll see you soon.
If you are new to my channel, hello and welcome. My name is TT. Make sure you hit that subscribe button and make sure your notifications are turned on because I do randomly upload videos, as all of my subscribers know. But I did like this frontal. It already has that shape to the hairline, whereas a normal— or not a normal, but a typical hairline is. And there's already the pre-plucked look to it, um, and it does have shorter baby hairs already cut into it. I do tweez anyway, but this is a beautiful natural body wave curl pattern. And there's 4 bundles, 2 20-inch, 2 24-inch. And I will also show you when I kind of finger comb through each bundle what it looks like still in its bundle, and it's pretty long, but I will show you that once I get it put in. So this is the 4 bundles and the frontal in its natural state, and then this is finger combed through, and that's the frontal. Alright, so my last video I did not use this with the swim cap underneath, and you see my, my wig got stuck to my canvas. So a little trick for you all to prevent that from happening, make sure you put a swim cap on top of your canvas head and it will protect you from sewing into the, um, the canvas. So that's just one little extra tip that I didn't give you last time, and I'm now able to show you the difference in using it. I use my regular sew-in net underneath the wig cap. And I use the wig cap that they provided with this hair, and it does have a little circle hole in it which I will put net on as I sew it in, but I won't do that until after. So that little circle, I will put a net on it just for extra coverage and stability. All right, so I will put my 4 push pins in at the nape of the neck, which is the bottom of your hairline in the back. And then where the back of your ears are, I will put another pushpin because that is kind of where the frontal will lay. And that is basically my outline to know where to stitch, which way. Um, again, I do sew-ins for a living, so I pretty much have a visual of where people's heads and hairlines stop. So now that that is good to go, the next step is to bleach the knots. And I'll show you right here, this is what your frontal will look like when it's done and it's ready to be washed out. So I shampooed the frontal out and I tweezed the hairline after I got it on the canvas. 2 hours later. Alright, so in my previous video, which I will link in the description below, I showed how I start off the wig and laying the frontal on the canvas head. This time I'm not going to do it because it'll be pretty much a repetitive video for all of my faithful subscribers, so I don't want to do that. But just a little walkthrough of me sewing behind the frontal, which I have videos in detail of that on an actual client, which is the same process as I do on a wig. Now I'm finishing it up, and this is the excess lace where, remember, I told you I was going to lay it over that circle? That is what I'm cutting out now. So she is done, and I'm going to cut the excess lace from around the wig. And you see it comes right off. Oh my God, because the last time y'all saw, I was like literally chopping pieces of the canvas head to get the thread out of it. But as you see now, I'm going to cut off all of the excess lace, and you can watch me do that for a second. All right, so the next step will be after I cut all this out, I will measure my elastic band for holding the frontal down because I'm not going to use any adhesive to put this on. So I will measure from the top of my ear on the right side to the top of my ear on the left side, going all the way down to the nape of my neck, and I will stretch it it as I measure just to make sure that when it's on me it has a pull to it. So as you see, I'm measuring from the top of that ear to the other side, and I'm pulling it and measuring to the top of the other side of my ear, and I let it go. And that's where I will actually cut it, and then I will sew it to the inside of the sides of that frontal. You will not sew it at the hairline. You will sew it probably 3/4 of the way behind the side of it. So I am stitching halfway on the frontal and halfway on the back part for the wig, which will be right behind your ear. That's where the elastic band will lay. And I'm just going to show me stitching that really quick, and then I will get to me putting it on and making it look like It did in the beginning of this video. All right, so my hair underneath is pretty much just in a ponytail with two little braids in the front, which is still super flat, so it won't mess up the look of the outcome. But as you see, I'm putting it on, and now I'm going to get to everything else. So I put it on, I pulled it forward, make sure it sat exactly where I would want it. I start with the middle and I cut down one side, then I cut above the ear, and then I cut the other side. And you see I'm cutting above the ear, and that's why you really want to go 3/4 of the way behind where your frontal starts on the side when you sew down that, um, the band because you're going to end up cutting half of it off anyway above your ear. So you want to trim the front of that lace to match your hairline. And now I'm going to part. I love my deep side part, so that's where I choose to part mine. Um, and I didn't show in this video, I kind of paused for a while because I'm like, this curl pattern after I rinsed out from bleaching the knots, it is not the same as the back. So what the heck am I gonna do? And then I was like, oh duh, I got my wand curl— so my wand iron. So I'm using my wax KeraCare stick, and now I'm using my baby hair cream to slay those edges. Everybody likes their edges different. This is the particular style I wanted for this wig. And again, my baby hair cream information is in the description below. It is not adhesive. Again, this is not bonded down, um, So I just pretty much put my baby hairs exactly where I want them on each side, and then I am going to get to the styling. So you want to make sure you have a little piece of hair covering the back tracks because if you don't, it will show. And then I'm going to wand curl my frontal to match the back curls of the natural state. And I'm going to finger comb them through each side. I am doing out to the outer side of my face, so I'm not going forward. My curls always go backwards. That to me is just a clean look for your face. I don't know, I don't like curls facing my face. All right, it's just a pet peeve of mine after doing hair for so long, I guess. But I want curl maybe about an inch of hair. And, um, finger comb it through, and then you will be finished with your look. What do you think so far? Did this seem pretty easy? Could you do it? You think you could do it yourself? Let me know, drop a comment. Let me know if you have. Who's on Instagram? Tag me to your Instagram post if you're trying this type of style. I want to see it.
And I haven't cut any of this hair. You see I wand curled the front to get it back in that curl. So this hair is called loose wave. However, when I shampooed the bleach out of the frontal, it did look more like a deep wave to me, like it had just a deep wave. I didn't shampoo the back bundles because I didn't want to change the natural natural curl pattern of them. I wasn't sure how I was going to blend the front, but winding the front frontal part of it did make it blend right in with the back. Just pulled it out, finger combed it. Some pieces could probably still use a curling, but, um, one thing that's very particular about me is I hate curls towards the face. Um, I don't know, it just isn't even to me. I just don't like it. I don't know what it is, but I hate curls towards the face, so I always curl away. Okay, so this is a loose wave. The company's name is all up in this video at everywhere. So what do you think? I told you everyone likes their baby hairs different, so this may not be a baby hair look for everybody, but it is what goes with the look that I was going for today. And as you know, I do not have any adhesive on this. You saw me put it on, I didn't take it off. I literally cut the lace in That was it. So tell me what you think, drop a comment.
It's 4 bundles in my hair again, so it's extremely full. Let me show you all the back because I guess that's what I didn't do.
So you see the back, this is 22 inches.
Let's see if you stretch it, you see how long it is. So yeah, it's very long. Um, but yeah, it's very pretty. It's nice, it's nice hair.
It's nice and soft. Um, it's very big.
I'll straighten it out later on, but for now, this is it.
So since I decided not to do my makeup for this YouTube video, I let the Snapchat filter do it for me. But tell me what y'all think about the hair. Tell me what you think about the frontal, the baby hairs, everything. You You guys know that I love input, so drop a comment below.