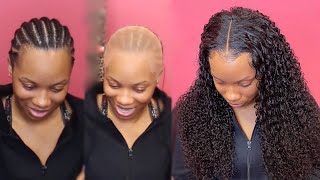
LaToya Kelly installs a curly lace frontal sew-in from start to finish, bleaching knots and tweezing the hairline first. She braids the hair straight back, uses a net and ball-cap method to secure the frontal, then double-sews four bundles (two 22 inches and two 24 inches) to fit the large piece. She finger-combs the finished style and skips brushes to keep the curls defined.
Chapters
Hey everyone, let's jump right into this curly lace frontal sew-in by You Pretty Hair. And first, I do this before my customers come usually. I'm bleaching the knots and then I will tweeze the hairline. So that is just to cut down on time while your customer's there. But first, I'm bleaching these knots. Don't ask me why I'm doing it on the floor. This is actually my first time doing this, so I don't— I have no idea. It was just convenient. And yeah, so 15 minutes on that, and then after that I wash that out and I tweeze, tweeze, tweeze. And depending on the client's hairline, you might have to tweeze once it's actually in their head too, which I will. But after all that is done, that is the customizing part of the frontal. Next, I will start those braids, and I love my braids going straight back away from the hairline so that everything is nice and flat underneath that sew-in. And I do have tutorials on all of this, and I do have my membership which you can click in the description. So I'm using my Wild Grow hair oil just to give her some extra protection while her hair is in this sew-in, just to moisturize her scalp, even though I do grease between each braid with KeraCare Glossifier. But yeah, I still put the oil in there because my clients love it and I love it. Like I've had it put in my head and I'm like, can you do that again? Like, that's how good it feels. But I am going to finish that up and then I'm rubbing through each braid after this and I am just going to massage it in. And then I'm going to sew on a net and I use my net to allow me to sew anywhere I can stitch, um, wherever I want to with the net, and that's why I use it. I'm gonna also do the ball cap method underneath the frontal because we want it to be flush, like when she parts through her frontal, wherever it may be. So I am just pulling out her ears from the cap, and then I am bonding her frontal down. I do not show my secrets because I paid good money to learn them, but I do teach them with my membership. So I am just kind of checking the size of it. Now you see that poof that's there? I did not comb out after I tweezed it, so do not judge me. And I do not recommend doing this ever in life because it makes life a lot difficult. A lot more difficult. So comb out the hair that you tweeze before you put it on your head or anybody else's. It just makes your life a lot easier. Okay, and honestly, her hairline looks very good, like the shape of it. I just eyeball it. I've been doing this for years, you guys, so I just kind of eyeball it and I know what I'm doing. But, um, I am doing the— remember in the beginning of the video I said sometimes you will have to tweeze once it's on the client? And I did tweeze hers. I just wanted to make sure it looked very natural. So, um, I told you why it was on her head, just so I can eyeball it for her face. So I'm tweezing, tweezing, tweezing, and then I'm going to do a middle part on her and lay her some baby hairs, and then I will get to the sew-in, which is in the back. And, um, this hair is super, super, super long. I have done a video very similar to this recently. However, this is 4 bundles and it's super long. I cannot say— I mean, you're getting curly hair, like, I don't know, like I've seen 20, 24-inch, 26-inch before, but this just— I don't know, this hair is extremely long for, like, you getting your money's worth. So she has a 20-inch lace frontal that is 13 by 4 inches, so she has 4 inches deep of parting space. And then she has 2 22-inch bundles and 2 24-inch bundles. And I am going to actually double up the back 2 bundles, the first 2 blends, because Honestly, the frontal takes up a lot of space, so you really only need 3 bundles regardless the length. 3 bundles is enough. So in order to fit 4 bundles in, I have to make it like it's 3. So I had to like quadruple sew, meaning that usually I will double up the first. See, so this is showing you the 2 24s and a 2 2x22s, but usually I will double the first track. But for this, I had to actually double up 2 bundles together. So right here I am sewing in 2 bundles at a time. I hope that makes sense, but this is what 2 bundles looks like in. And usually this would be just 1 bundle, but I had to make it fit. Um, and usually the longer lengths, you want more bundles to make it full, um, because usually it's sold by the ounce. So the longer you get, the less hair, so you need more. All right, so I am on the last bundle and I am going to sew that all the way up into the top. And then I am going to flatten a piece of the frontal hair to cover the back track up, and then I'm going to perfect everything because I am very tedious and I'm a perfectionist. So after I flatten this back, I am going to like put water on the ends and put mousse on them And you really want to avoid using like a paddle brush or anything at this point. Um, you just want to finger comb it because you don't want to poof it up. Um, I would avoid brushing it as long as you can. So, uh, you see I am just finger combing it through. And, um, the only time I did use the brush on it was to brush out the ends so that I can get all the hair that I tweezed from the hairline out. That was the only time. And look at those curls, they are so, so, so pretty. It's perfect. It's nice and full, and it looks really natural to me. Like, I don't know, what do you think? Drop a comment, let me know what you think, because to me it does look really natural. It doesn't look excessive. Um, it doesn't look like, oh my God, we get it, you have weave. It looks really, really natural to me, but I like it. What do you think? Would you guys rock this look? I sure in the heck would. I wish it was a wig sitting on my head right now, but lucky Ashley, she has her hair done. Okay, so y'all gotta let me know what y'all think about this look. Let me know if you all rock curly hair, and if you like this exact look, the links for this exact hair are all in the description underneath this video. Let me make sure you thumbs up this video and drop a comment. I really want to know what you guys think about it. All right, I will see you on the next video.