LuvMe Hair Braid in Bundles by @TTDoesitall
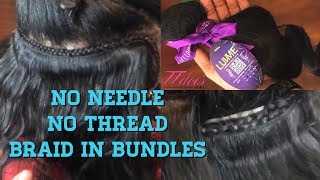
LaToya Kelly tests LuvMe Hair braid-in bundles and finds them awkward for natural-part sew-ins. The track creates too much bulk when folded underneath braids, so she cuts and stitches it instead, braiding on top. She recommends the bundles only for adding a few rows of extensions.
Chapters
Hey everyone, it's your girl TT Does It All, and this is a Love Me Virgin Hair video on their bundles that are braid-in. So these are braid-in bundles by TT Does It All, and this is how the bundle comes. If you see, there's the hair at the top of the track, and that is so that you can braid that into the client's hair. And create a sew-in. So, or not create a sew-in, but create a sew-in look. This is my sister and we are two clowns, so there will be a lot of craziness going on in this video, so bear with us. So I watched a couple of videos on this method and I was like, oh my God, everybody keeps starting from the back. I'm going to be different and I'm going to start from the top, which was an epic fail because it was just stupid and you're going to see why. Okay. Look, already right off, she gave me a look like, "Don't you call your mama names." This was a family affair. I had my mom recording for me. And I was in Kansas City, which you all know I don't live there anymore, at a friend's house. So I left a little horseshoe shape out for her leave-out to blend on top of it, and I kind of just braided and parted as I went. Um, yeah, just keep watching. Where the hell you at? Look, I'm not at home. Okay, see you. Flip you and I flip you back. Don't know where that song came from. Yeah, flip you and she flips you back. I'm so glad you can mute and edit. I'm not going to mute the sound. Okay. Rock and roll, what they love. Okay. Not to see me play like a dove. Doves play? I've seen a dove or You playing my day. All right, gosh darn it, you're too short. How do I do this? How do I live without you? What am I going to do with this? Okay, I see a braid here, I see a tuck there, I see something that won't be flat there. So as you all know, I am into very flat installs, so that was really my problem with this type of hair. I needed it to be flat, so I started over and I decided to go in a sort of a U-shape around her head. So yes, I took those braids down that I just did and I started to go in a horseshoe shape around the perimeter of her head. So I did leave her edges out around the back, and as you see, I'm going in a kind of horseshoe shape, leaving out a very thin braid for her hair. And as you see, that track is braided into that braid. So I am going to keep braiding around and around in a circle, just folding it over each way so that she can lift her hair up in a high ponytail. So as you see, this track is braided into it, and that track is braided into that braid, and it's very secure. I did like that. I think that this would be perfect for someone who just wants to use a couple of tracks in their hair. So for somebody who has naturally long hair and they just have kind of fine hair and they just want to add a couple pieces in, I think this method will be perfect. But if you're trying to get the look of like a natural part leave-out sew-in. I do not prefer it. Here you see where one track stops and the other track starts. It was really easy to braid in, but again, it just wasn't my preference because it's not flat for like a natural part leave-out sew-in. In other videos, I saw her wrap the track around like a high bun at the top and then just do the braid-in bundles in the back, and that was gorgeous., but yeah, for me, excuse me, I would prefer this to not be a natural part leave-out sew-in or sew-in look. I keep saying sew-ins because y'all know that's really all I do. I am the sew-in queen and I stick to what I love, which is that. So when I fold over the track, I have her hold it down and I braid. Up there. So I just want to let you guys know that this sucks, and I've started it already, so I can't stop now because her head's starting to hurt. But I think the fold over is stupid. I think this being attached to the braid is stupid. And I just— I'm not a fan of it. Maybe I'm gonna mute that because that doesn't sell hair. Not at all. I'm gonna tell them I don't like it. You can let it go. So again, I'm not into sugarcoating anything. I say exactly how I feel about hair. The hair was perfectly fine itself, but again, for a natural part leave-out, I do not like this method. It would be perfect if I was just adding 2 or 3 rows in, but to get the look of a natural part leave-out, no. I'm sorry, I can't say that enough. And I do want to be honest with you all and let you all know, you know, because you may want to try it out and Just don't try natural part leave out look with it. It's not hard to braid in, like that is not the difficult part of it. The difficult part comes with when you're folding over the track. So for future references, if you're wanting to try this hair out, instead of folding it over, I would cut the end of it and just stitch that end of her braid down. Just braid her hair all the way down. It down. Do not try to braid under— not underhanded, but I'm saying like, do not try to braid the track facing upward and then pull it down so the braid is underneath the track because it will be very lumpy. And again, I'm all about flat sew-ins or flat extensions. So this is some new technique. Yeah, look, this is the track and they got hair coming out this way, so I braid it into this so the track stays that way. There's some weird stuff. So I had another client that came in and she's like, what the heck are you doing? And I was just kind of explaining it to her. And, um, every now and then I will unmute the sound because some stuff is either funny or information. So I hope you all enjoyed this video. I'm just pretty much being honest and just playing around with hair. So drop a comment, let me know what you all think. This video is nowhere near over because I'm going to show you the end result of it and me pulling the back of it up so you can see her— that— or see that she's able to wear it in a high ponytail without the track showing. And you see how thin I'm doing this, the part that I'm braiding into the extensions. It's very thin because if you do a lot, it'll be a huge braid. And once again, I like flat, so I don't want anything lumpy. So my mom is trying to scoot over to get the perfect angle and lighting for this row, but as you see, I just flipped it over and started braiding the hair in once again. So for the top final row, I decided to to stop and braid a new braid. So that last braid I'm stitching down, and this braid I'm going to start a new braid because I thought that this would be flatter. And again, this video is kind of showing you if you want to try it a different way, or if you're like, hmm, let's try and braid under and flip the track on top of it, how it will look. This video is showing you not to try it because it may not turn out right. So I am braiding this braid as a new braid because I wanted the start of it to be really skinny. So this braid, I'm going to stop in the middle, and then I'm going to go to the other side and start the other side so that it goes to the middle too, so that it's nice and flat. If I would have continued to go all the way around the horseshoe with this braid, the braid would have been very big when it got to the other side. So that's why I did not want to do that, because I wanted to be super flat. Am I hurting you? Yes, I can see. I'm sorry, I love you. You are not hurting me. Oh, you look like you pissed The highest of festivity. Harlow, so you do voiceovers? Yes, yes. I'm sitting here like, yes. I don't know why everybody was so afraid for y'all to hear what I was actually talking about, but anyway. This is showing you how difficult it is when you braid underneath to lay that down. So that is the problem that I had. I actually had to kind of stitch it down, which is creating a whole lot of work. So if you do use this hair, remember to braid on top of the track, because if you braid underneath, it is near impossible to get it to lay flat. So now that I'm finished with the end of this side, I'm going to go over to the other side, kind of measure where to cut the weft and start braiding towards the middle from that side. And I said earlier, that is because I want it to be super flat on both sides. And, um, I will stitch the middle down. But I was gonna have to stitch anyway because if you braid underneath, that track is just going to stick straight up anyway. So either way, if you chose to just continue the braid around, you would just have to stitch the end of it down, um, but you would still have to stitch the track to lay flat, because it's definitely not going to lay flat if you braid underneath the track instead of on top of it. So I'm having her kind of hold it in place so that when I am braiding it into her hair, it doesn't move, because it's kind of impossible to hold it and braid it at the same time. So I did have to have help with that. So here, of course, is where I'm stitching her braid down. And you all, please just be patient and bear with my recorder because it's my mom and she's not in any way a professional at this, so she did the best that she could. Um, I have not been really recording videos because I lost the charger to the battery pack for my digital camera. So I have another video that I recorded with my iPhone 7, and we'll see how good the quality of that is. But, um, this is actually with my iPhone 7 as well. It's just not on a tripod. So my next video, I actually recorded it on a tripod, and I'll try to get that up for you. If not tomorrow, the day after. So This is where I was like, oh crap, it is definitely not going to lay flat. I mean, I like the way her hair was able to be lifted up, but I do not like the flatness of it. It's just not flat enough for my personal liking. So because I did not like the lack of it being flat, I did like a little twist braid, um, for her leave-out to kind of just lay. And then I went and stitched down that first track up top. But you see the outcome. It is not that quick for me. I do sew-ins within 2 hours, so it wasn't as quick as I would have wanted it to be. But there's the finished product. Please comment below, let me know what you would do differently, because this was my first time working with these type of extensions, and I look forward to hearing from you. Bye!
More from LaToya






St. Louis, Missouri - Lasts 4–6 months - Takes 4–6 hours - Investment: $3,000 www.TTDoesitall.ai


What are #ktips? Here’s your answer! Schedule at www.TTDoesitall.ai 🩷 #extensions #ktipextensions

4-6 hours install and last 4-6 months #ktipextensions done by the right stylist the right way 💕

Located in St Louis Missouri 💝 Consultations available www.TTDoesitall.ai 💕#ktips #natural

K Tips take 4-6 hours to install and last for 4-6 months with proper care! #ktipextensions