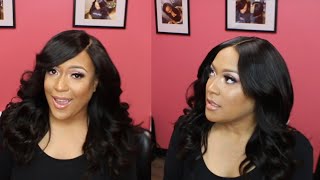
A 6x6 lace closure wig from YWigs made with four 14-inch bundles delivers multiple parting options and a polished look. The presenter shows how to style it with a flat iron and curling iron, change parts without the wig shifting, and add volume to the bangs using an internal band system.
Chapters
Some of us have to go to work and look more sophisticated than sexy. So what do y'all think about this look? I feel like this is like, I'm about to go to work but I'm still fly as okay. This is the look we're going to be achieving today. So, oh my God, this closure is huge. Wait till you see it. Like, I can part it in a freaking zigzag. You see how deep this side part is? Like, deep back. How far back, but I can also pull it up. Yeah, girl, girl. Okay, so this is my second review with YWigs. This was the first one, it was a lace frontal with the kinky straight hair, and OMG, it was gorgeous. I loved it, I had zero complaints. The second one, which is this video, is a lace closure and it is 4 bundles of 14-inch hair. And look how big this closure is— it is 6 by 6 inches wide. Okay, so this is what it looked like as I was making the wig out of the bundles and the hair. And yes, if you're asking yourself, 4 14-inch bundles is a whole lot, so what better way of making that look good than putting some nice curls in it. And, um, everyone asks about this flat iron all the time, and this flat iron is by Chi, and I got this when I was in college. Mind you, I graduated college in 2010. So this flat iron is a 1-inch Chi flat iron that I got off eBay. So I don't really know if you guys will be able to find it, and it's not really about the flat iron. I can do this with any 1-inch flat iron, but I use my wand to flatten, as you see right there. I use the wand to flatten wherever I want to part on the lace, and then of course I use my little curling iron to curl it. I always curl away from the face. If you are not subscribed to me, go ahead and subscribe. And if you are subscribed, you know that I like to curl away from the face so each side is curled going away from the face. So right now I'm going to put my little wig on, and I'm going to start with my part on my right side, your left. And I'm just going to kind of play with it, play with the bangs, kind of comb it, see how I feel. There is a band that's making this stay on my head, if you're wondering, and I do have videos on that in case you were wondering that also. Oh, okay. So here I'm gonna just kind of give my bangs a little body. Um, when everything is one length, everything seems to kind of droop down, so I just want to kind of get some, some volume up in here. And this isn't actually the curl or the side that this is parted on in the beginning of this video, if you notice. Oh, by the way, this is a CuraCare wax stick, and there's a link in the description below that tells all of the items that I use, even the comb. So this is me parting it in the middle, and I'm just kind of showing that you kind of have a flip-over method out of this wig. You can part it on the left side, you can part it on the right side, or you can part it in the middle, and you don't even have to shift the wig. So, you know, if you do have a traditional lace closure, you can move your closure to the left, right, or in the middle. But for this one, you can keep it centered, and then you can do a deep part on the left, right, or you can do a middle. You can even do an off-center part. Your possibilities are endless with this closure. I did bleach the knots, and this closure actually came pre-plucked. So as you see, I did a middle part. I did your left, my right, and now I'm going to do my left and your right. And I'm going to part it over there. And as you see, I have not shifted the wig at all. You see the middle part's still there. I'm just kind of covering it up. You see there's a middle part, and I can go right back to the side. To the other side when I'm ready. So that's just to kind of show you how wide this sew-in or this closure is, and it goes far back. So it's 6 inches far back, and it's 6 inches from left to right too. As you see, I just parted it and I'm flattening this part out, um, because I don't like the little dents in it. So one thing is, if you look at it from here, it doesn't really need any concealer on the part. But me being me and a perfectionist, I want my makeup on the part. So I'm putting a little bit of concealer. You just use your color. And, um, I use a flat brush and I put that on the part. And then I'm just kind of showing you what it looks like in the middle. It's so like sophisticated. I don't know, I just feel feel like I can go anywhere with this wig. Like, with a pink wig, I can't really go— I can go anywhere if I want to. However, I choose not to get all the attention in a pink wig at some places. You gotta know by now that I love my SSS, which is my sexy signature swoop, and I love the fact that this is a 6x6 inch closure where I can do that. Oh my God, okay, this hair is so soft. It had zero smell to it. It just smelled like— it smelled like kind of like hair store hair, but not the bad hair. So it just smelled like clean hair. It curled perfectly, it swoops perfectly, like my shears glide down it when I'm cutting. Oh my— I don't know, like I'm surprised that 4 bundles of 14-inch are not too huge, but these were very full bundles. So enough for me, I want to hear from you. Have you heard from the— about the company before? And I want to hear your experiences because I am in love. It's so full, it's so silky and straight, and it has a little bit of texture to it so it's not like fake silky looking. I don't know, you know what I mean. But drop a comment below, let me know what you think about this look. And again, it's all 14 inches straight hair, bleach knots on the lace closure, and just my Southern Belle wig. So I hope you got— I hope you all enjoyed this video, and if so, please thumbs up, drop a comment, and let me know. And I'll see y'all in the next video.