NEW 2024 Extremely Detailed Closure for Thin Hair - Dome Cap Method
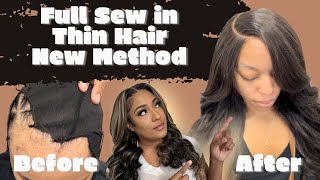
LaToya Kelly demonstrates her dome cap closure method for thin hair, covering sewing the cap to the scalp, trimming excess fabric for a natural look, and stitching hair bundles without creating lumps. She shares practical tips on thread placement, needle technique, and managing tension to keep clients comfortable.
Chapters
Hey, it's Titi, and this is part 2 to my last video on my dome cap method. In that video, I explained what the dome cap method is. I also demonstrate how to do the dome cap method on a client, who can benefit from it, and why I created the technique in the first place. What I didn't show was me sewing on the actual dome cap. I didn't show an alternate method to cutting off the excess fabric, and I didn't show how stitching of the bundles is done behind the closure. So I'm going to show all of that today. All right, so we're about to show you how to sew on the cap. K, K. So this is about to be a side part. Her part's gonna be over here. So I always start my thread where I would start the first track. First track will go from above her ear to here, and then I will keep going back because her closure is going to be over here. So you kind of want to angle it to where her tracks are going that way so it'll close all the way up around the closure over here. I start this with my long threaded needle And I start over here, and it's already knotted at the end, so I just pull it through. And I only loop this once through here so it holds the entire way around. And then I can use the extra part of the thread to sew in the first bundle. So I'm just going to do a regular stitch around the braid. So the thick part of the band should always be ahead of her braid because you don't want the sew-in to not be attached to her braids. And if you put this over this, you're not going to see if you stitching through. To the braid. It's very hard with that thick band. So I stitch all the way up to here, and I braided her hair basically based on how much hair she has around her edges, so which is really what you got to do with the dome cap. I'm feeling where the braids are. All right, so this is her first braid. Y'all see it? So I want it right up to it, and I'm going to stitch. So even in the back, you want it to be under the braid. You don't want that thick part to be in the braid at all. And by the way, Kim has been coming to me forever. She literally comes faithfully every other month, and she always uses my Luxury Deep Wave hair, which is what we're using today. We reinstall it over and over and over over until she's like, I'm just tired of it, I want new bundles, like a bougie chick, okay? But you can get that in the description below or just go to TTdoesitall.com. So this is how much I got left to sew on the rest. So with Kim, what she is always wanting covered up is this little piece and then her widow's peak. So the band being right here is definitely going to cover it up, but I leave a little bit of leeway for it to slide back a little bit. So you see, I got this much room for for it to slide while I sew. So before I cut anything, what I used to do was cut the sides off first around the bottom of the bag, but now I only cut out what I need for the closure, and then I cut these off once I have the closure on. Okay, so this I definitely want to be over this line, and the other side you want to be over this. So And then you want your front to line up with your closure. So I'm just going to measure from here to there, and I don't really measure the back because the back is going to be sewn down according to the sides. So that's where I'm gonna cut it open, so So the reason I cut this out is because I want the part underneath the closure to reflect her scalp. To me, that's the way it looks super natural. Now that the closure is sewn down, you see I still have not cut this off yet. I'm going to cut it off and then I'm going to stitch the sides down. How's your head feel up here where it was tight? Fine. Okay, so usually for the customer, when I cut open the cap, their hair will kind of pull that way because the tension of the cap. But once you sew the closure on, it'll go back that way. Um, and now she said it's fine, which I knew. So just FYI, if your customers say you hurt my head, you killing me, to her, just hold on, she going home, in my Drake voice. Okay, so here is a whole lot forward, so it would have to be like this. So I kind of measure or see where So this would end up being stitched to this braid like that. So now I'm gonna see where this should go. Which I can cut everything behind this. I can cut off. So, so this will be stitched to this braid, and I will still sew onto here like it was back here. Since none of this is going to be used and this is going to be stitched like this, I could technically just cut this piece out too, cuz we really don't need it. So instead of starting down here, I'm gonna start up here. And as I am stitching this, you want to make sure when you get to that next side that the closure is still laying tight, because let's look at it. So right now it's, it's floppy. So until I actually secure this and secure the other side, it's going to be You know, movie, movie, floppy movie. Y'all get it. Depending on how far up you have it depends on how far into her sewing you're gonna have to do it. But, um, usually I just stitch on the first braid, but I want this to be smooth. I want it to lay flat. I don't want no lumps under that sewing. So yeah, okay, so then we go to the other side. Oh, and by the way, if you're interested in custom t-shirts, you're interested in custom digital prints, planners, checklists, and custom-made items by who else but TT Does It All, there's a link in the description with all of my Etsy store goodies. So make sure you check that out. Then I'm going to still utilize this long piece of thread I got. And then we'll start up here. And over here, I'm just going to stitch to the first braid, which is what I usually do, because it doesn't have that much like the other side. Do you feel like your hair is pulling? The crazy part is here it probably looks like it. Because this is smooth back, so it probably looks tight to them. But it's— I mean, like, literally I can pull her hair. Like, it's not even— it's not pulling at all. It's just smooth. But you want to argue with me anyway. I can't tell. Her hair is pulling. Her hair ain't even— your head ain't even red. Now this is red. Apparently I'm touching your ear too much. Apparently your ear is in pain. All right, so then let me see your first try. So this is a long thread from sewing on the cap. So this part is basically where I give that leeway for it to pull back a little bit. Because I'm sewing on the thick part. So in the front, it probably looked a little closer up on her forehead, but by the time I finish sewing these bundles down, it'll be in a perfect spot. Because since it's so— the closure is sewn on to the first braid, it's not going to shift back, but it's going to shift back just enough on the sides where it looks natural. So I just did my little lock stitch over here, and you see I'm running out of needle. So to lock this down, I just thread a little bit to where I know how much I have left, and I can go backwards. So I kind of go over it a little bit, and this is why I did not cut this off, because because now I can use this starting here and going that way. Oh yeah, and I don't tie that or anything. Stitching over it back and forth like that is not gonna move. So when she goes to take her sewing out, she don't have all those knots and stuff to take out. It's just gonna unravel as she cuts. And then I'm saving thread because if I had cut that, it just would have been wasted. Okay, so I'm almost done, so I just want y'all to see what it looked like. Oh, this is perfect because it's a lamp as well. Got a landscape. Stay motivated. I got to get to work. Bye! We've got a ton going on at Eric and Arno's dream home and, uh, not a lot of time to do it. Exterior paint is going on, walnut. We're So this is the only time I tie a knot ever in this entire sewing. I don't know anywhere else but at the very end, and I usually do it like 3 times and that's it. It's looking good. Okay, and then I guess we can just wait to be You can see— let's see where her widow's peak is. Oh, it's right there under it. Ew, you can't see it. I got you, okay? I got you. Which is fascinating to me, especially from a performance SUV setup. So Kim does not let me pull apart her curls, if y'all don't know already. She just tells me to curl them tight as hell so they last forever. And she's laughing, which means she's listening, you guys. I'm not talking about her behind her back. Okay. Huh? You said what? You've been dying for this. Come on. What's your YouTube channel? Oh, you scared? What's your TikTok? Come on, do a dance. You going to dance? You going to do a— you shy now, but you be on it. So this was actually my customer today watching the video that I'm uploading today as I'm doing the same thing to her head. Cool, huh? Okay, but this is actually what Kim's hair would have looked like yesterday if she let me pull those curls apart, but I just had to show y'all the real deal, okay? Holy field, okay, okay. See y'all in the next video. And y'all going to have to excuse these kids in the background, okay? I can't block them out, I can't mute them out, okay? And y'all want this video tonight, so I had to do what I had to do, okay, okay.
More from LaToya






St. Louis, Missouri - Lasts 4–6 months - Takes 4–6 hours - Investment: $3,000 www.TTDoesitall.ai


What are #ktips? Here’s your answer! Schedule at www.TTDoesitall.ai 🩷 #extensions #ktipextensions

4-6 hours install and last 4-6 months #ktipextensions done by the right stylist the right way 💕

Located in St Louis Missouri 💝 Consultations available www.TTDoesitall.ai 💕#ktips #natural

K Tips take 4-6 hours to install and last for 4-6 months with proper care! #ktipextensions