New 2024 Method | Thin Hair Lace Closure Protective Tips and Tricks - Dome Cap Method
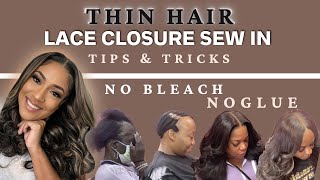
LaToya Kelly shows how to install lace closures on thin hair using a mesh dome cap sewn to braids instead of glued to skin. The cap sits ahead of the hairline without adhesives or tension, reducing hair loss and lasting longer between touch-ups.
Chapters
If you haven't heard of my dome cap method, this is what it is. It's where I take a dome cap and I do a sew-in over it with a lace closure, no leave-out, and I place the closure ahead of the customer's hairline. So you see where this client's actual hairline is? Her hairline is about an inch and a half behind where I will lay the actual closure. All right, so her braid starts here. Her braids are here and the closure is pulled up forward with no glue, no tape, just, just needle and thread. So this method allows someone with a larger forehead, someone who suffers from hair loss, someone who has thinning hair around the edges to have their closure pulled forward without additional tension on their scalp, without causing additional hair loss. Without having to use adhesive, without having to use tape. It's just all around more beneficial for the client. It lasts longer, and you don't need a touch-up with this. So it's better than a wig because it doesn't come off, which a lot of clients don't want. Um, so yeah, I'm going to teach you guys how to do this. Dome caps were traditionally made to make wigs on, like this canvas you see right here. And nowadays they make them mesh so that you can really see through them, and they do come in different sizes. So the one that you see me using is mesh. You can see through it, you can see the braid. That previous one on the canvas, you could not see through. So this is a client with moderate hair loss, and she is able to take advantage of the dome cap method where her sides and a little bit of the inside are just not as full as she would like to be able to have that closure to the forefront of her hairline. So instead of having a stitch on where her hairline is fragile, I can use the cap where I circled and I'm pointing at right there to actually attach the lace closure to it and have it lay flat to her skin. So if your hair is moderately thin like on the left, or it's a little more extreme like the hairline on the right, the dome cap method can definitely work for you. If you have not subscribed to me yet, go ahead and click that subscribe button, turn on those notifications, because I have a lot of new videos coming up in the next few weeks. So as far as the braid pattern, it is the exact same as my typical braid pattern, and if you've been subscribed to me for a while, you've seen it, but I'm going to go ahead and post a 2023 version of it. So the braid pattern is the same. The only thing that is different is the cap. I do have it where I sew on the net the exact same way as in my previous videos. So I start from right above her ear and then I stitch around the part so that I can cut it out. Another thing stylists used to do was attach an elastic band to each side of the front of the lace closure to actually make it lay flat. And I cut that thick band off because it does eventually start to cause tension around the back of her head. So I do cut off the elastic band. So when I initially started doing this method, I would cut out the back first, but now I actually cut out where I'm going to place the closure first, leaving the back still attached. And then after I've got the closure secure and where I want it to, I cut out the back. And then I stitched the flaps down. So I'll show you all of this in detail. So now I'm cutting out her part, and I have measured the front of the hairline. And you see, this is another client where I did it the exact same way. So I am going to start stitching the very edge of the closure to the very edge of the elastic band, and I'm going to come around to the next side so you can see it a little bit closer. Since I don't have somebody to record for me every day, I use the people I can and I piece the parts together that you all need to see. So here on this side, I am starting with a new needle and thread, and I go through the dome cap just to secure that thread, and then I start stitching the closure to the dome cap. So I push my needle down through the top of the lace closure to the bottom, and then from the bottom of the dome cap out through the top. And then I just go in that rotation, so down through the closure, up through the band. Because of the way her ear is, I'm going to cut this up a little bit higher so that I have room to stitch this back here. I got big ears. Yes, I'm joking, I'm joking. I say thank you. No. So with the way I'm doing it this time is I stitch the front of the closure to the elastic part of the dome cap, and then I start stitching those flaps down above her ear to the braid. I'm always asking my customer, let me know if something's too tight, let me know if something pulls, let me know if something feels even just a little bit too secure because it'll only get tighter. Check with your clients while you're doing this just to make sure it's not too tight. Stitching this down. Is what's adding attention to this. So this is elastic. So once I sew this side down, that's where this stays flat to where it ain't gonna come up. The same way I sew on my regular closures is the same way I'm stitching this down right now. I stitch it onto that first braid just to make sure that it doesn't have that pull back. My clients say these sew-ins last until they take them out. They don't need touch-ups. The closure stays ahead of their hairline because of the placement initially. So It's a really good technique so that your clients get the longevity out of their install, plus they get a little forehead coverage, or they get to cover up something that may have been an insecurity for them. And let me just interject two things. Number one, look at that lace. Look at her forehead compared to the lace. I mean, it's already looking good. But number two, the major point is do not stitch this client's hair on her edges. So you're stitching to the elastic on the dome cap. You are not stitching all the way through to her edges underneath. Those edges should remain untouched. So now what I'm doing is I'm stitching onto that first braid again. And remember, anything ahead of that first braid should not be stitched onto on her scalp. Um, so I'm stitching on that first braid, and this also prevents— when I stitch the back of the closure down, it doesn't start shifting back. So if you were to start shifting the sides in the back of this and you had not stitched onto that first braid, your closure— I was getting ready to say frontal— your closure will start to shift back slowly as you stitch. So this first braid helps prevent that as well. So now I'm about to stitch the other side, and you'll get to see how I do that. And then again, I'll go up that first braid on the other side. You made it this far, go ahead and drop something in the comments. Let me know you still watching, you ain't skipped ahead. Because listen, if you have skipped ahead to this part, you have missed some key information. And that key information is not sewing this on too tight, not skipping a step like cutting off that band in the back. You really need to cut that off. So there's a lot of things before I do this that you need to hear. So if you skipped ahead please go back. Trust me, you want to go back. But I am parting out that front braid now, and I am going to stitch onto it— stitch that closure down to that front braid. And again, that prevents that closure from shifting backwards. And yes, it's just looking good, y'all. Come on now. And by the way, I did not bleach any of these knots. I don't bleach knots. I have a trick that I do and I showed you all that in my last video. So this is where her braid is right here, and this is how far up I'm bringing this closure. But you see, her hairline is right here, so it's not like it's too far up. Her hair don't start there. Her hairline starts up there, but it's the thinning. So now I'm going to continue on with the sides. So I stitch both sides of the front first, and I stitch that braid down, and then I stitch the rest of the sides down on each side, and then I go to the back. So I don't actually stitch the center of the back of the closure down until I'm done stitching both sides, and that helps prevent any type of like buckling or like folding in the closure. You want it to be nice and flat so that it looks like scalp. So while I'm stitching the sides down, I do add a little bit of tension so that the closure does lay flat. So I'm not just stitching it exactly where it's laying while it's flopping around. Like, I actually, as you see, I am pulling it more my direction. So my needle doesn't actually go through the dome cap until— I mean, it's kind of far away from the closure, but that gives it that room to pull it where it needs to be. Now, if I had went and start and continue to sew around the back as you see, it's floppy right there. It would not have been flat to her scalp once I got to that other side. So that's why I don't stitch the back until I got that other side stitched down. And you'll see, like, once I actually finish stitching this side down, it's super flat. There's like no gaps between it, no room for buckling. And again, if you are new to my channel, I do not braid tight. I am very passionate about what I do. I'm tender-headed myself, so I am always asking my clients, does it hurt? Are you okay? Does it feel okay? So it's important that you check on your clients and make sure that you are not hurting them, because beauty is not pain, okay? But anyway, so as you see, it is nice and flat, and I'm stitching that back side down, and you see a yank, but I promise you I promise you I am not yanking her head. Um, so I'm applying that tension to the back of the closure, and then I go ahead and stitch everything else. And I do stitch the bundles on top of that dome cap when I am stitching back and forth, and that will be in an up-and-coming video. So make sure you are subscribing if you haven't already, and drop a comment and let me know something you wanted to see that you didn't see or something that you wanted me to explain, because I have the closure and how I prepare that for an install and what I use is in my Amazon storefront in the description below. Thank you guys for watching this far. Turn on them notifications because YouTube has been playing your girl, okay? But I'm back, I'm back and I'm better. No. Do y'all notice this is my luxury deep wave hair that I used to call my Brazilian deep wave hair that has lasted the test of time, baby? I mean, it's still unmatched. It's unmatched. Okay, so I'm going to style hers and post the video at the end of this so you guys can see what that deep wave does, but it also does revert back to its natural state. It does go back to the deep wave, y'all. So if you haven't yet, my website is TTdoesitall.com. I do have hair for sale, and you can get it shipped straight to you like as soon as tomorrow. Oh, what did he— oh, watch him! What is my child back here doing? Jesus. Uh-oh.
More from LaToya






St. Louis, Missouri - Lasts 4–6 months - Takes 4–6 hours - Investment: $3,000 www.TTDoesitall.ai


What are #ktips? Here’s your answer! Schedule at www.TTDoesitall.ai 🩷 #extensions #ktipextensions

4-6 hours install and last 4-6 months #ktipextensions done by the right stylist the right way 💕

Located in St Louis Missouri 💝 Consultations available www.TTDoesitall.ai 💕#ktips #natural

K Tips take 4-6 hours to install and last for 4-6 months with proper care! #ktipextensions