⭐️NEW⭐️ 3 Part Lace Closure Sew in Start to Finish by @ttdoesitall
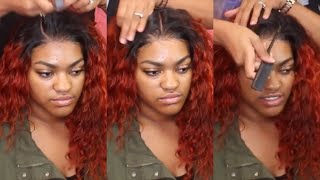
TT Does It All installs a 3-part lace closure sew-in using a horseshoe braid pattern that lets you part the hair multiple ways in front. She uses a 4x4 HD lace closure, stitches a net underneath to hide the cap, and applies adhesive for longevity. Three bundles of custom-colored Brazilian deep-wave hair complete the install.
Chapters
Hey everyone, it's your girl TT Does It All back with another slay. This one is something that I haven't really shown. I showed a video of this similar install, but I didn't show me parting multiple ways. So in this one, I am going to show that, and this is what we're going to accomplish. This is a 3-part lace closure. You get some closures that are 4x4 inches that can be parted like this, and some are 5x5 or 6x6. This one is 4x4, and it is my HD lace from my hairline tutidositall.com. We are gonna do this 3-part lace closure sew-in, so I am going to braid this a little bit differently from my typical lace closures. And let's talk about this braid pattern. I'm parting out a horseshoe here because I'm going to braid differently than this one that you see that popped up. And that one is just strictly a middle part. Some that I do for a side part, I only part that on the side. But for this one, we're going to do a horseshoe in the middle and those braids going back, and then the side braids around that horseshoe coming down from the side. And that is so that we can, um, have a flat surface in the front of that closure so that she can part it multiple ways. And that's what you saw in the beginning, the effects of braiding it towards the back. So I am going to braid her hair. She is using my Brazilian deep wave hair, 3 bundles, and I did custom color it for her. She sent me a picture of what she wanted and it came out so perfect. I use Pravana's Vivid line for her hair color and Pravana bleach or lightener. If you want to see the video of my hair and how I did that, I will put that video in the description, a direct link for you. But for now, let's quickly braid her hair and then get to the next step. So I'm going to keep braiding until I am at the back of my horseshoe, and then I'm going to start with that middle section, taking those braids straight to the back so that it's nice and flat, kind of like the way you braid for a frontal. You always want to braid away from the hairline so that it's nice and flat. And then I'm going to do the other side exactly the same as I did the first side, which is straight down from that middle section. That way we have those side braids to sew onto, just like I do for the middle and side parts, which I do have a tutorial on. If you guys have not seen those, they're in the description below. All right, so now that I'm done with that, this is going to measure, just make sure everything fits right. And then I am going to sew on the net. I am sewing on the net on the outside of the part that's going to be underneath the closure because you don't want that black to be showing when she goes to part her hair. Um, I could have left that black net over there, but I wanted to cut it out that way underneath where the lace is, is just the cap, which I'm going to do my own version of the ball cap method. If you're one of my Pro Slayers under my memberships, I will have this video up for you as soon as this video airs. Um, so that link's in the description below. But if you all have seen my regular sewing video, I am showing you that I just stitch it down on the sides first, and that is to make sure that it's still in place. You don't— and it's just me personally, I don't want to bond it down, and I don't have to bond it down at all, but you don't want to bond it down before you have stitched it because it's going to start pulling. So for this particular customer, I am going to use adhesive on it. You want the longevity of the wear, so we just want her to be able to tie it down every night, not have anything flapping up. And it'd be nice and flush with her skin. And as you see, it looks natural already. I'm going to go ahead and tie the next strip around it just so that it melts. That is the melting process is happening while I stitch the rest of the closure down. And then I will stitch the bundles behind it. And I am sewing in her bundles. The lengths she used will be in the description. And as you see, this matches so well with the picture she sent me of the color she wanted. Um, she said her hair used to be like this. It's, um, the color's fading out a little bit. But yeah, this is my Brazilian deep wave hair, and this is the natural state of it. So I let it dry on like a pants hanger and just let it air dry, and this is the natural texture of it. This is available on my website, and go ahead and check that out because I do have sales, uh, for the holidays and for my birthday. I'm gonna do a sale which is in March. So if you guys are on social media, make sure you check me out on Facebook. I'm also on Twitter, Instagram, Snapchat. I'm on all of them because you never want to shorten your reach. I'm even on TikTok, believe it or not. Okay, like Yes, I'm on TikTok. Uh, TikTok is actually hilarious. It's not all kid stuff, it's adult stuff too, and it's funny. But there are a lot of kids on there. But anyway, are you on TikTok? If so, drop your username, I want to follow you back. But this is, um, me almost done stitching around the closure. I do stitch all the way up to it. I have videos on that as well. How long have y'all been following me? If you've been following me for longer than a year, I need you to drop a star in the comments, okay? Because y'all have been following me forever. I've been on YouTube since 2006, y'all. '06. It's 2020. What? But you know, I'm doing better now. I upload every Friday, 6 PM. I used to go away for like years and then come back, so I'm not doing that again, y'all. I'm back. I'm here to stay. And yeah, so drop a star if you've been following me for a while. Drop a star. Who remembers those micro braid videos? I have come a long way, and you, my dear, have been right there next to me, okay? Because Lord knows I couldn't have done this same thing like 5 years ago. Mm-mm. But she has hair left over, which is awesome, and I'm just finishing that part up. She did want to leave it in its natural state This hair is beautiful regardless of curling, straightening, and it reverts right back to this after you let it air dry, um, after washing it again. So I am going to tweeze her hair, um, that part, just to define it a little bit more. And to see the things that I may not have shown on this video, make sure y'all check out, um, the membership pro page because I definitely uploaded a few things. That's the CuraCare wax stick, and then she's good to go. I'm going to show y'all how I'm parting it, and then we're set. Oh, this is just water, so I'm just gonna put water on it. I could have used my mousse that you all know— I have a favorite video of mousse— but I did not use that on it because that makes it hard, and we just wanted to put water on it and tone it down a tiny bit. But is this not gorgeous? I'm jealous. I really like this. I'm serious, some stuff I'll be like, she loved it but I hated it, but this I love. It's like burnt orange, it's perfect. But drop a comment, have you worn a lace closure before? Have you done the 3 parts? Are you scared of adhesive? Don't be scared of adhesive, ladies. It's all about Who puts it on in the correct application and how you take it off, and do you have the education? Okay, oh, who put it on in the correct application, how you take it off, do you have the education? I might need to rap, okay. Drop a comment if I need to make a song about lace frontals. No, I'm joking, I'm not making a song about lace frontals, but that was cool. So, uh, let me know if you guys like this. I actually love it. It looks very natural. This is my undefined baby hair look, so it's not like your typical finger wave-ish type baby hairs. These are movable. She can comb them all the way back, she can put it wherever she wants. And as you see, I was just kind of messing with them, making them a little bit more natural, not so thick. But I love this look. She is done. If you have not already, make sure you thumbs up this video. And if you're new to my channel, welcome! Go ahead and put that subscribe button. I don't bite, and I upload every Friday, 6 PM. So I'll see y'all in the next video. Y'all know I'm perfectionist. If you're new, yes, I'm a perfectionist. I don't stop until it's what I want. All right, y'all, but I will see y'all in the next video. Check out her expression once I show her the video. She's like, yes, cuz you know, I mean, like, the mirror is pretty far away from my customers. They're in front of a mirror, but it's far. But once she sees it up close, she going to be like, ew, looks good. Make sure you tie your edges down with a scarf every night. Scarf? Okay, I was just about to ask. Scarf, not a bonnet.
More from LaToya






St. Louis, Missouri - Lasts 4–6 months - Takes 4–6 hours - Investment: $3,000 www.TTDoesitall.ai


What are #ktips? Here’s your answer! Schedule at www.TTDoesitall.ai 🩷 #extensions #ktipextensions

4-6 hours install and last 4-6 months #ktipextensions done by the right stylist the right way 💕

Located in St Louis Missouri 💝 Consultations available www.TTDoesitall.ai 💕#ktips #natural

K Tips take 4-6 hours to install and last for 4-6 months with proper care! #ktipextensions