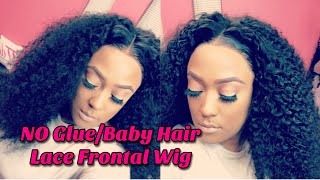
In this 20‑minute YouTube tutorial, LaToya Kelly (aka TT Does It All) demonstrates how to install, style, and finish a 20‑inch 360‑lace frontal wig without glue or bleached knots. She begins by showing the wig’s natural curl pattern, then walks through pre‑tweezing the hairline, cutting the lace, and adjusting the internal clips for a secure fit. Kelly explains how to tighten the wig, create a middle part, and style the edges using a homemade baby‑hair cream she sells. She uses a tie‑and‑dry technique with a strip to set the edges, applies concealer to blend the part, and shows texture transformations by wetting the hair with water and foam before brushing. Throughout, she offers alternative methods for those uncomfortable with bleaching knots, promotes her own baby‑hair cream, and references Wild Ebony Hair Company for the wig purchase. The video ends with a call‑to‑action for viewers to comment, follow her on social media, and share their experiences with the product.
Chapters
Hey everyone, it is your girl TT Does It All, and this is a Wow Ebony hair video of a 20-inch 360 lace wig. And on your left is when I put like water and my foam on it, and the right is it untouched, just brushed out. All right, so this is what the wig looked like, and I had tweezed the front hairline, but I hadn't brushed it out yet. So you can see like the hairs that need to be brushed out up there, kind of bunched up. But this is a natural curl pattern on the back of it, and this is the details of the hair. Or of the wig. Okay, okay. All right, so first I'm going to cut the lace off, and again, I have already tweezed. I did not bleach any of the knots because, um, what if you don't know how to bleach knots? Or what if you're like, I'm just not good at it, is there another way? Yes, there's another way to make this look good. So again, first I tweezed the hairline, and this did come pre-plucked. However, I I still tweeze. And 9 out of 10 wigs, I still tweeze all of them that say they're pre-plucked because I like it to look really, really natural. So with the look I did today, I wanted to do something a lot more, um, less drastic. So this is a 360 lace wig, and you see that the lace goes all the way around behind my ear, the back of the nape. And this is what it looks like in the back. Here you you can see if you wanted to wear your hair pulled up. That's what a 360 full lace— a 360 lace wig can do for you. You can wear it up in a high ponytail and nothing show. So with, um, with it, it comes with lace all around to cut off, and I cut right up to the hairline. You can see exactly where my scissors are going. In the previous videos, I didn't have it as clear to see, but in this one, it's very, very you could see it very well. All right, so here's the inside of the wig. It has 4 clips, 2 on the side, 1 in the middle, and 1 in the bottom of the back. And I'm just gonna try this wig on without adjusting the straps in the back and see. And I was like, yeah, no, it's way too big. So I tightened it. And I do wigs all the time, so I know exactly where to tighten mine to. And I put that clip at the bottom of the back, and then I just pull the front of it up to my hairline, and I'm like, oof, okay, this is what we working with. So I'm just kind of evening it out to my hairline. Where do I want it? How much forehead do I want to cover up? Because as I've said in one of my previous videos, to me, the whole advantage of having a lace frontal is I can get rid of the five head and make it a little forehead. Okay, instead of a forehead, I have a five head. And I can make it a forehead all over again. So, so that I don't have to glue this down, I'm going to cut the sides off and use my own sides. In my previous video, I discussed this, so please make sure you watch my videos because the voiceovers are really detailed. And if you watch me, I'm sure you know why that is left out. Okay, okay. All right, so I'm gonna do a middle part for this because with curly hair, I am really into middle parts, and this is kinky curly texture. So, and again, you see that, that part right there, I just, I did not bleach the knots. So if I had bleached the knots, it may be a little bit lighter. But again, for those of you who don't know how to bleach knots or uncomfortable doing it, this is an alternative to make wherever you part your hair look just natural and beautiful. All right, so now that I am combing out those sides, I'm going to actually let those be in the wig and combed out of my face. So traditionally in my videos and my frontals, I usually do something like baby hairs. I do like a little swivel, swirl, whatever you want to call it, and then I make little baby hairs into a style. But this look, I've never done it really out of your face without baby hairs, so that's what I'm gonna do with this. Edges. And I'm using my baby hair cream that I make and sell myself, and that's in the description below. And I'm using that on the edges, and I'm going to tie it down and then go from there. So it really did not need anything on it, but unless I was going to take this wig off, sit on a mannequin head, brush it, and style it, I would have to set it to my head some way.. So I'm doing that with my baby hair cream, and I really wanted to do that on my head also. So I'm doing the other side the same way as I did the right side, and I'm going to just lay my baby hair cream on it, comb those hairs back, and also comb my real hairs in this little corner right there back also. And then I'm going to put a strip across the hairline. So here's the strip, and then I'm gonna tie that up. Tie, tie, tie. And the next thing you're gonna do is sit under the dryer. When you get out of the dryer, take the strip off, and you are set. And now I am able to just brush and check out all of those curls and just get it nice and brushed out. Okay, so this is what it looks like when I just finger comb through it, and I'm going to show you those pictures. That is what it looked like in its natural state, and then I'm going to make my hair part look a little bit natural with some concealer. Whatever concealer you use is up to you, just make sure it is your skin color. That is the most important part. So I just made my part look a lot more natural and realistic, and I am pleased with that. Yes, you cannot say that that is not crispy. And you can see the difference that when I part on the other side You see that line? It's not as defined and it's not as light. And that's how much parting space you do have on the frontal. So you can do other parts than this middle part with this unit, but for me, I like it. All right, so you can see this is before the concealer, so I'm sure you all can tell the difference because it is a big difference. But the hair is beautiful, isn't it? I love kinky curly hair. It's just so big and pretty. But if this look is not for you, I do put some water on it and some foam, and I tone it down just to see what it's gonna look like. So I am using a big paddle brush. I'm using water in a spray bottle. And there's some— which side you think, left or right? I liked it with it toned down a little more and more defined and uniform. So I did go ahead and just wet the whole side down to make them both match and just kind of brushed it through, put more foam, put more water, and I let it be gorgeous because it is gorgeous. Okay, so here's the back, and you all saw in the beginning of the video, this is 20 inches, and this is the natural state of it. So let me know what you all thought about this look. Would you rock it? Because this is a wig that— I don't know, I could honestly keep this wig forever and not let anyone else have it because it is so easy. But I love it. What do you all think about the texture? What do you think about the curls? It is such a difference from when it was in its natural state and those little coils from when you actually brush it out and wet it and brush it through. It is so pretty now. But as you see, I'm really feeling myself and I'm really feeling these curls. But, um, I actually put every video, all of my YouTube styles, I put them on my Snapchat and my Instagram first. So make sure you all check me out on Snapchat and Instagram. And I'm also on Facebook too, if you have that and not the others. But thank you all for watching. Thank you all for the support throughout all of these years. Oh my God, look at the— look at the hair before I actually put water on it. This was when it was brushed out. Oh my God, it's so pretty. Oh, Keisha Marie did my makeup, per usual. She's flawless. I mean, Oh my goodness, my videos are like— they could be like a 5, but with her makeup they're like a 12, you know, out of 10. But yeah, you guys, let me know what you all think in the comments. Leave me an emoji. Let's see what emoji we're gonna do this time. Let's drop the fire— the fire emoji. Let's drop fires in the description if you thought this look was fire, okay? And I will look forward to seeing you all in the next video. And also let me know if you all have heard of Wild Ebony Hair Company. The information is in the description below as far as how to get this hair, how much it costs if you wanted to order it for yourself. And if you already have, drop a comment and let me know about your experience because I would love to hear it. All right, so I will see y'all in the next video. Huh? Ooh!