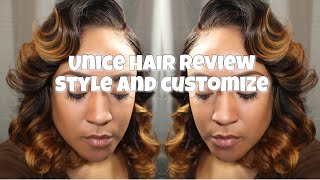
LaToya Kelly installs a UNice hair frontal without glue or tape by sewing it to an elastic band on a cap, then customizes the hairline and adds baby hairs with cream. She used two 13-inch bundles but recommends three for fuller density, and bleached the frontal with 40-developer without losing the curl.
Chapters
This video will show styling the hair, putting it on, and making it look like what you see today. All right, so first I'm going to start curling, and I'm curling away from the face on each side. So I curl one half going towards the left and the other side going towards the right, and I will do that all the way up until I get to finish all of the curling. And I'm only curling it before it gets on my head because, of course, as you all know if you've done your own curls before, It's a lot harder to curl your hair on your head in the back than it is while it's on your head. So I figure I could just curl everything and then, um, put it on my head and actually perfect it to how I want it styled. And if you are subscribed to my channel— first of all, if you're not, you need to subscribe— and if you are, you know that I am all about my deep side parts. Which is why this turned out to be a deep side part. And if you have not checked out the video of me coloring the hair already, the back bundles did come already ombre, and the frontal I actually did myself, and I have the video of that in the description below. Um, yeah, this is Unice hair. The hair is very beautiful. I did say in the color video how I actually had a little bit of shedding with it after I bleached the frontal. After that, I had no problems whatsoever. And I will be doing an updated video on this video— I'm sorry, an updated video on this hair in about a month. So make sure you stay tuned for that. But look at that hair, look at that color. Oh my God, it's so pretty. Okay, so, um, after curling it and fingering all those curls through I am going to put it on, and this only has an elastic band. I talk about that in the video of me coloring this hair and showing how I sewed it onto the cap. So make sure you check out that video for sure if you have more questions, because if it's not answered in this video, it is answered in the previous video. Um, so there's the elastic band, and I just Slip it on and then I get to customizing. Usually I cut the hairline as it's on my head, but for this one I decided to do something different and cut it before it was on. So I'm going to customize it to my ears by cutting it while it's on because it's 13 inches long. You'll always have the little excess lace, the ex— excess lace over the ears, so You want to cut that off, and then I will choose my part, which again, I love my deep side parts, and I'm not steering far from it. So I am going to flatten it a little bit. You can use like a curling iron, a wand, a mini flat iron, whatever you want to use. And the description has everything I use in the videos that I post, so make sure you check those out. Um, here's where I'm going to do my little baby hairs, and I use my specially made baby hair cream, and that is also in a link that is in the description. So I make my little baby hairs, I just do one on each side, and then I do my little sideburn, which the baby hair cream is actually what I use to hold my frontal on to temporarily instead of gluing it down since it's just a wig. I want to take it off every day, and I am actually just going to go into perfecting my curls the way I want it to work, or the way I want it to flow for me. And yeah, I will say that I should have put some oil on this hair. After the video, I did put oil on the hair, and all my little flyaways just came right into place. For the part, I actually use my CuraCare wax stick, and for the rest of the hair, I just sprayed a light mist of oil, and you won't have those flyaways. Um, I used 2 bundles, but for this look, I would have loved to use 3 instead. You all know I love full hair if you've been following me for a while, so this is more of a natural everyday look than I like to go for, but overall it got the job done. I have customers who have brought this company's hair for me to sew in, um, many times, so this is a popular hair company, and I have not had complaints from my customers either. So, um, this is a very reputable company. They have a big following already. So that should tell you a lot about how nice their hair is. And I did notice with the ombre bundles, they were a little bit thinner at the ends, but if it were not the ombre bundle, it would not be that thin at the end. And also, if you have a problem with the density of this particular wig I just made, you can just add a bundle because again, this is only 2 bundles, so Adding a third bundle is what I use pretty much for every one of my clients anyway, so you wouldn't have a problem if you just added one. Even with the 40 developer bleach I used on this, I still have movement in my hair. My hair still curls very pretty. You see that the frontal just melts right into my skin. I did not use makeup on my frontal at all. I did bleach the knots, but this is my overall look. So if you want to see how I got these highlights and everything in the frontal, that video is in the description below. And leave a thumbs up and drop a comment and let me know if you like the chunky highlights and how would you style your hair differently, or tell me your thoughts. Alright, I'll see you on the next video.