🚫 No Leave Out? No Problem! 🚫 The SECRET Under-Braid Stitch for Flawless Ponytails Revealed! 🔍
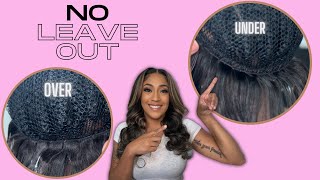
LaToya Kelly shows how to sew hair extensions under the bottom braid of a sew-in so the track stays hidden when wearing a ponytail. She walks through the lock stitch technique, needle positioning, and how to tuck the weft underneath without stitching through the braid itself.
Chapters
So the whole benefit is when you lift it up, you don't see that track. Yeah. Hey y'all, it's TT. So in this video, I'm going to show you how to sew underneath the bottom braid so that a customer doesn't have to leave hair out. They can still wear their hair up in a ponytail or a messy bun and not have to worry about their track showing. So if you watch my dome cap method video, I show how I sew on the cap and how I always have that extra amount of thread which I intentionally leave. The bottom layer is honestly the longest row to stitch because you're trying to get underneath the bottom of the back. Sometimes it's hard for the customer to lean their head down forward, but here is where the only time I stitch through the weft is at the beginning, and the rest of the time I stitch above and underneath. And you're going to see me place it there, and I'm going to push it underneath the braid. So as you see, my finger just pushed it right there. I just pushed that track underneath the braid. Now I know in my previous videos I said that I hate loc stitching, but when you are trying to achieve the stitching underneath the braid, it's important to do the loc stitch because the loc is actually what keeps it underneath the braid. So it still won't cause this sew-in to be impossible for the customer to take out because they can still see the brown thread, number one, and number two, it's only this one row underneath the braid. So I'm doing this lock stitch technique, and as you see, I go down and loop over, down and loop over, down and loop over. And you'll be able to see the pattern really, really close in detail once I actually get going. But you stitch down through the braid, underneath the weft, and loop the thread around. And you don't actually have to go round and round, you just go— you're just going through the thread. So you see I'm holding the thread down as I'm stitching underneath the braid, and I just pull it through. So this technique is locking it in place. As you see, my finger is still holding the placement of the track underneath the braid, and I'm stitching above the braid, behind the braid. So I stitch behind the braid Underneath that weft, and I make sure the thread is to the left of my needle. Let's be honest, we're entrepreneurs, we're creative, we don't care about the legal stuff. It will affect your business in the long run, and trust me, you want a lawyer on your side. I've used Rocket Lawyer myself, and trust me, it's a lifesaver. I didn't think I needed a lawyer until a customer came, paid in full on my website, and after she got her hair done, LaToya Kelly asked her about home, and next thing you know, there's a chargeback on my account. I needed legal help. The legal help would tell me what I could do, what I needed in the future to prevent these things from happening. A Rocket Lawyer isn't just to help you once you've gotten into something, it's preventative. Yeah, I know it's not as glamorous as talking about hair extensions and beauty, but you'll thank me in the long run. If you're juggling with your business, your side hustle, or even just trying to understand the legal side of your business, trust me, you need Rocket Lawyer. Double tap that link in the description and see if it's something that you need. So if the thread is to the left of my needle, automatically when I go through, it's going to lock it in place. So I'm going to show you again. I'm going down through the back of that braid through the bottom of that weft, and the thread, as you see, is on the left of the needle. So I hope that makes sense. I'll do it over and over again so you'll get to see it super close up and personal and slow. Um, and I'm also going to show just one more example of it on another customer, but I am going in and out still the same, and I'm lock stitching it. Sometimes you'll have to pull each side of the string if it does get uneven, but you want to make sure that you're continuing to guide the weft underneath the braid so that when you're stitching it there, it locks right into place and the customer won't have any problems with it moving. After this layer, I do stitch the next one on top of the actual braid. So here's another close-up where you see me going in the braid and out. So I'm grabbing the thread the needle through the thread. So you see I'm holding that thread at the bottom, and then I'm going through the needle, and the thread is on the left of that needle that I pulled through. So with everything that I'm doing, just make sure you're watching it super closely. Watch how my fingers are grabbing everything and pushing everything through. There's also a section right here where you can see my finger push the track down. The track is coming over the braid So I'm going to go ahead and push it down underneath the braid, and then I'm going to continue my stitch. So sometimes that'll happen where you'll see the, the track is trying to come over the braid, so you have to kind of force it underneath. And as you lock it in, as you see to the right where I've already done the stitching, it's not moving. So then I'm going to continue on to the next row. And you guys, I know what it's like to have to stop and start a video a million times, So I've made sure that when you pause this, like, none of the outside things that pop up on YouTube are in the way of the video. So you'll be able to see really clearly, like, what I'm doing in the center of the screen. So here it is, and I'm going to flip it up so you guys can see. And as you continue to sew, and you're going to want to just make sure everything's underneath the braid and snug. Once you stitch on again to that first braid, it'll just lock that into place even more. So as you see, there's no tracks showing, and once her hair grows out, it'll really, really, really start to look natural because, um, the new growth is in. It's just kind of like a messy ponytail. Now, if you're trying to put a ponytail at the top of your head, I would not try this. But if you're trying to just get a messy bun or you're trying to get your hair off your neck and you don't want your tracks to show, this is something that's a good solution for you. So I'm gonna go ahead and just stitch around. You guys continue to watch and drop a comment if this is something you guys wanted to learn learn. If there's something that I haven't said, or if this is like, oh my God, this is a game changer for you, or anything, just let me know. Because there's a lot of tips and things that I just do on the regular that I don't realize you all want to learn. So make sure you guys drop a comment. If you're still watching at this point, go ahead and drop a heart in the comments. I am going to let you guys just watch everything. I'm no longer loc stitching, I'm just going to stitch back and forth, back and forth. So this is a part a lot of people ask about, and that's how I end the weft on the temples of person's head. So I only knot the threads here. So I pull it through the track, and this is just a little sample. I'll create a full-blown video on this up close and personal. But you see, I wrapped that thread around the needle, and then I pulled the needle through, and it's secure. That is secure, so it's not going anywhere. None of it's moving. That's how I lock stitch only at the end of each row. So that gives me the support to just stitch in and out, in and out, as I do the inside of the sew-in. My customer's hair never falls out. So a lot of clients will ask me, hey, how long do your installs last? They last until you take them out. My installs do not fall apart. Some people may think the loc stitch technique helps their install longevity, but I am here to prove you wrong because I do not do it in the inside and my sew-ins last just as long. Um, so that is just a quick little teaser of what is to come. Let me know how you guys are liking these 4K videos because my iPhone is killing it. So here's another angle I tried to do. I don't think it was that good of an angle. Y'all let me know in the comments what y'all think about this angle because honestly you can see it really good here. It's just the lighting was a little bit off. But let me know if the second view was a good angle for you guys to see, um, if I need to slow it down maybe, or what you think. And you know what, what the heck, I'm going to replay that in slower motion. And I think this is a really good angle now that I'm really looking at it in slow motion. I feel like I'm about to start talking in slow motion, but yes, I think this really shows you all the loc stitch. Now, isn't this silly to do all throughout the head? It just seems like such a waste of your time, but that's neither here nor there. That's not my business, okay? My business is my business, and I'mma— what do they say, uh, mind the business that pays you? That's what I'mma do. So Yeah, I really enjoyed this voiceover. I really enjoyed giving you all a little bit of my story, the story that happened with those two girls, which— oh, if they was watching, what would I say to them? You might win some— never mind. No, but, uh, what I would say to them is karma is the mother. That's it. You know, God is blessing me 10 times over, so I'm not worried about it. I was— my feelings were really hurt, and I'm not afraid to say that I literally cried about it when there was like nothing I could do. I mean, but I want you all to be more prepared than I was because I just didn't expect it. It's like I was doing hair, walking around like I couldn't be touched, and when I got touched, I was, I was shooketh. I was shooketh over. Okay, so I really enjoyed making this video for you guys. I hope you guys enjoyed it just as much as me. I'm still sewing. I'm going to still show you all close up and personal how I stitch So enjoy the rest of this video, y'all. I'm, I'm so happy I can start giving y'all these up close and personal videos. Like, y'all don't understand. So as I was saying about Rocket Lawyer, I've got an affiliate link in the description below. It won't cost you anything extra, but it will help support the channel and it allows me to keep bringing more great content. So it's a win-win. As always, I only recommend tools and services I believe in, and I think you could benefit from. So thank you all for the love and support, and I'll see y'all in the next video.
More from LaToya






St. Louis, Missouri - Lasts 4–6 months - Takes 4–6 hours - Investment: $3,000 www.TTDoesitall.ai


What are #ktips? Here’s your answer! Schedule at www.TTDoesitall.ai 🩷 #extensions #ktipextensions

4-6 hours install and last 4-6 months #ktipextensions done by the right stylist the right way 💕

Located in St Louis Missouri 💝 Consultations available www.TTDoesitall.ai 💕#ktips #natural

K Tips take 4-6 hours to install and last for 4-6 months with proper care! #ktipextensions