PROTECTIVE Tips and Tricks | No Leave Out | Lace Closure Sew in | NO glue | Start to Finish
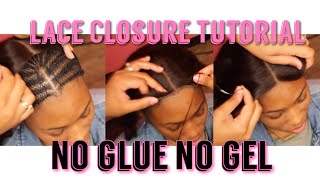
LaToya Kelly shows how to sew in a lace closure without glue, reparting it into a curved side part and stitching through the braid underneath to keep it centered. She uses a hot comb instead of a flat iron to flatten the lace, then presses the wefts and tweezed the hairline for a natural look.
Chapters
Hey everyone, let's jump right into it. Part 1 with the braid pattern and sewing on the net is all in the description below, but for this video, let's jump right into sewing on that lace closure. Regardless of the size of the closure, you can part it any type of way that you want to. So this particular closure came with a middle part already in it, and my client wants a side part, so I'm going to change it to a side part. And what I do is I take my rat tail comb, which is my carbon comb, and I part it to to the side, and I like kind of a slightly curved side part. If you all are familiar with my work, you see that even my side parts are not straight back. I do a slight curve, and that's just what I prefer. So I part it and I lay it flat with my hand, and then I hold the— hold it down with clips, and then I want to use heat to flatten it. The link to this video is in the description below. This is an older video. I still use the same technique in 2020. The only difference is I use a hot comb now. Um, when I used to use a flat iron, I would clamp it so the bottom of the flat iron would be on the bottom of the lace and the top of the heat, um, on the flat iron would be on the top, just flattening it. But I noticed that as lace progresses, that heat is a lot hotter than the lace can take, so I don't like to use, um a flat iron anymore. So then I started using a wand. Then I got familiar with the plug-in hot combs, so now I use a hot comb. So what you're going to do is just apply that heat to each side, laying those hairs in the direction you're holding them, and which is the direction it's going to go and look natural when it's on your customer or your own scalp. So I just apply the heat to each side, and then I, um, will show you the next steps. On this step, I thought I was recording the cutoff, but I was not. It was out of the screen view. But I use my makeup palette from MAC, which has like 6 different colors in it, and I use a flat brush from MAC. All that are in the description in that video. And then this is your outcome. It melts right into my skin. So with today's customer, I am going to pull that up in front of her hairline because as you sew, it will kind of come back a little bit. So I am taking this through the bottom of the lace, only the lace, not the braid yet. And you see that knot? We want that to be secure under the lace. You don't want it to show outside of the lace, so you want to go inside out. Just a short piece of information, I do have a video in the description showing what length for your thread you would need for the closure. You don't want it to be extra long because it'll just go wasted when you cut it after you sew on the closure. So you want to use as much as you need, which I have calculated after doing this from years and years. So that video is in the description. I'm pulling it forward because again, as you stitch, it's going to move backwards. So you want to have it a little bit forward to give it some wiggle room. And then I'm going through the lace and through that first braid again and again until I feel like it is secure, and then I'll move to the other side. And I do it about 3 times, and then I do the same thing. So I'm going through the top of that lace, inside that braid, just to hold it as an anchor. So you see the middle of that color where I put the foundation and her hairline match right up. The middle part is right to the middle part, and I did part this in the middle just like I did that previous video. This did not come with a part at all, so I'm going on top of the lace and through the braid. So through that lace and through that braid, and I'm making sure that it is nice and snug because I need that thread to pull each side nice and flat. So what I do here is I make a part, and I'm parting in front of that braid, and I feel where the front of that braid is as I'm stitching. So I am stitching through the braid, in and out in front of it so that this closure will be just stitched to that braid, and that will prevent it from sliding back and flopping up. So as you see, my pointer finger was feeling where that braid is, and I'm just going straight through it. I want to make sure you keep all the hair in front of it and behind it nice and flat so that when you go to comb it it's flat. And as you see here, I'm making sure none of the hairs are in the way, and it's a straight line. So you see my finger kind of feeling where that braid is just to make sure that I'm right in front of it. And this technique can be used when the client does not want a 3-part closure. You all know I have a video on my 3-part lace closures, sew-in. I will also do one on the 3-part lace closure sew-in without glue, but this is for a single part. So I'm gonna feel where that first braid is, and I'm gonna part right in front of it, and then I'm going to stitch the exact same way on the other side. And I'm making sure I part a straight line because when you go to comb or style this hair, you don't want to snag on any hairs or thread. So I'm stitching through that first braid, going in front of it to back, back in front. So I am looping it straight through that braid and coming right back out the same line. And again, this is only stitching it to that braid, and this is only for that middle part. So I just felt where that braid was just to make sure I go through it, and I go all the way up the braid, and then I come back down. So after I've done this on both sides, then I will sew the sides of the closure down. So I don't start stitching on the sides of the closure until I am finished sewing the front. If you skip this technique and you just sew one side down and go all the way back, and then you sew the other side down and you go all the way back, you'll notice that your part is off-center. You'll also notice that the front of it has shifted back. So right now I am just going to start stitching the front of it down that's in front of that braid and just stitching that into the front of the braid. So the piece of lace that's laying on her forehead, that's a little bit before her hairline starts, and on the sides— and if you think about it, the client's middle of her hairline right in the center, it goes further forward than her hairline on the sides. So this is bringing that all together, is making it all line up and match so that the sides are a little bit more forward so that her middle can be forward to match her hairline. I hope that makes sense because as you see, the outcome is flawless. So if you follow these steps piece by piece, you'll get the same results. So after you're done securing each side of the front, you then can go and just stitch down the sides. Um, I kind of sometimes will hold my finger over the middle part just to make sure it's in place. You don't want the front of her hairline on the closure to be in the middle and then the back starts shifting to the left or right. So sometimes you want to hold your finger there just to make sure that the middle of the part stays in the middle of her head. Um, and then you just go stitch around. And if you have watched my stitching videos, I overlap my stitching at the end of each thread. I do not tie in my sew-in until the entire sew-in is done. And that's just to help the client when it's time to take it out, and it also takes you less time because you don't have to keep stopping and knotting. So I am going all the way over to one side, and then I'm taking that previous side and I'm crossing over the other side. So I do more of a double over stitch instead of tying. So I'm kind of double backing over my stitching, if that makes sense, hopefully. All right, so I cut that off, and then is where you begin your sewing. So you all, I have videos up showing how I sew in, but you want to clip this piece up right here out of your way so you can finish your sewing around it. And I will come back after I've stitched everything down and then show you exactly how I do around the closure, because you do want to stitch all the way up to the closure. You don't want there to be any gaps. So again, I have the video in the description on how I do my stitching. Very detailed, nothing has changed. And then I will show you how to sew— not show— how to sew around the closure. Do not feel like you're missing out on anything. I do have a very, very, very, very detailed video if you just click the link in the description. I promise you will not be disappointed because it will teach you everything you need to know. So as I continue to stitch, I will get all the way up to the closure, and then I will close off the space between the closure and the wefts. So I'll zoom in a little bit and show you. That is me stitching through the outline of that closure underneath the weft, and I will just make sure that there's no spaces or gaps showing so that when you comb that closure over that weft, you don't have net that you're snagging, you don't have thread that you're snagging. It's a seamless transition. So that is really important to make sure that you stitch all the way up to the closure so that there is no gaps between where the closure stops and where the bundles begin. If you all are still following along with me, make sure you thumbs up this video and subscribe if you have not already. I drop videos like this every Friday and sometimes multiple times a week, but this is the only time I knot or tie anything, and that's at the very end of the sew-in. So I'm going to use my hot comb to kind of flatten out the root of that weft since it's been in that bundle. Sometimes that happens. And I'm just going to use my hot comb to kind of comb that wave out of it. And now it's time to just press the flat— or press the flat iron— it's time to press the front or the frontal. God, Jesus. It's time to press the lace closure hairs back into the sew-in. So this client did bring her own hair. These are not my extensions. I do have my own extension line, which is on my website, TTdoesitall.com. But again, I'm using my hot comb just to flatten everything back and to be nice and flat. And then you can style it as desired. After this step, you're pretty much done with the hard part of the install. So I want you guys to drop a comment and let me know if this looks super, super difficult. Does this look easy? Are you gonna try it? Have you tried it? I really want you guys' feedback, so make sure you drop a comment and let me know. This video has went on pretty long, I feel like. So, um, I'm eager to see who all still paying attention and listening. So let's make sure you all drop a comment and let me know that you watched till the end, because I pay attention to y'all. So this is the final, final, final customizing piece. I tweeze a little bit, and I have a mirror on the other side of the room, and you want to the naked eye this to look like it's coming out of her scalp. Which is why I tweeze a little bit. So I will show you a side by side of the difference of it being tweezed versus not tweezed. And tweezing to me, on top of her color on the part, just makes it look that much more natural. So I will see y'all in the next video. Make sure you thumbs up this video if you have not already, and don't forget to subscribe for more videos like this.
More from LaToya






St. Louis, Missouri - Lasts 4–6 months - Takes 4–6 hours - Investment: $3,000 www.TTDoesitall.ai


What are #ktips? Here’s your answer! Schedule at www.TTDoesitall.ai 🩷 #extensions #ktipextensions

4-6 hours install and last 4-6 months #ktipextensions done by the right stylist the right way 💕

Located in St Louis Missouri 💝 Consultations available www.TTDoesitall.ai 💕#ktips #natural

K Tips take 4-6 hours to install and last for 4-6 months with proper care! #ktipextensions