Secrets to customize a Lace Closure sew in
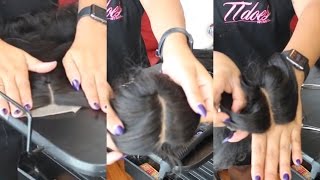
LaToya Kelly shows how to convert a middle-part lace closure to a side part without damaging the lace. She uses a curling wand instead of a flat iron, matches scalp color with MAC concealer, and blends the hairline with KeraCare Edge Tamer for a seamless finish.
Chapters
Hey everyone, it's your girl TZ Does It All, and these are tips and tricks on customizing a lace closure. And I use a few things, but before I actually install it, there's a couple things I do as well. This is a middle part lace closure, and I'm going to change it to a side part. And I'm going to do that by parting it where I want it, sectioning it off, and then applying the heat on the top of the closure. To flatten it where I want it. So I actually use a wand curling iron because the heat from a flat iron can sometimes be too much for the lace. So here I'm going to be very careful not to touch myself, and I'm just going to flatten it out by just rubbing that heat from the wand across the top of it where the hairs are. Basically what I want to do is change the direction where the hair is laying. So you don't want to use a flat iron because the heat on that lace can melt it. I've even had situations where some closures have melted, some have not, but you want to just be very careful when applying heat to the lace, especially if you don't know what kind of company or lace you're dealing with. In this particular instance, the client brought her own hair, and I don't have the specifics on it because she purchased it on her own and brought it in. I'm just kind of customizing it and installing it. So again, I'm just going to apply heat to the top of it because I don't know how the lace underneath will react to high heat. So now that I've changed the direction on where the hair is laying on the closure to the side part versus the middle part, I'm actually going to cut right at that line where the hair starts, and I'm going to cut that excess lace off. Unfortunately, I thought I was in view of the camera, but I was not. It was clearly— I was trying to be, but Yeah, I basically cut all the way up to the lace. The next thing I'll use is my concealer palette from MAC. This I love because it comes with different complexions, and I use my flat brush, and I can kind of play with the colors and make it match what her scalp looks like. That way, as soon as I put this on her head, it's an automatic blend. So most women have makeup at home and we have makeup brushes, so this is something that you can do if you already have a lace closure and you kind of want to make it look more natural. This is something that will not affect the longevity of your closure because you're not bleaching the knots and you're not causing it to shed more often. So after installing, which I do have a video of how I install my lace closure,, but after installing it, there's more customizing things you'll have to do. So for instance, I still use my wand and I still use my flat iron, and I still have to flatten it once it's on the client's head. If the client wants volume, I won't use the wand as much when it's already on the client's head. The wand takes away that, that height in the closure. The wand flattens it to where you don't have volume in it. Now if you're like me and you like volume in your deep side parts or volume in your, in your side parts period, I wouldn't use the wand on mine to flatten it as much. I would want to leave some of the volume in the closure. So here I'm just showing you how I'm curling it, and again, I can customize my heat depending on how well my flat iron slides across the hair. So if I go to curl it and it does not slide across the hair, I know that this hair cannot take high heat like I'm applying. So yeah, I'll just show you all how I flatten out the closure and style it, and then I will come back. Again, this wand is taking away the volume. Some people don't like volume in the top of their head, some people do. So for this particular client, I'm taking out that volume with that wand. If you want to keep volume, that's when you don't use the wand, you just use a flat iron. And straighten it or curl it. I mean, the volume will stay in there. If you all notice, in most of my videos I usually speed them up, but because I want you to see every little detail and step that I take on this closure, I'm just leaving it as its natural time and I'm not going to fast forward it. While I customize it because again, I want y'all to learn. I don't want to miss a step and I'm definitely not trying to skip anything that I'm doing or hide anything that I'm doing. So yeah, this is just the natural timing. I'm not speeding anything up so you guys can see everything that I'm doing. Again, right here, this closure already has volume in it. I want to flatten it because my customer does not want that volume. She doesn't want it in her face. So you see how I'm pulling it to the side as I apply that heat. Then I'm going to style it as desired. Sometimes I cut before I curl, and sometimes I curl it first and I see exactly how my curls are going to lay, and then I cut it how I want it to look. I ask clients, do you want me to cut the bang, or do you want me to leave it how it is now? And for some clients who don't know how to style their own hair, I recommend cutting it because the way I curl it is easy for me to do, but when you get home, it's not as easy for you to do on yourself if you are not really familiar with curling. So I recommend clients who don't really know how to curl their own hair as well to go ahead and let me cut it. That way it's a lot easier for them to cut— to curl it and make it look like when they left. So after I've installed it and done everything else I want to do to it, I apply some of my favorite products. This one's in my list of products that I love, which is a hair oil. I've been using it for years and years, but I'm going to spray a little mist of that. A little bit goes a long way because it can weigh your hair down. And then this is one of my other favorites from Razor. It's the polishing gloss, and it smells so good, and the shine is like pretty. So I go ahead and apply that to the ends, and that way, you know, her ends aren't dry or anything. So I'll comb that in and smooth all of that in, and I'm just kind of finger combing through my curls. And then I will lay the edges and kind of comb everything through. Don't judge my hair, y'all. This is like right before I did my crochet video on myself, but, um, yeah, I am smoothing some of the concealer in with her, her real hairline and smoothing it right into the closure. That gives it a look to where you don't see a line of demarcation, you don't see anything changing, you just see the same color all the way from her forehead. So I will still use my KeraCare Edge Tamer and kind of lay those edges down. And then I will be finished. What do you all think about lace closures? I personally love them. If I could— and I might actually do one on myself in a couple days— but I love them, especially, I mean, when you know how to blend it and make everything look natural— sorry about my little fro in the camera— but when you know how to blend it and make it look natural, when your client uses a scarf versus a bonnet and actually maintains her hair throughout the months she keeps it in, I mean, they're so worth it. I've seen so many of my clients grow their damaged hair out a lot of clients have had heat damage. They come to me after doing a bunch of quick weaves and they're kind of ready to grow their hair out. So this is an excellent way to— it's not damaging your hair in any way, shape, or form. And I don't braid tight, so the tension is not heavy on the client's hair to where it's pulling it out. So let me know what you all think about closures. Make sure you thumbs up this video and comment below. I am definitely waiting for your response because I love watching y'all's feedback, and I am so thankful that you all love my work. If you enjoyed this video, please subscribe. Don't forget to comment, rate, and share this video with fellow stylists or clients that you want to see my work.
More from LaToya






St. Louis, Missouri - Lasts 4–6 months - Takes 4–6 hours - Investment: $3,000 www.TTDoesitall.ai


What are #ktips? Here’s your answer! Schedule at www.TTDoesitall.ai 🩷 #extensions #ktipextensions

4-6 hours install and last 4-6 months #ktipextensions done by the right stylist the right way 💕

Located in St Louis Missouri 💝 Consultations available www.TTDoesitall.ai 💕#ktips #natural

K Tips take 4-6 hours to install and last for 4-6 months with proper care! #ktipextensions