Start to Finish 360 Lace Wig Install & Style | WowAfrican
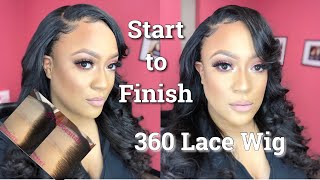
LaToya Kelly installs and styles a 360-lace wig from Wow African, showing how to fit it with the adjustable strap and elastic band, cut and tweeze the lace, then curl and style it with baby-hair cream and her signature swoop technique.
Chapters
Hey everyone, it's your girl TZ Does It All, and this is a 360 lace wig start to finish install, and I cannot wait to get into this video. So I stacked my money fat. No, so this is Wow African Hair. This is, um, the cap came with it that I did not use because I did not need it, and I did ask for a removable elastic band. And this is the first time I've ever seen something like this installed in a wig, and I thought it was awesome. It did come with the combs like a normal full lace wig, and it also came with the adjustable strap in the back, which their hook is a lot longer than, um, other companies' hooks. So I did like that because that meant that through activity it's not gonna unhook, and I have had those issues in the past. And I really, really like the way this wig was constructed. Now let's get into false advertisement, okay? Companies will let you select to have knots bleached, or they will say and they will advertise that the bleach knots are there and they're not. But this wig, they are. You can look under it. I did not bleach these knots, you guys. I hate having to bleach knots on full lace wigs or even 360 lace wigs because the combs are in there and it's so hard to get around them and have it so perfect. So here's the adjustable strap. I measured it on my head and I left it at the standard size they had it at, and I just hooked it onto the wig and put it on. And it was difficult because I'm not used to having an elastic band and comb in the back, so that was kind of different for me. But I got the hang of it very fast and put it on and got to, um, customizing it. The only thing that I did to this wig— and I, I actually made it tighter because it didn't feel snug enough for me, so I have the adjustable straps in the back tight, and I have this strap tight. And everybody's head size is different, so it'll vary for everybody. But to me, it's best that it is already a larger size because not everyone has a smaller head, so it'll be perfect for anyone. So I cut off the extra lace on these sides over my ear. But again, the only thing I did to this wig was tweeze the hairline. And if you guys are on Instagram, I actually put a picture of the before and after on my Instagram, so go ahead and check that out and put a thumbs up if you watch this video and then went to that picture and saw it. Um, you know, my Instagram is TT Does It All. So for wigs that do not require adhesive, my personal preference is to have them forward on your hairline in the top and in the middle, but on the sides it kind of goes a little further back. So I'm just kind of parting it and seeing This is what I like, and I am very particular when it comes to parting, even for my braids, for installs. If you all do not know who I am or what I do, I do do sew-ins for a living, and I'm very particular even on my braid patterns. So I'm going to continue just parting, getting everything the way I want it, and then I am going to use my baby hair cream. To make my baby hairs exactly how I want them. So I have plenty of videos showing exactly how, but when you're doing your baby hairs, just make sure that you take your time. And there is a discount in the description below, so make sure you click on that and use it. I ordered my hair on the 30th, and, um, they actually sent me a link to order the hair. So I ordered it on the 30th, and on the 30th they sent me a tracking number. So It was very quick that it came to me exactly how I ordered it, and, um, it was ready super fast. And I made sure that I clicked on customizing things, and all of the options that I selected are in the description below, as well as that discount code. So I am just messing with it and kind of making sure you can't see my ponytail in the back. Sips tea. All right, so I am just kind of messing with my little sides. This— if you all are usually watching my videos, I have a side of my hair that's shaved. So I have a little bitty bald spot on my head that's been there since I was in like high school. So, um, that's the side of my head where the part is that's actually shaved, you guys. I know I usually don't part on this side. I usually try to do the other side because of that. But I'm growing it back. Neither here nor there. Okay, so now I am curling it, and I don't know why I was curling it. I just— I mean, it was beautiful straight, and the hair is gorgeous. I just was like, for video's sake, let's just do something to it. And if you all— how about this, I'm gonna stop saying like, if you all follow me, or if you all know please subscribe to my channel. I have a lot of videos on everything, and I say a lot in all of them, especially the videos that I talk through, my start to finish videos. And, um, yeah, I'm addicted to a side part. I call it the SSS, my sexy signature swoop, and that's kind of what I'm giving myself here because I like it. So I'm just going to keep curling. I'm curling the ends first, and then where, where needed, I kind of put a top curl. And this is not how I curl my client's hair, this is how I curl my own. It's a faster way to curl your hair on your own head because obviously curling your hair on your own head just takes a lot more time. So this is my faster version. But which side do you like? Do you like this side that's curled, or do you like the straight side? Drop a comment, let me know which you liked. Should I have kept it straight or is it okay? I know y'all let me know. So right now I'm going to use my Razak Perfect for Perms, and I put them in my what I use for my sew-ins video years ago, and they sent me a box of goodies of their products and I still have them. Like, these products last forever, and obviously I do hair every day, so If I still have this product, it's pretty awesome. And that was years ago, at least 2 years ago they sent me that box. All right, so as you see the curl, I am addicted to the SSS. So I'm going to go ahead and cut this bang so that it has a lot more volume in it. And I am— cut that. And I'm funny about my curl too with my SSS, so I had to like redo it several times because it's on my own head, just to make it exactly how I want it. So once I got it there, I switched to the other side and cut a little more. When you're doing your own hair, it's like stop and go and fix and redo. Yeah, that's me at least. All right, so now I'm on my other side, and if y'all are wondering who the heck is in the corner over there, it's actually my makeup artist Keisha Marie. She is who does my makeup for most of my videos, and as you all see, it's pretty flawless. She's awesome at what she does, and I'm feeling myself. Okay, that dance means, oh, I feel like I'm looking good, honey. Okay, do y'all get that way? Like, when you start like getting to the end result, you kind of start looking at yourself and dancing and feeling yourself? No? Is it just me? I know it's not just me. It can't be just me. Okay, so I am just kind of pulling this bang to the front a little bit more to achieve that sexy signature swoop, and I'm feeling myself. Yes, I am. Yes, I am. Okay, I'm sorry, y'all, I was really feeling this look. So here is the look. Let me know what you all think about it. Should I— should I have left it straight? Just be honest with me, you don't have to spare my feelings. Oh, this is the CuraCare wax stick that I'm taking care of just the flyaways with, and then I'm gonna comb it in. I have like zero chill with this hair and makeup right now. Like, I feel like a million bucks. Okay, so let me know if you guys think that I should do a salon tour. You guys know that I used to work from home forever, and now I am in my own suite. It is a 4-room suite. So let me know if you all want a tour of that. Drop a comment and let me know, because no one's really asked for it, so I don't know, I didn't feel pressed to do it. And also, I'm thinking about going to New York soon. So drop a comment and let me know if you are local or somewhere around the New York area. All right, so here's the finished look. I did not tint the lace, I did not bleach the knots, I tweezed and installed, and you saw the entire process. So tell me what you guys think about the finished look. I definitely read my comments, so I can't wait to see. And this is 20 inches again, so that's what the length looks like. All right, so I will see y'all in the next video, and I will be tuning into those comments to see what you all have to say for me. All right, I'll see y'all in the next video.
More from LaToya






St. Louis, Missouri - Lasts 4–6 months - Takes 4–6 hours - Investment: $3,000 www.TTDoesitall.ai


What are #ktips? Here’s your answer! Schedule at www.TTDoesitall.ai 🩷 #extensions #ktipextensions

4-6 hours install and last 4-6 months #ktipextensions done by the right stylist the right way 💕

Located in St Louis Missouri 💝 Consultations available www.TTDoesitall.ai 💕#ktips #natural

K Tips take 4-6 hours to install and last for 4-6 months with proper care! #ktipextensions