Start to Finish | Curly Lace Frontal Sew In | DSOAR HAIR
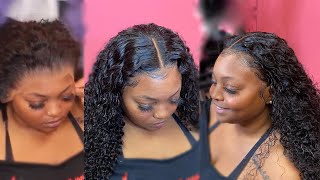
TT Does It All installs a curly lace frontal sew-in on client Chris using three bundles of Malaysian hair (26", 24", 22"). She walks through bleaching knots, the ball-cap method, and layering without heavy cutting, finishing with baby-hair cream and mousse for hold.
Chapters
Hey everyone, it is your girl TT Does It All, and I'm back with a lace frontal sew-in, and this is the Malaysian curly texture. And I'm going to start off with the braiding, and this is the before and after look just side by side to give you an idea of what we're going to be doing today. How y'all doing? How you doing? How y'all doing today? What y'all doing? Y'all at home? Y'all at work? I get a lot of comments about y'all watching my videos at work. Y'all better stop it, okay? I cannot be the reason while y'all get suspended or something from school or work. Okay, anyway, I'm gonna start out with the braid pattern. This is Chris, you guys. Chris is the one who actually helped me set up my salon. If you all have not checked that video out, it is in the description so you can click it. She helped me set it up as far as— I mean, throwing the, the, um, what's it called, the grand opening, and, uh Yeah, she helped me set the thing up. I mean, decorate, laying floors, honey, like everything. This is my girl right here. She's also one of my sorority sisters. I met her at UMKC. And, um, yeah, this is my girl right here. So I had this hair in and I was like, girl, she's never worn a frontal, y'all. So I was like, let's do this because this is gonna be beautiful on her. She's been dealing with so much, so So I was so happy to be able to do this for her. This is my Wild Grow hair oil, and not mine, I didn't make it, but, uh, I bought it, so it is mine. But you get what I'm saying. This is just to moisturize the scalp, give them an extra little protection while they sew it, and it feels freaking amazing. Amazing. Okay, so I'm sewing on my net, and my— everybody's like, why do you sew on the net? I sew on the net just so I can sew anywhere. Her braids are nice and flat for me, and they're going how the exact perfect way that I want them to make sure that this is a flat install. But the braid pattern does not allow me to stitch anywhere. With this net, I can sew anywhere I freaking want to. So this is me doing the ball cap method. For a tutorial on that, feel free to join my membership, which is also in the description below, and I will teach you a way step by step how to do it all. Okay, because TT what does it all? No. Okay. All right, so I am continuing the ball cap method, and yeah, okay, so let's see, let's talk about Chrissy. Christian is her name. Kristen, Christian, whichever one y'all want to say. She will turn around and be like, hey girl, to either one. But, um, Yeah, this is our first time wearing a lace frontal, and I freaking love it on her. And I'm going to show you all— she still has this in right now, and I'm in Orlando and she's actually in Atlanta. I'm not from Atlanta— I'm sorry, I'm not from Orlando. I am visiting my husband, and, um, yeah, while he's working here. So no, I don't live here. I'm— I live in St. Louis, Missouri. So you guys, I will show you her response to this hair because she was like, girl, oh my God, I love this hair, girl. She's been sending me pictures and she's been posting on her Snapchat. She looks good, y'all. She's still rocking this hair and it's fabulous. But anyway, I am— oh yeah, I forgot to tell y'all, she's working from home right now.. And no, we're not at home, but she's still working. So if y'all see her looking down or focused on something, she's working. Okay, I'm handling business. I did bleach the knots and tweeze before I put it in, but sometimes when you put the frontal in, you have to do a little bit of extra tweezing because sometimes you have to cut some of that hair off. And right here, I am using my baby hair cream to perfect those edges. And I just really, really, really, really love this look. I should have made a wig with this hair, but Chris, I love you, okay? So be happy because this would have been a dope wig for me. But my hair is fabulous too now, which I will go ahead and share that link in the description if you all want to see that. But the hair that she is using, I will I will show you what length I am putting in as I am putting it in. There's 3 bundles going in her head, and it is long and full. You would think I used like 4 bundles on her hair, but it's beautiful. The bundles were nice and full. The frontal is nice and full. And you see, I'll show at the end of the video when I get it all in, she has parting space to change her part however she wants it. So I noticed something as I was editing this video, okay? My hair matches the box. And I did not do this on purpose, y'all. I could not make this up. Like, look at the color of the box and then look at my hair. Like, it's perfect. Okay, so, uh, we are taking out those bundles from the box that I was shipped this hair in. And my camera just was like, I'm not autofocusing, so goodbye. But we're using 26, 24, and 22-inch bundles, and I start with the longest at the bottom of the back, and then I'll go to the shortest at the top to give it that layered look without having to actually do a lot of cutting. And this is my favorite mousse. I have a video about this mousse because I freaking love it. So watch that video if you haven't already. If you have, y'all know why I love it so much, but it is really the best for curly hair, which is what we're doing. So I am done with her frontal, and I am just going to slay these bundles. And I'm going to fast forward a lot because you can't see the back. And this is also one of the things that I show, how I do my, um, frontals behind the client's frontal, which is sometimes tedious. It depends on how you, how you, how you doing it. It depends on the look you're going for. So I am now just going to fast forward through this stitching again, and now I'm on the 22-inch, which is the third and final bundle. Wait till Chris see her hair, y'all. She's gonna be like, tongue out, Cardi B face. Okay, so let's finish this up. I'm done, and I'm going to take a piece of the hair from the frontal, just a row of it, and flatten it back so that it covers the first track back there. And then I'm just going to do all of my little customizing and tweaks, because if you have never watched one of my videos, I am a perfectionist. I like everything to be perfect, every hair in place. I like the outcome to just be on point. So I just got through spraying water on the hair, and, um, I am just finger combing it through, and then I'm going to perfect my part because, as I just said, I'm really a perfectionist. And, um, that's what I'm about to show you, is that you may have thought it was done. Okay, watch. I even moved and my watch is going off anyway. Um, If y'all got an Apple Watch, I understand. If you got an Apple Watch, drop a little watch emoji because you know what that was. But y'all probably thought like a long time ago I was done with her hair, but I still— like I said, I'm a perfectionist. So I am just combing out those hairs that I tweezed, putting my favorite mousse in her hair, which is going to just add the finish touch on the look. And I'm just going to kind of play with it after I finger comb it through. Oh, I'm gonna trim it. Just trim little long hairs, little long curls that are just out of place, just kind of perfect the look. I'm sorry I'm so tedious, y'all. I'm sorry. But this is the outcome. What did you all think? I'm gonna put some pictures at the end of the video so you all can see what it looks like. But she definitely is still posting this on her Snapchat and still rocking it, and she loves it. Look at them dimples! She's so pretty. Okay, sorry y'all, but, um, this is the finished look and, um, it's so cute. Oh, so I'm just gonna start parting it now so y'all can see like that it does have parting space. So if you're not a middle part person, you can definitely change it. And what's up with these middle parts lately? When I tell y'all, I hated middle parts at first. Like, I could not stand— okay. Here's how I started. First, I hated middle parts because I thought a side part was just so sexy. You know, when you get the SSS, my sexy signature swoop, that's my favorite. So now that I see a middle part and everybody getting them, they are just so sleek and clean and nice, and you can still be sexy with your middle part. And I realize that now, that everybody in my chair wants one. But let me know if you all have ever tried out this hair. It's so beautiful. If you all have, um, ever used this hair, you know, like, I'm not one to play, and I will tell y'all— actually, I won't tell y'all like, hey, their hair was trash. I just will not make a review of the hair. Like, I will not post it on my channel. They'll be like, oh, where you get that hair from? Don't even matter because I'm not about to promote them. But this hair is beautiful. It is treating her well. It works. I mean, I tell her, hey, just keep your edges tied down when you're in the shower and let the, let the water hit the rest of it. Let it air dry and you are good to go. I don't think there's— it's just— yes, come on, come on, come on, come on. Oh, this looks so cute. The mousse I put on is going to make it hard so it don't poof back up. Yeah, let's go. After I finished her hair, I was like— she was just sitting on the side of the room while I started my next client. I'm like, girl, what lace? Girl, point it out to me, please. But yes, if y'all like this look, please thumbs up this video, subscribe if you have not already, and I will see y'all in the next video.
More from LaToya






St. Louis, Missouri - Lasts 4–6 months - Takes 4–6 hours - Investment: $3,000 www.TTDoesitall.ai


What are #ktips? Here’s your answer! Schedule at www.TTDoesitall.ai 🩷 #extensions #ktipextensions

4-6 hours install and last 4-6 months #ktipextensions done by the right stylist the right way 💕

Located in St Louis Missouri 💝 Consultations available www.TTDoesitall.ai 💕#ktips #natural

K Tips take 4-6 hours to install and last for 4-6 months with proper care! #ktipextensions