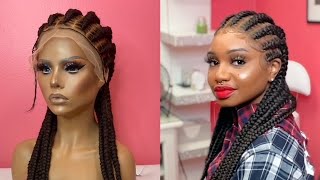
LaToya Kelly shows her workflow installing a full-lace wig with stitch braids, including laying baby hairs and styling with her cream. She's 37 weeks pregnant and dealing with carpal-tunnel syndrome while demonstrating the process.
Chapters
Hey everyone, it's your girl TT Does It All, and I am back with a slay of this full lace wig. And this is the outcome. This is what we're going to be working on. This is not an educational video like I'm about to teach you tip by tip, step by step. This is just a start to finish video, and this is the before, um, the braid pattern, which I do have a video already on as far as like my special tedious techniques of laying lace. Paid a lot of money to a lot of people to learn how to do that, so there's a link in my description. TT Does It All University is available, um, go ahead and check it out if you are interested in learning how to 2 for lace. But this is the wig that we're going to be putting on, on your left. And on your right, I'm just putting my Wild Girl hair oil through her braids now that I've braided it back. And if you recognize her face, this is Remy. And Remy was in my blonde lace frontal video. And as you see, it wasn't a tutorial, it was just start to finish of me showing how— not how, but me just showing my work. Um, so, um, the bald cap is now on, and then we're going to move to cutting the lace, laying the baby hairs. And I am 37 weeks pregnant, so I'm a little out of breath with talking, so bear with me. But as, um, just an FYI, she had a picture of some baby hairs that she wanted, and the picture only showed one side. So I did the picture on one side, and then I freestyled on the other side. So she's like two different people because I am not the one with these baby hairs. If you follow me on Instagram I am currently on maternity leave. I have carpal tunnel in both freaking wrists, so I have not worked for a few months. But I made a post— by the way, I'm using my baby hair cream, which is that picture— but I made a post saying that I hope by the time I am back from maternity leave that this baby hair phenomenon is over because it takes so long to create these baby hairs. And who has time for this? I mean, if I'm having a day where I'm just feeling really good and maybe you my last client, okay, but this takes time, okay? But it looks good, honey. Yes, it did. Okay, so if you all don't follow me already on my social medias, I'm on Snapchat, Instagram, TikTok, TT does it all on everything. And, um, as you see, I have that little toothbrush-looking baby hair brush in my hand, but when I get to the other side, I'm gonna go ahead and let that go because I don't like it. I like my carbon rat tail comb. Um, I don't like the brush. I just feel like I don't have enough control with all those little bristles on the brush. The comb is just one row of teeth, and I just— yeah, so I'm gonna get rid of that on the other side. But, um, yeah, uh, shoot, I'm out of breath, y'all. I gotta— whoops, I take a breather. I'm using more baby hair cream. About my baby hair cream, you guys, excuse me, it gets rock hard, okay? It gets really, really hard. And I do that because if they're soft— and I do this, I think everything I do on my clients, I think of as me being the client. So when I wore lace closures and frontals and didn't have my sisterlocks, if I wake up the next morning, I want my baby hairs to look just like they did when you did it. I don't want to have to recomb it for customers. What if they're not hair people? Like, what if they don't know how to do it? Sometimes it is really all in the wrist, and if you don't know how to do this stuff, there's no way you could duplicate this. So my baby hairs and my baby hair cream that I sell, it gets your edges rock hard, but it doesn't look rock hard. So your edges look soft, but it's, it's just they're not. But they don't move. I've had customers come back for a touch-up and their baby hairs were still in place. Only thing that happened was the adhesive was now ready to be reapplied. So yeah, I am cutting the extra lace off the back. Um, the link is— the link is in the description for this particular wig. Um, and yeah, I just thought this would be a neat video to record because it is a wig with stitch braids, which you don't usually see. So I figured this would be a cool new video to upload for you all, just to see the progression of wigs. Like, who thought we would be putting on wigs that are already braided? Like, the dreadlock wigs, the— all of them. Like, it's just— it's gone so far. Has it gone too far? Yes or no? Drop a comment. Let me know if you think wigs have gone too far, because there are some people who are like, listen, that is too much. That's too thick on top of her thick hair. I don't like it. That's cool, you know, like everybody has their own preference and style. But do you think wigs have gone too far? It's like, just let it go. So drop that comment and let me know. But this is a pamphlet that comes with my baby hair cream, just to let you know how to use it, how to apply it. And meanwhile, we got her over here holding this dryer in one spot like that's gonna do it. And I mean, anyway, so my little pamphlet is to tell you what to do, like when you take off whatever. I mean, because you don't have to put the strip on it, you can just blow dry it and go that way, but I like to make sure it is laid super flat with the next strip. So, um, all the instructions to my baby hair cream are in the pamphlet. I like to take off whatever's tying it down from wet the direction the baby hairs are laying in. So if the direct— if the baby hairs are laying to the right, you want to take the wrap off to the right. So I hope that makes sense, but I'm just wiping off any extra baby hair cream with a little paper towel and some water. You do not want to use rubbing alcohol on baby hair cream because it won't do nothing. It's not adhesive, it's baby hair cream. Okay, all right, so we're gonna get through this part and I mean, I'm basically finished. I'm just gonna tidy the rest up. So let me know what y'all think so far. You like it? You think it's cute? If you think it's cute, I need a thumbs up on this video, okay? Her makeup's on point too. She do— she do— she does makeup now, and she did her own makeup. It's cute or whatnot. But I do have to blow dry this side because she had the blow dryer sitting on one side like she was just so tired. And I asked my customers, hey, do you want to sit under the dryer or you want to blow dry it? The blow dryer is quicker. The dryer, people be sitting with their head the wrong way. So I mean, I guess it ends up balancing out if you only got the hand dryer on one side, but whatever. So I'm gonna finish this up, show y'all the end look. Y'all make sure y'all drop a comment and let me know what y'all think. Just make sure you tie down with your edge foam. What? Make sure you put your pop socket on your phone. You got a pop socket? Mhm. I was just literally— I just had one in my car at Amazon. I got one. Let me see. I'm going to put it on my case. Where is it? What else? You got edge control. Don't put the edge control on your lace, okay? Because it's really easy to turn— what else? Yes, so you tie the edges down. Point where the governor decided— I didn't make it here. So right now, Dan Conley is not our Suffolk County District Attorney. I feel like— thank you all for watching. Make sure you thumbs up this video, share it with a friend who is not in belief of the lace And I will see y'all in the next video.