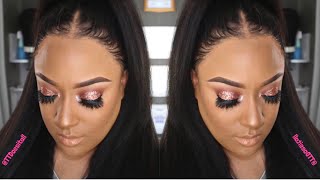
In this YouTube tutorial, host TT and hair professional LaToya Kelly review a 14‑inch YWigs lace frontal paired with 16, 18, and 20‑inch kinky‑straight bundles. They begin by unboxing the wig, describing its natural texture, packaging accessories (weaving cap, elastic band, comb, net), and noting the wig’s density and softness. LaToya demonstrates how to sew the frontal onto a canvas head, use a net for extra stability, and customize the hairline to match a widow’s‑peak. She walks through multiple styling attempts for a Kevin Hart concert, including side and middle parts, flat‑ironing with a Babyliss 2‑inch iron, tweezing the hairline, applying double‑sided tape, and adding a high ponytail. Throughout, she shares professional tips (e.g., avoiding combs on braids, using baby‑hair cream, wax stick for fly‑aways) and critiques each look, explaining why certain styles are suitable for beginners versus professionals. The video also includes a discount code (TT03) for viewers, a brief personal plug for TT’s fitness Instagram (@TT_WorkinOut), and casual commentary about daily life. The overall conclusion is that the kinky‑straight hair is thick, soft, and versatile—good for everyday wear and customizable to individual hairlines—though it requires skill to achieve a polished finish.
Chapters
Hey everyone, it's your girl TT, and this is a hair review on YWigs. This is a 14-inch lace frontal and 16, 18, and 20-inch bundles. Yes, 3 bundles.
Usually—
this is kinky straight hair, first of all, and usually with kinky straight hair you do not use like more than 2 bundles, but for the purposes of YouTube But for the purposes of YouTube, I decided to use the 3, and it looks good.
What do y'all think?
I have a discount code for you. It's TT03. Okay, it's in the description. You can copy and paste it. Um, thumbs up this video.
Hey you guys, this is the first time I installed this wig, and I didn't have my makeup done or anything, so it was kind of a trial run. This is the bag the wig came in. And this was the frontal in its natural state before I bleached the knots or did any tweezing to it. So this is the natural texture of it. And if you see in the bottom right corner, that is the ultimate, um, product, finished product of my hair. This came with the wig. I did use this weaving cap, which I'm starting to get the hang of these caps. I kind of like them. And then it came with like the elastic band and like a little comb in it. And I don't use combs because from my experience with customers, they say combs have really taken their hair out, and I wear my hair in braids when I put wigs on, and of course I don't want a comb going through my braids, so I don't use those. But it was pretty dope that it came with it. So that's the net, you see that there, and that was me sewing the wig onto my canvas head. I do use some regular net underneath it just for extra stability, extra durability. Whatever you want to say. So this was the finished product of the wig, and I had a lot of trial runs with this wig, okay? So this video, I hope you guys got like some popcorn or something and you could just like sit back and watch uninterrupted because I'm going to be doing a lot here. So the day before was that first video I showed with me having the wig on. That was the day before I actually got my makeup done. So I took the wig off and now you see me reapplying it with the same cap that was underneath it before. So when I went to sleep, I did not tie my hair down and the cap was just a hot mess. So right now I realized that the hairline was not, um, it wasn't custom to my hairline and I have like a small widow's peak and I like my hairline of my wigs to match that. So I cut that off, and then now I'm just going through tweezing everywhere the hair needs to be tweezed. But you see the cap through there? It was not going to work, so I took it off. And, um, when I took the wig or the cap off, I just decided, okay, I've already wasted a lot of time here, so I'm just going to put it on. I'm not going to put another cap on because that took a lot of time. So here is where you just see me going through, customizing, customizing it a little bit more, and, um, just kind of laying it here. I'm using my baby hair cream, it's in the description below, and if you follow me regularly, you're familiar with that. It's something I make and I do sell it. Um, so here I'm just kind of laying it in I was actually doing my hair in this video for, um, the Kevin Hart concert. So I was getting ready to go to the Kevin Hart concert and I was like, yeah, I need something to wear, so why not record me doing my hair? So as you see here, it's still really thick in the front, and this is thick hair in general because it's the kinky straight hair and it's very full, very soft, very pretty.. But, um, I do use a wand in the front to always make it flatter. So you see, I did like a little side part and I'm like, let's see what that looks like. And I was still like, no. So I started flat ironing it, put makeup on the part, tweezed it and everything, and I still was just not happy with this look. And I mean, if you are a beginner and you do not do hair for a living, this is a perfect look for you. But for me, someone who does hair for a living, someone who does frontals for a living, this was just not a good enough look for me. So then I was like, okay, I gotta wear this out tonight and I don't want it to come off, so I'm going to use my double-sided tape. And usually I put this on the stocking cap, but I don't have a stocking cap on, so I put it on without the stocking cap, straight on my hair. And I'm like, oh, it's tape, it's one piece. And you see how it looked I was still not happy with that. That, I mean, it looks okay, but it wasn't what I wanted. So I tried a middle part, parted in the middle, flattened it a little bit, then I put a little makeup in the part and then tweezed it a little bit. And that was good enough to get me to go see Kevin Hart. Okay guys, that was good enough. I was like, I'm done, I've straightened it. And this was the look that I was going to wear. And you see the back is still very textured because I didn't really hit the back with the flat iron, but it was perfect. Look how full it is. And usually if I've done sew-ins with this texture of hair, and I usually just use 2 bundles, but if you like big hair, oh my God, it's gorgeous. The hair is so soft and pretty. And yeah. So this is look number 1, okay? Now we're about 6 minutes into this video and we got a whole nother part to go, okay? All right, so here you see that I was good enough to go out. This is me in the car getting ready to go see Mr. Kevin Hart himself. And when I came home, I took this wig off and created a new look. Follow me on Snapchat, guys. That's where you see the hair first. So here you can see the second look in this wig. And basically what I did to achieve this look, I only flat ironed the hair back and parted it in the middle, and I tweezed the heck out of the hairline. It needed to be tweezed so much because this hair is so full. Um, and then I just put my little, um, neck wrap around it and went and got my makeup done, and voilà, here I am. And that's the before, and you just see how much more natural it looks now. So, um, I got rained on when I went to see Kevin Hart. It was so bad. So I was back to my hair looking like this. And look at that flat iron, right? One more time, look at that. Oh, that's a Babyliss. This flat iron is called Babyliss. It's 2 inches wide, and this is what I use when me or any of my clients want straight hair. This Babyliss is like heaven on earth. So I'm just going to straighten it out a little bit more, and I'm just kind of playing around with it so you all can see the texture. And I'm going to show you on your right where you're looking at it's flat ironed, and then on the left where it's not. And it is so pretty when it's straightened, it just comes out so gorgeous. So this time I'm doing a better flat iron job than I did the last time and just kind of showing you as I go through it what it looks like before and after. And then I'm going to show you the after. And this is my Cure Hair Wax Stick. And that's just to smooth any of the flyaways down. This frontal was so thick and full, which was perfect because you can customize it exactly how you want to. You don't want a closure to come super thin. And you see the density of it, it's gorgeous. I do have a cap on underneath this, so of course parting it now looks like flesh underneath and you can't see my real hair. And you see the wig a little bit back there, but of course I'm not— I'm going to make sure that it's not showing when I go out in public. But I was like, hmm, maybe I can put a little high ponytail up here. And you see, I can just comb it thoroughly. I can part it if I want to another way, but for the video's sake, I just decided that I wanted to do just a little ponytail up at the top. And I didn't really plan to do this look. I just so happened to be doing it, and I was like, oh, this is cute. So I just continued to go, and it ended up being the look for this video. And I do want to point something out. On this side, it's perfect, but on the other side, I did mess up a little bit, which overall in person it looked perfectly fine. And, um, I would do it differently if this were a customer. I would not let her walk out the house with the other side looking like that. But, um, this is a frontal, of course, as you all know by now, and it is fully customizable to your hairline and what you want to go for as far as your end result and look. Um, but I loved it. I really, really loved it. I have people that are trying to purchase this wig, and it is not for sale because you really have to know what you're doing when you wear wigs. And this one is something that I can wear every day. So I think this will be the one wig that I actually keep for myself, and I actually rock it. So that'll tell you a little bit about this hair. If this hair was terrible, do you think I would be trying to keep it? No, ma'am. That does not mean that the other hairs that the other wigs that I make are not good hair. It just means that I've given, I've given them all away or sold them. So at this point now, I need something of my own, which will be this. So look at that texture back there, it's so pretty. I did curl a piece and it curled beautifully. So yes, this hair does curl as well, but it's so much hair that I personally would wear it straight., and just bone straight. It has a really natural texture to it.
Everybody's waiting on a review on my surgery video, and I'm going to do a review, but first I'm going on a fitness journey to get back in shape because I have significantly gained some weight. So I have an Instagram page, it is TT_WorkinOut, working, W-O-R-K-I-N-O-U-T. So Check that out, you guys. Go give me some motivation as I push through this fitness journey and eating healthy journey.
Today has been so busy, I'm literally going to have to eat and drive, like literally.
So yeah, it has been so tempting to go just get something fast, get something fast, or like fast food or something like that, but I didn't do it.
I went home, I got my meal. So you all, I really love the hair. Check out the description for where I got it from and how you can purchase the exact same hair. And leave a comment, let me know what you think or if you had questions or anything. And I will see you all in the next video.