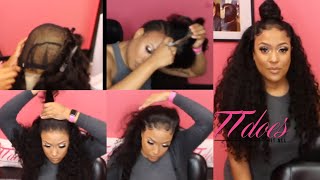
LaToya Kelly installs a top-bun wig using a 20-inch frontal and three bundles of Wiggins Hair. She sews the bundles opposite the frontal's grain, tweeze the lace edges, then styles it with baby-hair cream and a night-scarf for a natural, undone look.
Chapters
Hey everyone, it's your girl TT, and this is the look that we will be completing today. What do you think? Do you like it? This look isn't for everybody, but some people love their baby hairs like this, some people don't. But this is for those who love that top bun. Now this is the third video for wigs hair I've done. This is the first one, it was with loose wave hair, two 20-inch bundles, two 20-inch bundles, two 20-inch and two 24-inch bundles. And I did not glue this one down, but in this particular video I actually showed how I made the wig, and then I have just me putting it on, and I didn't use adhesive either. I talk about the texture of the frontal as well as bundles, and that was my first, my initial work with Wiggins Hair. So my second was this one, which everyone really, really, really loved, and I showed how I got started and me braiding my hair, and I kind of did a little freestyle wrap in there as well. Please don't judge me because I'm crazy and sometimes I can be all over the place, but who's not? I'm human. So this one was, um, body wave, and I left it in its natural state, kind of put a bump to the front. For today's video, I have a 20-inch frontal with 1 20-inch and 2 22-inch loose deep wave bundles. Now here again, I already have videos on how I actually did the wig and my entire process with that. But this one, I'm just gonna kind of show you the process of me getting there. And you see I got my hat on and a jacket because I'm always cold. But I sew this frontal on with all intention to do a top bun, so I sewed the bundles in the back going the complete opposite direction of the frontal, going towards the back. And then I'm sectioning off a piece of the frontal to go back over those tracks so that you won't see the tracks with my bun. So now I'm showing you what the wig looks like after I've sewn it together and cut all the extra lace off. And then I am going to put it on. I've cut the lace and, and tweezed and molded the hair how I like, and I am going to just kind of customize it to my head. And I kind of parted through it just to see what it looks like, you know, parted multiple ways. But again, I already knew what I was gonna do was a top bun. But you know, sometimes you may get a different vibe or feeling with the hair. This hair was like finger comb approved, okay? Wiggins Hair never has a horrible smell. The bundles are always super full. This was only 3 bundles and you see how big and gorgeous the hair is. Um, so here I'm just clipping the back away from the front. Um, you want to— when you're doing like a top bun, you want to lay your baby hairs. If you're using baby hairs, you want to lay those first and then lay your actual ponytail or bun or whatever you want to call it. So I'm using my baby hair cream, which is in the link in the description underneath the wiggin's information. And I use my baby hair cream. It is like a lifesaver. I use that to lay my baby hairs. My baby hairs hold for a week and a half. Tie your hair down with a scarf every night and you are good to go. This— it does not budge. All right, so I'm laying my baby hairs. And then I'm going to mold this look for the top ponytail, and I'm putting a little makeup just because my lace is a little dark. I did not bleach the knots, nor did I tint the lace. I'm putting it up in the, the top bun, and I'm just twisting it around. And for me, I don't want the really flat iron straight and molded into a perfect bun look. I want the kind of I woke up and threw my hair in a ball look. I don't, you know, like, I, I just want it to look natural versus I really tried for this, you know? Like, I want it to be like I just woke up and threw it in a ball. Okay, okay. So I am cutting off my little strip just to kind of mold my edges. And all right, and this is my finished look. I didn't do anything to the back at all but wear it. What do you think? Do you like it? I love it. I feel like a million bucks. If y'all haven't already, go ahead and subscribe, drop a comment, and let me know what you all think about this look. And drop me a red heart in the comments if you love the finished look. I always look at you all's comments, and the last time I said leave a purple heart and there were so many purple hearts. So I love to see who's keeping up, who's watching me all the time, so that I can share the love and thumbs up your comment and heart your comment. And respond to your questions. So I will see you on the next video, but I will be checking those comments for that red heart. All right, see y'all later.