Transparent vs Swiss Lace Skin | Melt Knots | Full Lace Wig | High Bun ft Afsisterwig
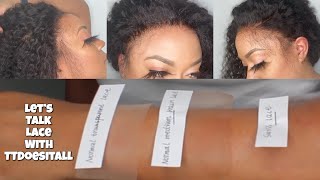
LaToya Kelly compares transparent, natural brown, and Swiss lace wigs, showing how each melts into skin with adhesive. Swiss lace blends seamlessly with any complexion, while transparent lace needs makeup to avoid looking ashy. She installs a full-lace wig without glue, using just straps and a wig grip.
Chapters
Hey everyone, it's your girl TT, and we're about to talk lace. This is something very unusual, so let's hop right in as I talk about this lace. This is Swiss lace, and you see it melted right into my skin. I did not use any adhesive, and you will see that I have this in a high ponytail with no adhesive, and it melted right in with my skin. You see it right there. Can't make this up. So the first lace we're going to talk about is your just natural transparent lace. And this lace is what a lot of people are selling right now, and it is usually white. So with transparent lace, I would recommend using makeup with it. You cannot not use makeup with it. It will eventually turn ashy. The natural brown lace is what we're going to talk about now. That is what you're used to people selling. Um, this is the oldest on the market lace. If you are lighter than the lace, it will turn out dark on your skin, and if you are darker than the lace, it'll be really ashy on your skin. So it is not 100% foolproof either. Now the Swiss lace is the lace that melts into any color. Yes, I said any color. Okay, honey, any color it will blend right into. So I'm spraying all three of these with the Got2b Glue as you see, and I'm just watching them melt into my skin and seeing how they all transform. Only the Swiss lace keeps its color even on the dry part. If you notice, that transparent lace is ashy. Like, I mean, it's just ashy. It's ashy where it's not touching my skin, and it's ashy where it is touching my skin with the Got2b Glue. So this is something that I don't want to technically use adhesive on. We want to be beginner, beginner friendly. And as you see, that third one, that Swiss lace, in all of the lighting, is just melting with my skin. Now the second one, you see how it has that ashy reflection on it? But the third one, the Swiss lace, is just melting right in no matter which side of the lace you see. So tell me if you guys— drop a comment right now, let me know if you see that one all the way at the top, which is a Swiss lace, that one being the better blend, or if you think you like the first one or second one. Drop a comment and let me know. And we are going to get down to the bottom two because I thought, you know, It was between the, the second two, right? That normal brown lace. But that's on my skin, you guys. I call myself caramel, but everybody else says I'm light-skinned. So let's just see. My arms are pretty tan to me, so for me being tan right now, I feel like the second one looks good, but it will not look good on my forehead. Now the third one, look at that. You can't even see— you couldn't even see where it started. It is perfect. So it's going to be a Swiss lace for me. I love it. It blends so perfectly. I don't know why I was playing with this spray at this point, because at the end of the video my arm was all in the camera looking ashy. But it looked really, really, really good to me. It looked much better than the brown lace. And I know like from the naked eye it would look like the brown lace looks good, But no, the Swiss lace will look good. Even, you know how if you look at someone's head straight on with a frontal and on the sides you can see that ash and in the middle it looks perfect? That's that brown lace. Like, that's that brown lace that doesn't match her entire skin. So if you want something that matches in all lighting, you're gonna want to go with a Swiss lace. And there is a double fold to this. I am a stylist.. So as a stylist, transparent lace is very easy to get your hands on right now, whereas Swiss is not. So as a stylist, if I am going to customize your wig for you and send it to you, which I do offer, I would recommend your transparent lace. It's okay, it's not a bad thing. But if you are doing this yourself and you don't have someone customizing, you're going to want the Swiss lace. So This right here is me putting it on my hand as I showed you in the beginning. And you see the Swiss lace just blends right in with even the lighter part of my hand, which is the back of my hand. It's not the same color as my forearm. So in the box came with some paperwork on the wig and what I got, the adjustable bands that go inside the wig, and then the cap. So right now I'm going to go ahead and start putting it on with my wig fix.. And you see, that's what that does. It helps so that when you pull, it does not move, so it doesn't shift or anything. So I am putting it on with the adjustable strap, and this is the pretty box it came in. As you see, I'm cutting the lace now. I haven't cut anything off the front until I put it on. It came with the bubble wrap, which I appreciate because that means that the box did not come all torn up and bent out of shape, okay? Sometimes that's important. They also have a $40 off that they offer for you to take to a stylist, um, if you contact them with that information with the wig you purchase. They have inside information on how they can give you $50 towards your install. But honestly, guys, you don't need nobody to put this in for you. This was good for me by myself. Also, I do do this for a living, so I did not glue anything down. And as you see, like, I'm not skipping ahead, I'm not like turning it off and on. Like, I'm showing you like real, real, real life. This is what I did. I didn't even have to comb out any hair in the back. I literally just cut a little bit of my edges off. And as you see, it already looks natural and I haven't even sprayed it down yet. But I'm going to spray it down and tie it down. I haven't sprayed anything. I put the combs and my new growth back there. As you know, if you don't already, I have sister locs, so I cannot have any of my hair out, obviously, because they're locs and this is curly. So I'm just gonna— I sprayed the Got2b Glued on my edges and on the back, and then I tied it down. And then I'm just wetting it down with some water, brushing it through so that I can put it in a high ponytail and then show you all what that looks like around. If you haven't already, please make sure you thumbs up this video right now. And if you're not yet, follow me on Snapchat because I am active on Snapchat, Instagram, Facebook, Twitter. Yes. So as you see, I have not stopped filming. I have not edited or anything right here. I am showing you live and in living color what it looks like in the back with that high ponytail. I did not put any glue, as you saw. All I did was spray it down with the Got2b Glued, and that is just so it has like a little bit of stick to it. And then I am just showing you exactly how it is. I'm also going to show me taking this down, and I— oh my God, these lashes, y'all. I'm gonna show me taking the ponytail down and reapplying it, um, because I want you all to see that I mean, this isn't something that, oh, it just happened on the first try, you got lucky. No, girl, I thought I got lucky too, but when I tried it again for the second time— and this is the second time— you see it with that light. So this is a full lace wig up close and personal. Those strands of hair look like they came fresh out of my skin. This is a full lace wig, so you can do half up half down, You can do pigtails, you can do, um, bangs if you want to, you can do designs in the front, braids in the front. You can do whatever hairstyle you want to with this because it is all lace and it has the straps in the back, the adjustable straps in the back. It has an adjustable elastic band into it. I mean, this thing is fully equipped and ready to roll. So everything about this wig, and this is this specific unit is in the description. And again, you see me turning really slow, lights turned up, up close and personal of this full lace wig all the way up in a high ponytail. And I did not use any glue, no tape, no adhesive, no Got2b Glued gel. I just use the spray, honey, the spray, and this was the outcome. I did bleach the knots and I tweezed a little bit, but that's it. So if you all like this video, if you like this look, please thumbs up this video because I really, really, really enjoy recording it. This was one of the easiest wigs I have ever put on for myself, and I'm honestly very surprised. I saw that little piece in the back and was like, hold up, What is that? I don't even know. But the wig came out gorgeous. Like, it is definitely an everyday approved look. You do not have to worry about sweating it out. You don't have to worry about your hair in the back lifting or anything. You don't have to worry about glue and repatching it down. You could take this on and off every day and you're good to go. So hopefully you all learned a little bit about lace because this was definitely tell you about lace. During the rest of the video, I'm going to show you me taking the ponytail down and kind of just playing with the wig. Um, the shine that you see through it is from the wig grip. So that, I would say, is one of the downfalls of wearing the wig grip. If you try to do a part that goes through the wig grip, you will see that shine. But outside of that, if that wasn't underneath here, you would see absolutely nothing wrong with this unit. And even with the wig grip, there's nothing wrong with this unit. It just made the unit to where it would not slide back. If I pulled it back, it would not move. There would be no shifting during the wear. So this is an overall 10 out of 10 to me. What do you think? How many popcorn bags would you give this video? Would you give it 10 out of 10? Would you give it 5 out of 10? Drop a comment, let me know. I hope you all really enjoyed and learned a couple things from this video. And I hope you all are doing well and feeling well and in good health because this is a very, very sad time for the United States right now and the world actually. So, um, I hope you all are keeping well and healthy. And, um, thank you to the company for sending me the masks because that was some good looking out. They're hard to find here in the States, so Um, if you all have questions, don't hesitate to drop them in the comments. I always see your comments. And, um, don't forget to subscribe if you have not already. Thumbs up this video. We ain't got nothing to do but watch Netflix and YouTube videos, so y'all better still be watching. How about this? If y'all still watching me, because I want to show y'all me parting this— if y'all still watching, let me get a heart in the description. Drop a heart in the description. That lets me know y'all still paying attention to me. I'm not rambling because I still got y'all watching. And, um, yeah, I will double tap and heart those comments because I appreciate y'all. So look at that part. Oh my God, look at that. I promise y'all, I looked at this and was like, hey, hey, hey, look at that scalp, bitch. And with curly hair, I always recommend that big wide paddle brush with it, not even the Denman brush, because the Denman brush is a little bit too fine for those curls. The reason why I'm using this brush is because it really, really makes those curls kind of stop being so connected and grouped and makes them kind of just not as transparent. So you see right there, I'm going to use a brush to break the brush to break up those curls. But I'm gonna stop talking now and let you guys just watch. Make sure you follow me on Instagram, Twitter, Snapchat, Facebook if you have not already. And let me know if y'all watch that video about these lashes, because listen, honey, they gave me the blues the first time I put them on. And this might be the last video you see them in because I don't know how I feel, but I'm done. I'll see y'all in the next video.
More from LaToya






St. Louis, Missouri - Lasts 4–6 months - Takes 4–6 hours - Investment: $3,000 www.TTDoesitall.ai


What are #ktips? Here’s your answer! Schedule at www.TTDoesitall.ai 🩷 #extensions #ktipextensions

4-6 hours install and last 4-6 months #ktipextensions done by the right stylist the right way 💕

Located in St Louis Missouri 💝 Consultations available www.TTDoesitall.ai 💕#ktips #natural

K Tips take 4-6 hours to install and last for 4-6 months with proper care! #ktipextensions