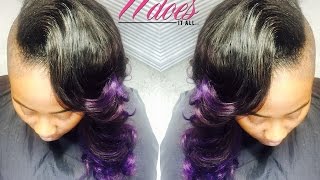
Titi shows how to curl hair extensions into a mohawk style using a flat iron. She splits the head in half, alternates hand rotations to create asymmetrical curls, and uses pressure and consistent jumps to avoid creases. She finishes with holding spray, Moroccan oil, and edge tamer for volume and a face-framing swoop.
Chapters
Hey guys, sorry the volume is so low in this video, and I'm sorry in advance that it's so long, but somebody did ask me for a styling video, so that's why I did this video earlier today at school. So I hope you all enjoy and it's beneficial, and you might want to make sure there's no sound in the background because the volume is kind of low. But I'll show you the after first and then I'll show you the process. Just finished styling Laura. You don't want me to dance? Show it! It looks good! Hi everybody, I am Titi of course, and this is my bestie Laura, and we are about to style her hair. It's in a mohawk. Oh my God, it's in a mohawk, and the back is actually cut too. So we're just gonna style it really pretty and have it in our face. Um, we're gonna have it like up in our face. It's instead of just being like over to this way. So is that okay in your face? So I said do whatever you want. So you'll see, I always split the head in half. So instead of it being everything going this way, I'll have some of the curls going that way and the other side going this way. So I'll probably do about this much of it going to the right and then the rest of it to the left. So it depends on where I'm at on the head, but if I'm at the bottom of the left side I will use my left hand and I will take it, roll the hair around, and curl it that way. And just slowly bring the hair through the flat iron. And if it's curly hair, I can flat iron it straight from curly. I'll just have to keep kind of pulling it so that this remains straight while this is feeding into the iron. So when I say it depends on where I am in the head, the direction I curl, I'll show you after this section. I'm going to do one more kind of facing this way. And then the next one, I'll do it to where it kind of falls, it falls like this and curls instead of just being like this. It'll kind of fall over and then just curl. All right, so again, with my left hand, I'm rotating the hair around the flat iron and I'm bringing it down. And sometimes this hand has to do a little bit of clamping with the iron just to make sure that the hair feeds through it. If you hold it too tight, you'll create creases and it'll kind of jump, but it's okay. As long as you keep your jumps consistent, it won't show any crease marks. All right, so this next layer, I'm going to actually curl it with my right hand because it's going to not fall like a, a ribbon. It's going to actually fall like her hair would lay in her face. So I'm actually curling under, but when I rotate the hair, instead of rotating it above the flat iron, I'm going to rotate it underneath the flat iron so it kind of goes down this way. You'll see the, the curl that it creates when you flat iron this way. You going to be watching this. Hello, you looking for Mrs. So you see how I just curled it this way, but when it falls, it's actually just laying this way to create that bump. So when she would pull her hair apart, it would have that initial flow over there instead of it just being a ribbon. Then I'll do another layer on top. On top of that. And her leave-out, which is up here, I'll do that last. So these few curls that are on this side of her head are just going to go that way. The other ones are going to come this way. So for all of you who are right-handed, this will be a lot easier from this side. So of course I'm using my right hand, and I'm gonna go down facing downward, and I'm gonna flip over towards the middle. And again, this is a lot of hair I'm using, so I have to go slower and just make sure that I'm applying a lot of pressure with my fist. If you see my thumb moving, I'm just applying pressure, applying and taking it away so the hair can 5. So there's your ribbon. So with this side, since I want the entire thing to kind of flow not like that ribbon this way, but I want it to flow with that bump like I did on the other side, so I'm going to do it the same way, which will probably be a lot easier if you're right-handed. So I take it, and instead of, instead of going down and flipping it to the inside, I'm actually going that way. So instead of it going just flipping up right here, it just slides that way. So this would be a curl that could go this way easily, but instead I'm flipping it back this way. And I'm just intertwining it with the last curl so that the heat of it just stays in that form while I'm curling the rest of it. The more hair you take, the harder it gets to rotate in the flat iron. So if you take a thinner section of hair, it'll glide a lot easier through. Um, so I'll take a small section this time, and again, I'm going to make it do that. I'm not going to do the spiral towards the middle, I'm going to do the spiral towards the outside so it creates that flow this way. So you see, the curl would be normal that way, but I'm pulling it this way so it can flow that way. Looks very nice. Good job. Yeah, she did with the color. Mm, sure. So I'm going to spray some holding spray. Whatever you have at home will work for this. You don't have to use what I use, as long as you just use something that will hold it. And I'm holding this straight up because I want to create that, the volume up here that I was talking about all throughout here. So this is a way to curl it if the client does not want their front cut. It still creates that swoop look, but it doesn't have anything cut. The rest of it's kind of hidden behind. So blending— I've already straightened this out pretty much. I could probably straighten a little bit more. So I'm going to take some holding spray and I'm going to not spray any of this, none of her leaves, none of her part. I'm going to spray where it's her hair lays with the extension. Let's put your head this way. So you see, I sprayed all here. None of this was sprayed. Yeah, it's my Moroccan oil, so delicious. All that stuff smells good. So the last thing I would take is my edge tamer. All right, so with the way I flat iron everything, this is flowing towards me, this is flowing towards me, and then hold it, just hold it here, and then This is flowing towards that way. Oh yeah, even if you wanted to, it's kind of like a big finger wave really. Um, if she wanted to push it up here, she could, to where it just is more in her face. Yeah, we're done. I'll take some pictures.