🌟UPDATED🌟How to: Lace Frontal (No Glue, No Tape)
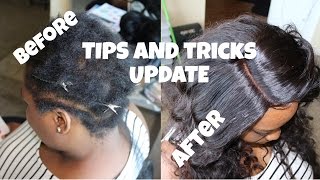
Stylist TT installs a lace frontal without glue or tape by sewing it to an elastic band and braids. She measures ear-to-ear, tints and bleaches the lace, custom plucks the hairline, and creates realistic baby hairs. She recommends Sally's nylon thread and emphasizes the importance of precision and charging fairly for the technical work.
Chapters
Hey everyone, it's your girl TT, and this is an updated video of a few videos that I previously posted. I have a lot of answered questions for you all, so I hope you all enjoy this video. This is the before, of course, of this client, and her hair was extremely short, so I wanted to show you all the before and the process, and I will show you all the products I am using in this video. Video, so stay tuned to the end. But I am French braiding her hair straight back, and of course I used a net. And I do have many videos showing my braid pattern and me braiding it and why it's important, so that video link is in the description. But everyone has asked me, how do you get those two slits in your last video? How do you measure it? How do I measure it? So I'm going to show you how I am measuring her head. And you see my two thumbs are ear to ear on her, so I am making sure the closure is centered, or the frontal is centered. And you see I'm lifting my finger to show you my thumb is at the edge of her hair. So I keep my placement, I fold the closure over in half, and then I cut where my thumbs were on her head. So I don't cut it on her hair, I don't mark on the frontal or anything. I take it off, keeping my thumbs in place, put it together, and I cut. So now you see where my two cuts are, and they are from ear to ear on her head, measuring her precisely. And you see this lace is tinted, and I will show you what I used to do that at the end of this video as well. But I did tint the lace to better match her complexion, and I also bleached the knots so that when she goes to part it, it looks realistic. So you see, I am still double-checking. So even after you've measured it, when you cut, you just want to make sure that you cut in this— in the right place. So you just want to measure it again and make sure that that slit is just above her ear, which is perfect. So I do have another video showing how I sew on my elastic band, so check that out in the description below. But here you will see how I am placing it on the head, and I do do something new with the elastic band because through trial and error, just like every sew-in, there are complications that you don't sometimes realize will happen initially. So I am measuring her sides. You see I'm kind of pulling wherever needs to be pulled, and I'm measuring, just making sure that it fits good, making sure that it's secure. And, um, once I adjust and everything, I will turn her around and you'll see how I stitch it down. The one thing I do to frontals before I even put it on the client's head is I do the plucking. So So the customizing of that hairline I do do before it's installed, but I cut after. So I'm going to show how I sew down the frontal. I stitch from the center to the outside, so I go from the center to the left, and then I'll go from the center to the right. And this will show very detailed how I am stitching it down. I'm not using any special sewing technique right here. I am literally just going over and under, over and under, um, and I will stitch that all the way down to the corner. And then I sew down the sides, which a lot of people requested that as well. I want to see what happens to the sides of her hair. Um, I do not use glue, so my clients do understand that they will not have the corner baby hairs at the frontal. It will be a little bit of their hair. And my clients also know that baby hairs help make these frontals look realistic because your natural hair is not just a blunt hairline. It has— you have baby hair. So I'm stitching it down and I'm applying tension with my left hand. I'm making sure that it is no lumps in that frontal when I'm stitching it down, because you want to make sure that when she goes to part her hair, it is flat. So I'm stitching it down still, and I'm still applying that tension with my left hand to that frontal, just making sure that it's nice and down tight. And I am also sewing the sides of this band down, and I will I'll show you why later. So I am going to show you how I stitch the sides down, which a lot of, a lot of my viewers, a lot of my subscribers were asking, you know, how does that work? How can she wear her hair up if the band shows? So I have adjusted this to where the band will not show. So here you will see how I'm stitching the side down. And I'm going to have my client hold down the front of this while I stitch inside this frontal onto her first braid. You see that I lifted that up and the band wasn't showing. Now I want to remind you all, and I say this in most of my videos, this is YouTube, so you can pause, you can rewind, and you can play it as many times as you want just to make sure that you get it. This video is available in HD, so you can make it big, you can expand it, make sure it's HD because I'm using a very expensive camera so I want you guys to see everything. So she's holding down the front of that so that it's tension pulled, making sure that there is no rolls in that closure, or I'm sorry, the frontal. And I'm correcting myself when saying frontal and closure because they are two different things and Customers really do get confused because they want to know what's the difference between a closure and a frontal. The closure is not from ear to ear, and it is, to me, very easy to install. I'll put a link to a lace closure video below, but they are very much two different things. So here I am cutting just where that elastic band stops, which is right behind her ear, and I am going to cut it off and stitch that down as well. And frontals are not a small task. You want to make sure that you get your practice in, but you want to make sure that you're charging your time's worth because this is very technical and it does take a lot of work to customize these, make these something that clients can wear up or down, and make it so that it looks realistic. So I am stitching underhand at this point, and I am going to stitch that lace to the frontal because it is already stitched— I'm sorry, I'm not— I'm stitching the lace to the elastic band so that the elastic band is already stitched to that first braid, and the first braid is already sewn down inside the frontal. So now you're just making sure the outside of that frontal is sewn down as well, and you will see that I am going to also stitch this, this elastic band onto one of these braids and the, and the lace or the net that I've sewn onto her head. So I stitched down the bottom of that, parting it, and it looks great even inside the frontal. So now I'm going to stitch this band right behind the closure. I'm sorry, right behind the frontal. I'm going to stitch this band right to a braid, and you'll see on the other side I'm going to do the exact same thing. So I'm doing the exact same thing as I did to the other side, and I'm going to part throughout it and pull that tension just to make sure that there are no, no lumps in that frontal. You want to make sure that it's pretty pulled securely so that when she parts it, it's a flat surface. You don't want it to be any rolls in the frontal. So just like the other side, I'm having her hold it. I'm stitching onto that first braid, and I'm going to cut the lace and then stitch under it just like I did the other side. Cutting that lace off just above the ear, right at where that elastic band is. And then I am going to stitch underneath, and you see the slits are perfect. They're exactly where her hairline is. That's why you want to make sure that you double-check so that everything lines up. And again, I'm going to sew this band right onto a braid, and this is something that I did not do in the previous video. This is a new technique, um, but I have learned that these bands are tight, so I cut them off. That's why I'm stitching them down. So that is one of the new things in this video, is I cut the elastic band off, and she is very relieved because it's a lot of tension. So when making baby hairs, that is a very, um, tedious task as well. You want to make it look as realistic as possible when she goes to wear her hair up. The baby hair look is so cute in disguising what's real and what's not, especially with the lace. Um, the lace is not her hair, so— and it's not her skin, you know. Even we can tint the lace all we want to and bleach the knots, the closer you get, you will be able to see the lace. So for me and what I tell my clients, you want to make sure you leave your baby hairs out if you wear your hair up. So her hairline has already been plucked and customized. At this point, I'm just pulling the baby hairs out and I am going to cut them. So they haven't been cut, but I have plucked. I use my wand curling iron, and it can be any wand curling iron, it doesn't have to be this one. To lay down those baby hairs and separate them from the rest of the hair. And then, um, as you all see, I'm sorry I didn't even mention it, but I am finished sewing everything else in. So that part I have in another video, link in the description. But for this one, um, I am just showing a couple of things that I didn't show in the previous So I am cutting underneath those baby hairs because of course the closer you get to the edge of the hairline, the shorter your hairs get. So I kind of cut with this razor comb close to the hairline first, then I come out, and then I am just kind of cutting those baby hairs across. And you see it looks pretty nice, it doesn't look super unrealistic. Um, And I will do this again to the other side, and then I will come and show you how I cut the lace, which is also something that has been a big question, and a lot of my subscribers wanted to see how do I cut the lace. So another tip which I did not show in my previous videos is I do a stitching inside of the frontal. So my client and I have a discussion. Where do you part your hair? Where do you not part your hair? She does not do an off-center part. This is an off-center part. It is not interfering with her parting a middle part, and it's not interfering with her parting a side part, in which you will see me part her hair on this side, and you won't see any of the stitching. So I am definitely doing a special technique of threading in this particular video, and you don't have to do this. It's just something that I do, but I am using very, very thin thread. Um, I'm sorry, I can't even tell you where I bought it from. I've had it for so long, but it is very, very thin. And actually, I bought it from Sally's. I bought it from Sally's Beauty Supply. It's, um, nylon thread. There you go, just remembered. So it's nylon thread that I did use in this particular stitching because you don't want this to be visible. And I am doing this because a lot of you ask, what if the frontal starts moving back, or how do you keep it from moving back? This is how. I'm stitching forward and backwards in the same spot, and this will keep that sewing in place. And I do inform my clients to use a scarf and not a bonnet because a scarf will hold your hair in place, a bonnet will hold hair out of your face. So, didn't mean for that to rhyme, but that is true. And now I'm showing you all the cutting the lace, which is something that you all wanted to see. I don't use any special technique in cutting my lace. I don't do any jagged cutting anymore. The simpler the better for the customer and the better for reusing it. And as you see, I'm cutting a straight line and her baby hairs are doing all the work. And the fact that this lace is tinted to match her skin, it looks even better. And as you see, you can't even see the lace right here because it's just the color of her, so it looks Awesome. Alright, so she is in there and you see that little bitty piece of lace right there, which is fine because the baby hairs will definitely disguise that. So she is good to go. I hope you all enjoyed this video. In the next couple of pictures, um, as well as showing you the finished results, I want you all to see the products I use because I get a lot of questions on those too. So, um, one of the things that I used in the very beginning was this finishing cream, which is from Razak. They sent me an awesome box of supplies because they saw one of my preferred items to use. This is what I use to tint her lace. That's the thread that I use, and this is the net that I use. So I hope you all enjoy, and I will see you soon in my next video.
More from LaToya






St. Louis, Missouri - Lasts 4–6 months - Takes 4–6 hours - Investment: $3,000 www.TTDoesitall.ai


What are #ktips? Here’s your answer! Schedule at www.TTDoesitall.ai 🩷 #extensions #ktipextensions

4-6 hours install and last 4-6 months #ktipextensions done by the right stylist the right way 💕

Located in St Louis Missouri 💝 Consultations available www.TTDoesitall.ai 💕#ktips #natural

K Tips take 4-6 hours to install and last for 4-6 months with proper care! #ktipextensions