Wig Cap Lace Closure Sew in Method by @TTDoesitall
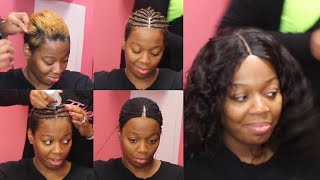
LaToya Kelly demonstrates how to sew a wig cap lace closure onto braided hair. She shows the technique on a client with very short sides and back, explains how to braid with added hair and secure the cap to prevent shifting, and shares tips for a natural-looking finish.
Chapters
Hey everyone, it's your girl TT Does It All, and this video is gonna start out a little funny— or not hilarious funny, but like weird funny— because I didn't know what the heck I was about to do when she took her head wrap off. I was like, um, pause. So This is what her hair looked like when she came, and on the right side is the finished look. So when she came, I just kind of started parting it like, wait, um, you booked for a wig? Wait a minute. So what I think what happened was, if I remember correctly, she booked for a wig, and I was like, well, listen, I can do a sew-in, but you're supposed to bring your hair in advance to make a wig or have a wig that's already made. So if you're coming in with a wig, you should have brought it— or with bundles and a frontal, you needed to— or you needed to bring me the hair in advance. Maybe that was this issue. I think that happened another time. I don't even think that was this time because when that happened, I end up doing a quick weave. I don't remember, but whatever happened, when I saw her hair, I was like, uh, what am I about to do? So then it finally dawned on me that I had done this before, and I had another idea. I did before the video that you see at the bottom of the screen, and I was like, I can do the exact same technique on your hair. And with this technique, I braid it down with the braiding hair in every braid, and I connect it where I can braid. So I braid down as much hair as I can. For the sides and the bottom that are too short, I don't braid it, and then I'll show you what I do with that hair. So in the beginning of the video, I was explaining to her how it would be. So I was letting her know it wouldn't be attached to her head, so it wouldn't be a wig that comes on and off. Because if I didn't attach it to her head somewhere and I sewed it on her head instead of a canvas head, it would constantly shift and shift as I sew, and it just wouldn't stay on her head unless something was holding it in place. So I had to sew it onto her head. And that sound kind of confusing, so let me break it down. I can only sew onto her hair where it was long enough for me to braid. The sides and the bottom of the back of that, it will not be attached to her head, but it will be attached to the wig cap that I'm going to use instead of the traditional net that I use. So I hope that made sense because I was like, wait, I don't— that was kind of weird. That was— yeah, so So again, I have to use braiding hair inside of all of her braids, which I don't usually do. If you all are familiar with all of my videos and my braid pattern videos, I usually only use braiding hair on the anchor braids, which are the outer braids that I stitch a lot onto. So I am just going to finish braiding up, and I'm going to braid it the same way I do a traditional lace closure sew-in. It's just less hair to braid because it's way too short to be gripped right now. And for some reason, I get this all the time where people come with a fresh haircut and be like, uh, can you grip this? And I'll be like, oh, if I wasn't planning this wedding. Oh no, but I wasn't even engaged. Yes, I was. Okay, I was engaged at this time, but listen, maybe that's why. I don't know, but I had to. I was like, girl, just come on, let's just do the hair. Plus, oh, she drives a long way to get her hair done too. So yeah, I couldn't not do her hair. I had to do something. So I am almost done with these braids, and I'm still greasing between her scalp, and I'm still going to use my Wild Grow hair oil between each braid and make sure she's fully protected with the wig net. And I will put the link in the description to the cap that I use because it is a very specific cap. I don't use anything other than that. For this type of method. Even the last one I put, that little video at the bottom of the screen, that's the exact same wig cap. I don't use anything other than that for this type of sewing. All right, so there is her wild growth hair oil, and then after that, I'm going to sew on that cap. So this is a wig cap. This is traditionally used on a canvas head. You put it on a canvas head, you pin it down, and then you sew a wig onto it, whether you want to use a closure, a natural part, leave out, whatever.. It is just a— it's like a, a universal wig cap that you can just make a wig onto it. So I am sewing that on, and, um, I'm sewing it where her braids are, and then I'm going to stitch the flap that's above the ears so that it holds down with the back. And you'll see me do it, and then I'll kind of make the time in real time so that you can see what the side looks like. And oh my God, my dog is in the background making the noise licking and everything. God, as soon as I start recording. So here is where I actually sew those flaps back to the back of it. And remember I said I have to sew it on her hair somewhere so that the cap doesn't constantly shift. And then you could kind of see where I sew that flap to the behind the ear. So she— her cap is not going to move because it's stitched to her braids, and that ensures that nothing's going to slide back as I sew. But I'm going to sew this exactly how I traditionally sew a lace closure sew-in, except I'm using the cap as my anchor braids, which are sewn to her anchor braids. So I hope that makes sense, but it makes it a lot This is also— it makes it a lot, um, more natural for her to be right at her hairline, to not use that hair at the back. And it, it is also the method that I use when I am doing the edges, the clients with very thin edges. If you all seen that video, it's my— one of my most popular, one of my top 5 popular videos.. That is in the description below. But this method is also what I used on her with a net. It's so much easier with the cap. So right now I'm sewing the back of her hairline, which there is— it's— the hair is really short. So right now I'm sewing on the cap and I'm not sewing on any hair, it's just the cap. And the cap will not move and shift because it is already sewn to her head and it's there's nowhere for it to shift because it's sewn down. So I'm gonna speed that up and I'm gonna sew, and then I'm gonna come back when I'm almost done. Go, girl! It's your birthday! Say she done. Hey, hey, okay, no, but what do y'all think about the outcome? How do you— what do y'all think about the method I used? Let me know, because this was very different. Um, honestly, when she came in, she probably didn't know how I was going to do it, and I'm pretty sure she's shocked that I made this work and look like a regular lace closure sew-in that I do every day with no hair on the sides or in the back. So honey, we made this work. Yes, we did. Oh, and I have a video coming up because I found a new mousse, and some of you may have heard of it and some of you may not have, but I will put it up in an up-and-coming video because when I tell y'all this mousse changed my life and I can't find it anywhere but on Amazon now— yes, stay tuned for that, okay? But this is not the mousse I'm talking about, y'all. This is not it. But, um, what do y'all think about the look? What do y'all think about the style? Let me know. Look at her, she cannot stay out of that mirror, honey. She is all the way to her left, to her left, okay, to the left, to the left. She cannot help it. She's like, girl, what are we doing now? But it came out really beautiful, and you can definitely tell in her expression that she really liked it. And I'm just defining her curls, making sure she doesn't have a poofy fro when she leaves up out of here. And then I'll send her on her way. I'm— again, I'm very tedious. The small things matter to me. When my client gets home, I don't want her in the mirror like, oh, well, she didn't fix this piece, or this piece is lifted up like this. Like, I don't like that. So I try to make sure that every little detail is in place so that when she leaves my chair and goes in the car and looks through that rearview mirror, honey, she is flipping that hair. Or she on Snapchat when she get in the car. Something. I just want you to be fresh and dressed to impress and ready and refreshed. I don't know, but drop a comment, let me know if y'all like my flows. Okay, no, let me know if you like this look and drop a thumbs up if you do. And make sure you thumbs up this video and subscribe if you haven't already. I will see y'all in the next video.
More from LaToya






St. Louis, Missouri - Lasts 4–6 months - Takes 4–6 hours - Investment: $3,000 www.TTDoesitall.ai


What are #ktips? Here’s your answer! Schedule at www.TTDoesitall.ai 🩷 #extensions #ktipextensions

4-6 hours install and last 4-6 months #ktipextensions done by the right stylist the right way 💕

Located in St Louis Missouri 💝 Consultations available www.TTDoesitall.ai 💕#ktips #natural

K Tips take 4-6 hours to install and last for 4-6 months with proper care! #ktipextensions