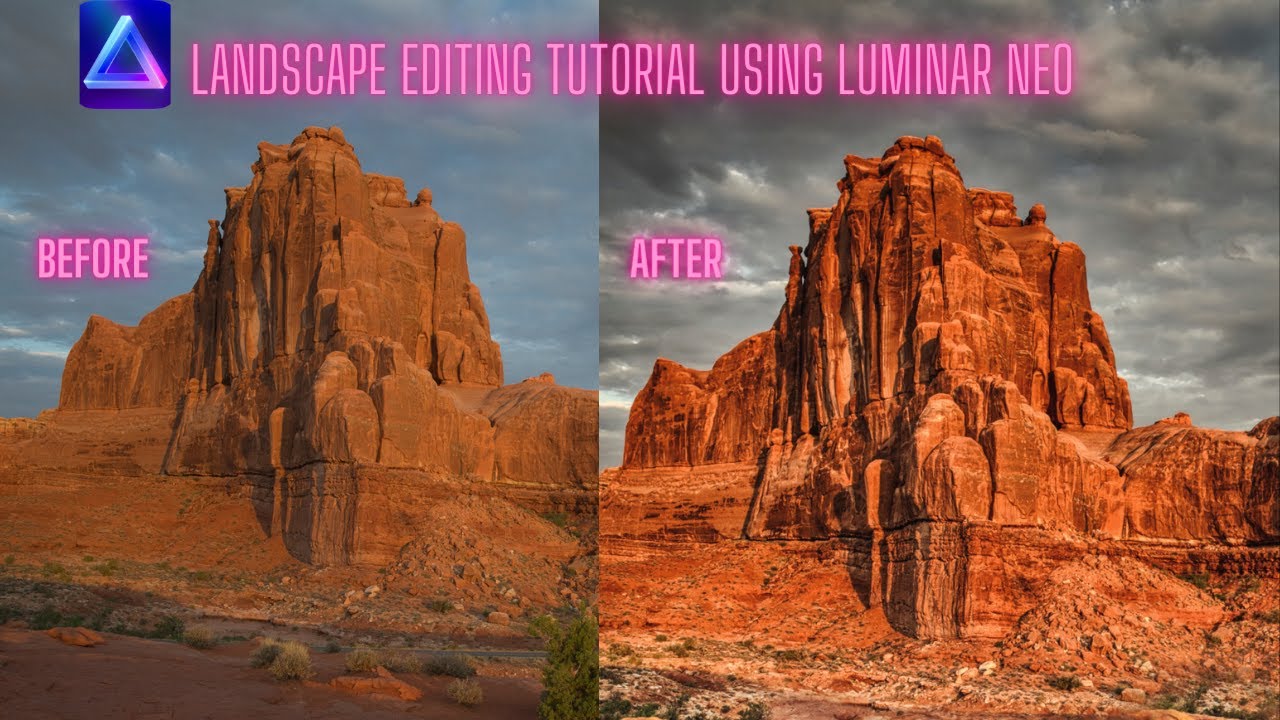
In this tutorial, Angie Birmingham walks viewers through a complete Luminar Neo landscape editing workflow. She begins by importing a RAW file into the HDR Merge module, then moves through the Develop module to balance highlights, shadows, smart contrast, temperature, tint, and saturation. Next, she enhances sky texture, applies global Structure and Dramatic adjustments, and uses the Manhattan Mood preset to brighten shadows. After showcasing the edit, she promotes her affiliate links, discount code, private workshops, mentorships, and branded merchandise. She then demonstrates the Erase and Clone tools to remove dust spots and unwanted road elements, followed by masking the sky for targeted denoising and luminosity correction. Finally, she saves the edited image to her catalog, encourages audience interaction, and invites viewers to like, comment, and request further content.
Chapters
Hello and welcome back to another episode of WTF Stop and Jeff and Angie Photography. Today we are going to do a Luminar Neo edit together. I'm going to show you how simple it is. We can take the image from this raw image and turn it into a very detailed and dramatic landscape. So let's get started and let's, let's do this. All right, so let's jump on into Neo and First thing I did to the image is I took it and I dragged the single image over into HDR Merge, hit the merge button, and give it a few seconds and it will pop out in the HDR Merge file where it puts all the images that you have put into HDR Merge. All right, so let's jump on into the edit and let's work on this together. We got a, we got a long ways to go, but it's going to be fairly quick. I pretty much guarantee it. So first thing you're going to do, you're going to jump into the Develop Module. And the first thing you want to do is, as you call it, control the light so that when you're doing the other modules, it kind of helps control the light as to— I guess controlling the light so that Neo doesn't completely take over, I guess, is the best way to explain it. Okay, so here we go. In Develop Mode, we're gonna take the highlights and I'm just gonna bump those down to -45 maybe. And then I'm gonna take my shadows and I'm gonna open them up somewhere around there. Cool. And let's see. I'm gonna go ahead and do some smart contrast too. Uh, maybe I'll go negative, take it down a notch. There we go. All right, and then from there, uh, we're not going to do anything in the black and whites, but you can if you hit your J key on your keyboard. It actually will bring up your highlights, which will be in red. Let's see if I can get the highlights. There we go. Some of the reds are coming out there on the screen there now. But I like to back them off so that they pretty much disappear or very little in the image. And then the shadows, a little bit of black is good because you get good contrast with that. I could probably bump that shadow up just a smidgen more. There we go. I won't do anything in the black and whites just yet just because I don't think I'm going to need it on this image. Alright, so now let's jump on down to— on this image I'm going to skip color here because we're going to do something a little bit later in one of the other modulars for color. Actually, I take that back. We are going to take the temperature down a little bit, maybe somewhere in there. And then the tint, we're going to do a little bit on the tint as well. I know it's looking a little bit oversaturated. But I'm gonna take some of the saturation out. And you'll see later where the saturation is really gonna come out because we're gonna do another module and you're, you're gonna be blown away. So there we go, something about like that. There we go. So I am gonna do something in the color module. Okay, now let's move on over to— we'll close out of the Develop and we will move on down to Enhance. And I think I'm just going to enhance the sky just a little bit, get some of that texture in those clouds to kind of pop. There we go. And let's see what accent does. Accent. I mean, you can really just move the sliders around when you're doing an edit and just kind of go down to where, where you like it at. I don't want any accent in this particular image. The sky enhancer, I mean, you can really, really dial that up if you wanted to. But I like to stay a little modest on it. All right, we're done in that little modular right there. Now we're going to move down to Structure. This one is one of my favorite. Um, I'm gonna probably do a global on this, which means the whole image, because I really want the rocks to come out. And the sky. Probably somewhere right in there. And then the boost kind of gives it a little boost on all the little fine little details. There we go. So, and this right here, we're going to jump down to dramatic. Dramatic. And we are going to bring that dramatic up just a smidgen, maybe a little more than a smidgen, somewhere right in, I don't know, somewhere right in there maybe. And then the local contrast, I'm gonna bump that up down. Maybe somewhere in there. There we go. That looks pretty good. Now we're going to jump into mood. And mood, I'm going to choose— oops, sorry about that. I'm going to choose The mood called Manhattan. So I think I like that. That's before and that's after. Just kind of brightens up the shadows. So, and then Let's just take a look and see how the image looks so far. We got before and after. I'm liking it. So on these videos, my goal is to get to where I can do some of these live, but I've got to figure out how to use the app and the little Stream Deck to get it to where I don't have to go back in and do any edits. So be patient with me, and you can always go into the comments below and post your questions, and I can address them. If it's easy enough, I'll address it right there in the, in the comments, and if not, I will create a video. So let's just go ahead and take a quick break. I want to show you my website. I have an affiliate page, and on the affiliate page I got B&H, a link there to the Insider's Best Deals. Click that and you'll get the best deals going on at B&H at the current time. And then I also have links with Promedia Gear, F-Stop, and Topaz Lab. And then Luminar Neo, if you click my link here and use code AB15, you'll get 15% off site-wide. So whatever you decide to purchase at Luminar Neo, you'll get a 15% discount. And I also offer private workshops. We can go out and do some beach landscape We can do birds. That's pretty much all I have to offer down here is beach and birds. Every now and then we might get a deer or a coyote out on the beach, but it's mostly birds. But I have workshops. Just go to the website and send me an email, and I'll be more than happy to give you a price. And it's the same price whether it's 1 person or 3 people. So go on over to the website and sign up for your workshop. Or if you're not in the area and you want to do a monthly mentorship, I offer that as well. The mentorship includes 1 hour of one-on-one time, um, and if you are in the Corpus area, we can do it in person. And if you're not in the Corpus area, we can do it via Zoom. During that 1 hour, we can talk about images, image reviews, discuss your cameras, your settings, your lenses. We could work on editing. You can pick whatever you want. It's your hour to discuss whatever photography you want to talk about. And with that also comes email support throughout the month. So head on over and check it out. Check it out. One last thing I want to show you where you can get your cool WTF Stop gear. You can get hats, t-shirts. I got all kinds of different designs. My favorite one is the one that has— it doesn't show the back anymore. Well, anyways, it's the one that has keep calm and carry a Sony. All right, so back to our Luminar. All right, so I saved the last for least, or least for last, or whatever. Anyhow, um, We're going to go over to Erase and we are going to remove dust spots because I know there is a couple on the image. Okay, that's done. Now I'm going to go up here and I'm going to crop my image. How I want this to look so I'm not having to clone or erase too much of that road because I really want to get rid of that road. So probably something like that right there. There we go. Make sure it's straight. All right, that's how I want to have it cropped, just like that. All right, so now we're going to work on getting rid of this little bit of road that's left here. So we're going to go down to Clone. I need to move this up. There we go. Where is my Clone? Clone tool. Oh, I put it up here in my favorites. Oh yeah, if you want to put something in favorites, you just put your cursor over it, right-click on it, and add to favorites, and then it will be up top here so you have easy access to it. Okay, so here to clone, you just go in and you select where you want to clone from. So I'm going to select that area. I'm going to reduce the size of my brush, probably reduce the strength a little bit. Whoops. And I'm just going to start right here and I'm just going to work my way down. Work my way right on down the road to this little tree. And then I'm going to hit— I'll click Clone again, and then when I open it up again, I can start all over and work on another clone. So I'm going to choose— I'm going to choose this area right here, reduce the size again, and then I'm just going to work my way right on down the road again. And I probably should re-choose a new location just so that I don't get any weird stuff going on. So I think I'm going to choose this area right— maybe right here. And then I'm gonna work my way right on down the road again till we get over here to this tree and take a look at it. Looks pretty good. Um, I don't like that line right there, so I'm gonna go back into Clone. And I'm going to grab me another section, probably right here. I'm going to reduce the size, and I think I'll just kind of paint that right on along there. Yeah. Something like that. Get rid of that line. All right, so now we're gonna try out the Erase tool and see if it will just Erase those little sections of trees. Nope. How about just erase the whole tree? Try that. Oh yeah, there we go. That worked. Sometimes it does and sometimes it doesn't. All right, so now we've got to go and do one more thing. We got to do some denoise. Denoise. I'm going to mask the sky because that's really the only thing that I need to denoise, because when it turned it from the HDR, it created a bunch of noise in the sky. So I'm just going to draw right on along the mountains here, the sky. I usually like to just color it all in and then come back with the eraser, reduce the size and just kind of cut in along my edges. I find it easier to do that than it is to worry about trying to get all the little crevices just perfect. For this particular tool, close is typically close enough. There we go. Alright, so now we go over to adjustment and go ahead and hit the luminosity, and that should take care of it. Zoom in. Before, after. Oh, here we go, sorry. Before, after. And after. So yeah, that worked pretty good. Let's do a little color, see if that works. Maybe a little more luminosity. Yeah, that looks pretty good. All right, so back to the catalog. We'll take this image and put it down into my original folder now that we're done with it. It doesn't need to be an HDR merge anymore. And there we go, there is the image. That we worked on together. All right, what do you think? All right, well, if you like this video, be sure to hit like and comment below, ask your questions, and I will definitely answer them. And if it's more than just a quick answer, I will do a video on it. I hope you liked the Luminar video. There's more to come if you guys want 'em. Thanks for watching.