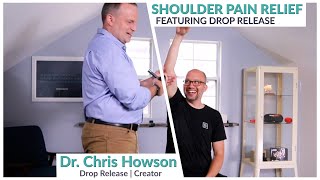
A recorded YouTube demo (hosted by Jeff Langmaid with Dr. Chris) showing how to use a Drop Release T-bar soft-tissue tool to improve shoulder range of motion. The video describes the tool, demonstrates a protocol—find the restricted joint, bring it to end-range without compensatory motion, engage the limiting tissue, and apply a rapid ‘drop’ to elicit tissue release—and reports immediate gains in ROM. Practical workflow advice includes pre/post testing to guide repeats, typically clearing the adjusting point first then addressing soft tissue, and following with exercises to retrain control of the newly accessed range.
Questions this video answers
About 20 degrees in a very short amount of time (as stated by the practitioner).
After clearing/performing the adjustment at the target joint (then address soft tissue), unless the joint is too tight to access, in which case soft tissue may be addressed first.
Chapters
Hey, what's up, everybody? I am here with Dr. Chris. We are talking about drop release. If you have not seen or heard of this, you're gonna want to check out this demo for sure. What we are going to break down is how you can utilize this in your practice. We're gonna do a live demo. As I said, if you have ever seen anybody in your practice or yourself that has chronically tight or short muscles, this is an instrument you're going to want to take a look at. He's gonna go through a protocol with me live and hopefully give you some insight into what it is, what it does, and how it can make a big addition into your practice. So with that, I'll let you take it away.
All right, thanks, Jeff. So basically what we have here, kind of menacing looking object, but what it is is it's basically a T bar soft tissue tool with a drop piece built into it like we're accustomed to using in a table. So what I'm going to do with Jeff here is prior to starting this, we took a little look at how his joints move and he's got a little bit of a hyperkyphosis going here. So it's going to play into this a little bit. But if we bring him into shoulder flexion, if I don't allow his thoracic spine to extend or allow his scapula to move, this is as far as he's going. Want to swing that way. Show the lovely people. All right, so this is what we got right now. Go ahead and spin on around here again. So what I'm going to look for here now, it's protocol wise. Basically what we're going to do is we're going to find the joint that we are addressing, find the joint that is restricted in movement in some way, and we're going to take that joint to its limit at the moment without allowing compensatory movement. So let's have you hold that up right there. I'll actually, a lot of times will really use my head. Very professional. So I'm going to get in here, I'm going to palpate and find, okay, what is limiting his movement here. We got some tight lats, limiting movement. We got subscapularis that does the same thing. Of course, everybody's favorite muscle, the pectoralis minor. We can get up underneath it and get a hold of that guy. He's got the nervous smile on him. So we'll bring this up here. So I'm going to put him at end range. We're Going to find the most limiting tissue, the one that's sticking up at you the most. And we're going to bring that up there. You can actually have the patient actively do this motion. So you want to hold that up. I'm going to engage that tissue with the end of the tool here. I want to add a little extra stretch to it by pressing it in. And then when I overcome the mechanism, does that fast drop, just like the table, which imparts a fast stretch to the tissue. And that's just one, one drop there. You can already see we're definitely increasing. So now the area I was working has released. But if we get down here into a little bit different division, that, that's pretty tight as well. So let's say you hold that up again and when you have the patient hold it up, you get the benefit of the reciprocal inhibition relationship also. So you get some of that can be helpful. Bend here, hand behind your head. So now I'm going to get it more into the pec minor. So I'm going to get up underneath here. And the nice thing about it, I can get around the corner with this, so to speak, around the corner of the pack. I'm going to get a little more tension. This is a variable tension tool, just like your drop piece.
More tension, a little more tension.
All those comments you made. So we're going to get up underneath here. I'm going to catch that pec miner. I'm going to bring it up and drop and there. That is pretty lovely, I'd say. All right. So without allowing thoracic extension, we're still. That's actually really pretty good. Yeah. Let's. Let's take you into external rotational times. That subscap, you're hoping to escape the subscap. So there's a little bite to this. But think about your pin and stretch techniques. That's minutes worth of.
And then when you, how do you know when you, if you need to hit it again, drop again or whether you're done? It's pre and post test. You're getting end range feel and range of motion.
And this is where the, you know, the kinesthetic sense, your motor skill as a practitioner of manual techniques comes in. You, you can, you can tell if you're at capsular feel, capsular end feel, or if you're in tight tissues, that kind of thing. So if I bring you up here. Yeah, see we're still. Something still feels a little bit funky over here, like this way. And that just might be short your shoulder morphology actually I will not change your shoulders morphology with this too. There. It's a little bit major I think.
Actually.
There spin sideways again and let's get you. Yep. Sitting up like you are. Let's go. Hand up of a bunch the head again. And so here we were about here, right?
Yeah.
So we probably added. I say close to probably 20 degrees in a matter of very short amount of time. Now you also. Oh, this I just got to take my hands off. Otherwise I. There. There we go.
So do you recommend this if somebody's doing active care in their practice, do you recommend this pre exercises, for lack of a better way to say it, post exercise, where in the workflow or pre adjustment?
Post adjustment. I typically will. Depends on where I'm working. If I'm working on a shoulder, I'll usually clear the thoracic spine first and the neck. Because the longer I practice, the more convinced I am that if we don't clear shoulders and hips, the spinal areas around them are just gonna get out of place again. Get dysfunctional again, for lack of a better term. So like here I make sure both sides are moving. Okay. Because you know, the lats are such a big player with the thoracolumbar fascia and they can affect everything all the way down there. But typically, to get back to your actual question, I would clear the adjusting point portion first and then I'll. Unless the joint is so tight that I can't get to and feel where I need to be. So I typically clear the adjusting. Then I'll go in and clear the, the soft tissue. And if you're. That it's at that point where you've brought in this new normal or this new end range of motion. That is what we want to work exercise wise. Okay. Because you have. You end up with the whole issue of cortical mapping that plays in. Right. So if you've not been in that, if not accessed that range of motion for however many months, years, whatever, you're not going to have real fine control over it because you're not going to have it very well understood proprioceptively. So we need to train that before you, you decide to go do about 100k skipping, pull ups in a row because you're gonna hurt yourself.
Yeah.
Right. So there's, there's that rehab aspect.
Gotcha. And then do you work typically top down, shoulders before hips, hips before shoulders or that doesn't.
That's kind of driven by patient complaint.
Okay.
So yeah. Or. And you know. Well, we had our pick with you. Right. As a Runner we could have done. Your hips are pretty tight. If you're depends. It's all patient driven, right. Like everything else should be. And it's just overhead. Athletes, people who work at desks, everybody's internally rotated. That's what we're doing. We're helping them unlock that, unload that. So yeah, I love it.
So if you, if you haven't checked out drop release, I'm going to drop a link down below and you can head on over, check out the instruments, see what it's all about. I know Chris is also producing a lot more educational videos that kind of show you the ins and outs of how to utilize it. What protocols can you utilize to get better results with your patients? Ultimately, I think of it as something that doesn't replace. It adds to the care, it enables you to do exercise and active care at a higher level. Because people are accessing that range of motion, they're not going to get otherwise. And certainly from an extremity standpoint, I'd always recommend if you're working spine, look at those the next joint over and see what's going on and who doesn't have athletes or non athletes for that matter who are spending too long at the computer, who have poor hunched over posture and, and all of that fun stuff that is not ideal and drives them to call your practice. This is a fantastic tool to utilize. Get in there on the muscles, get in there on the joints outside of the spine, make sure they're moving and get better benefit with everything you are doing in your practice. So if you haven't checked this out again, I'll drop that link down below and you'll be hearing more from Chris and I soon. So have a great night.
Bye bye.
Hey, what's going on? If you loved that video, be sure to subscribe to this channel. The evidence based chiropractor puts out videos all, all the time at the intersection of marketing and research, showing you how to grow your practice while also growing your knowledge base. So if you liked it, be sure to comment down below or hit subscribe and I'll see you in the next video.